Event Evacuation Plan: 7 Steps for Staff Teams
October 8, 2026

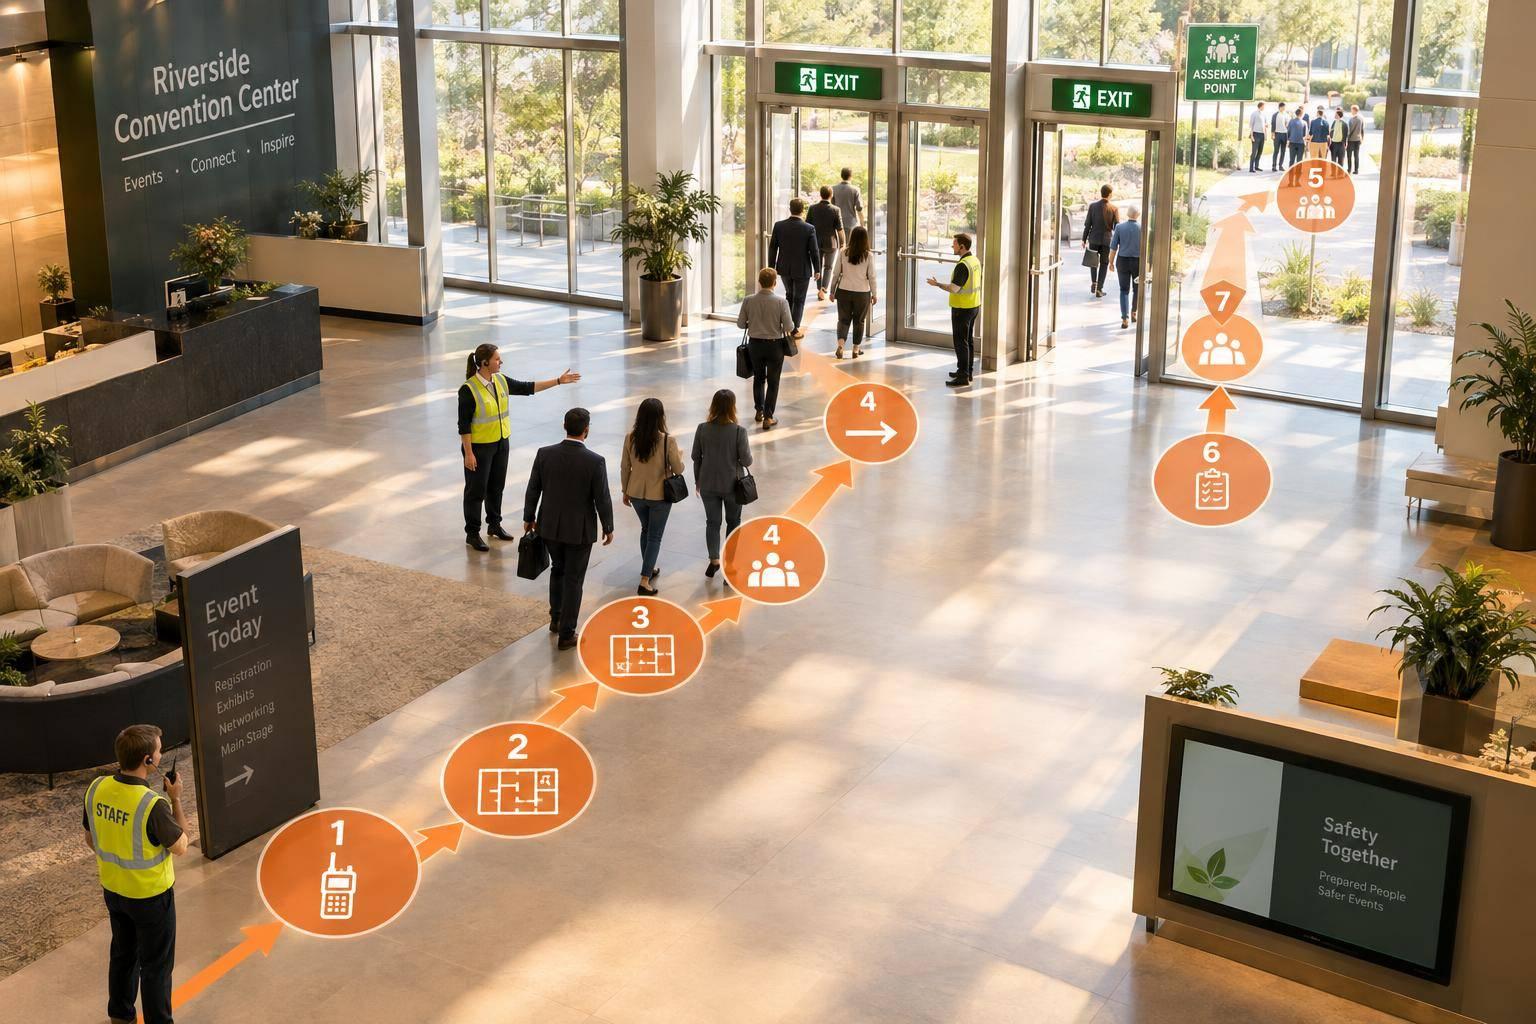
I start every event evacuation plan with three questions: Who’s in charge, where do people go, and how will we account for them? Before doors open, confirm the answers with venue management and brief every staff and vendor team.
Here’s the seven-step checklist I use:
My rule: <u>Never delay evacuation for approval or belongings.</u> Follow alarms, the venue’s approved procedures, and emergency officials’ instructions. Keep maps and rosters available offline - software supports preparation; it does not replace emergency directions. While scheduling software benefits include better communication and organization, physical plans remain the priority during active evacuations.
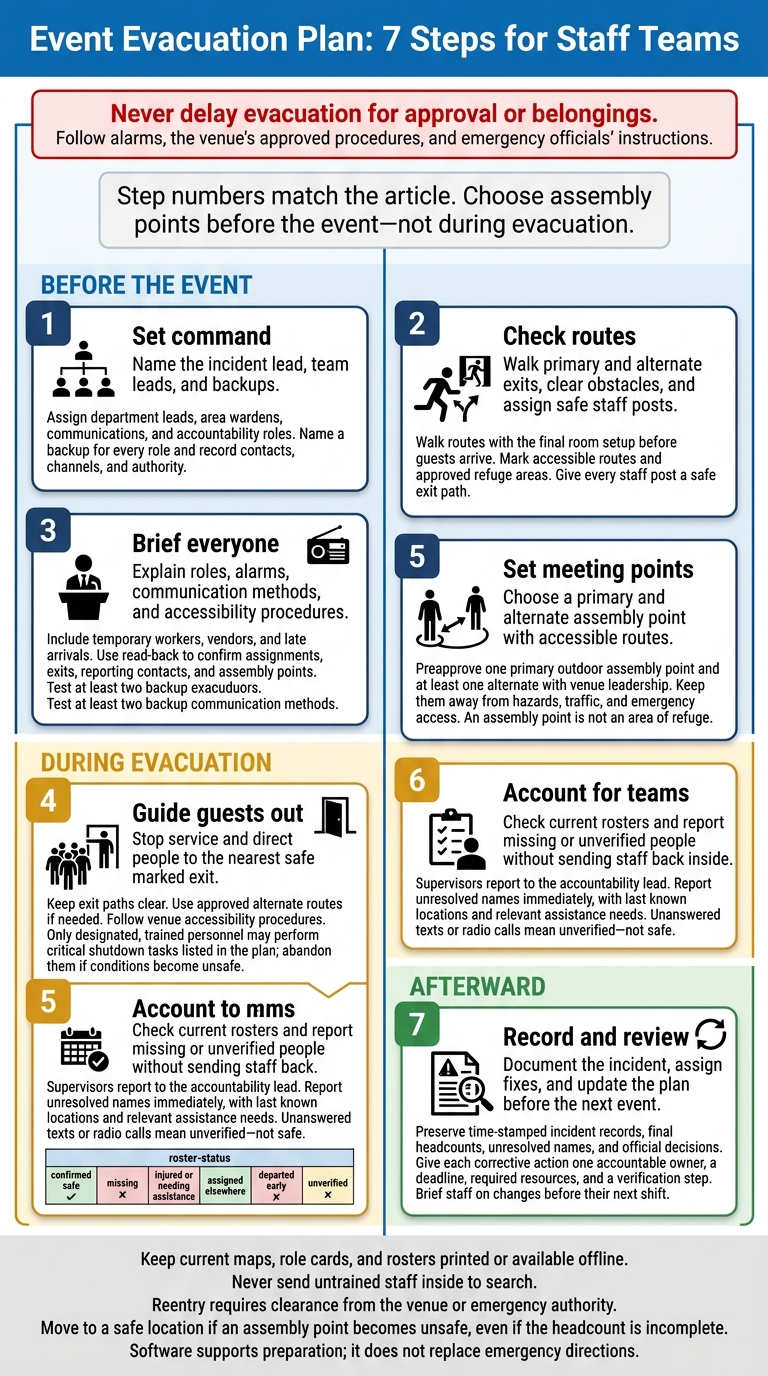
Event Evacuation Plan: 7 Steps for Staff Teams
Before guests arrive, turn the venue’s emergency plan into a clear chain of command.
Name one incident lead and a trained backup. Give both authority to order an evacuation, direct shutdowns, and coordinate with venue management under the venue’s approved emergency procedures. Record their names, job titles, companies, direct phone numbers or radio channels, and who takes over if neither is available. Staff should follow emergency responders’ instructions and the designated incident lead’s direction.
Assign department leads for catering, bar, production, security, and vendor teams. Area wardens guide people toward exits and report which zones are cleared or inaccessible. A communications lead sends approved instructions and calls 911 when required. An accountability lead collects headcounts and reports missing staff or vendors, including their last known locations. Name a backup for every role.
Put all assignments for catering teams, staffing crews, and vendors on one command sheet. Include each person’s department or zone, contact details, channel, authority, and backup. Department leads relay only the incident lead’s instructions. Before guests arrive, run a brief role check: confirm who orders an evacuation, who takes over, who contacts responders, and who receives headcounts.
Immediate danger overrides the approval chain. Staff must leave when an evacuation alarm sounds, an authorized evacuation order is given, or immediate danger requires it. They must not wait for a supervisor or retrieve belongings. Staff without assigned emergency duties must not investigate hazards or re-enter the area. They should report what they know from a safe location.
Only designated, trained personnel may briefly stay behind for critical shutdown tasks listed in the plan. Specify each task, the authorized person, the time limit, protective measures, the exit route, and conditions that require abandoning the task - including worsening hazards. A shutdown assignment is not permission to save equipment. Leave as soon as the task ends or the exit route becomes unsafe.
Next, map each team’s exits and staff posts.
Use the chain of command from Step 1 to assign each route and staff post. Walk every route with the final room setup in place, before guests arrive. Trace paths from guest areas, kitchens, restrooms, storage rooms, loading areas, and vendor workspaces to a safe outdoor location. Mark primary and alternate routes, exit doors, stairs, exit discharge points, and assembly points. OSHA guidance calls for at least two exit routes, separated as far apart as practical so one hazard is less likely to block both.
Check that exit signs are visible, lights work, doors open correctly, and paths can handle the expected crowd. Watch for bottlenecks at buffet lines, registration tables, corridor turns, and exterior gates. Clear carts, cases, décor, and other obstructions. Outside, check for parked vehicles, deliveries, and snow. Recheck routes after load-in, room resets, or weather changes, and confirm any unresolved problems with venue management before opening.
Mark accessible doors, ramps, areas of refuge, and only those elevators the venue has approved for emergency use. Add alarm pull stations, fire extinguishers, first-aid kits, and spill kits to the floor map.
Next, station trained staff at decision points where guests may need direction: ballroom exits, corridor intersections, stair entrances, accessible ramps, and kitchen or loading-area transitions. Keep posts out of traffic and give every staffer an exit path. No assignment should require staff to enter unsafe spaces. Staff should direct guests to the nearest safe marked exit, report blocked routes, and leave if conditions become unsafe.
Share the clearly labeled map when onboarding new event staff, catering crews, vendors, and temporary workers before the event. Post printed copies at staff check-in, kitchens, and vendor work areas. Provide accessible or translated instructions where needed. Each post’s route card should list its location, nearest safe marked exit, alternate route, assembly point, and communication method.
State the rule clearly: use the nearest safe marked exit and leave coats, bags, and equipment behind. Use this map to guide guest movement in the next step.
Brief everyone before setup or service begins, including temporary workers, vendors, contractors, and crew leads. Explain the alarm signal, assigned posts, reporting method, exit routes, assembly point, accessibility procedures, and headcount expectations. Cover hazards specific to the event, such as cooking equipment, temporary power, and severe weather. Repeat the briefing for late arrivals and whenever assignments, the venue layout, or the emergency plan changes.
Establish effective communication with event staff to make clear who speaks first and who passes along updates. Assign who orders evacuation, calls 911 or venue security, contacts venue management and emergency responders, and reports headcounts. Staff must report from outside the hazard area and provide the venue’s full address, room or floor, hazard type, and callback number.
Train staff to help guests with accessibility needs without lifting or carrying them. Set up and test at least two backup communication methods in case radios or phones fail. Options include the venue PA and in-person check-ins at supervisor posts.
If someone is missing, give the evacuation lead their name, last known location, and assistance needs. Do not delay evacuation or re-enter the area.
Give each worker a role card showing their zone or post, supervisor and backup, communication channel, accessibility duties, and reporting responsibilities. Use read-back to check understanding: ask workers to state their assignment, reporting contact, exit, and assembly point. Record who attended the briefing and answer any remaining questions before work starts.
If the event team uses Quickstaff, share the current plan, role cards, and reminders there. Keep printed or downloaded instructions up to date, and check that every worker has the current version. Software helps teams coordinate; it does not replace emergency alarms, 911, or official directions.
Once staff have been briefed, guide guests to the nearest safe exits.
Once staff are in position, move immediately from briefing to guiding guests out. Pause all service. Only designated workers should complete required shutdowns. Give calm, specific directions and use visible hand gestures to guide guests to the nearest safe, marked exit - not necessarily the entrance they used. Keep messages consistent with the venue’s approved emergency communication plan.
Keep the full exit path clear, including the space outside the doors. Move carts, hot boxes, dish racks, and other service equipment out of guest routes. Keep staff out of doorways, and don’t direct people against crowd flow. Separate guest movement from back-of-house traffic, and leave access open for emergency responders.
If smoke, damage, or crowd pressure makes a route unsafe, direct guests to the approved alternate route. Report the exact location and condition through the assigned communication channel. Don’t move equipment through the crowd, enter restricted areas without permission, or attempt firefighting or rescue beyond your training and assigned duties.
Follow the venue’s assistance procedures for children, older adults, and people with disabilities. Ask what help they need. Use assigned assistants and approved accessible routes or refuge areas. Report anyone waiting for help and give their exact location. Use elevators only if the approved plan and emergency officials authorize them.
Guide guests beyond the exit doors, away from fire lanes and emergency access roads, and toward the assembly point. From outside the exit area, discourage anyone from returning for belongings or equipment. Never lock or block an exit, or physically confront someone trying to return. Reentry requires clearance from the venue or emergency authority - not a staff member’s judgment.
After guests leave the building, direct them to a preapproved assembly point so teams can account for everyone. Work with venue leadership to approve one primary outdoor assembly point and at least one alternate. Both must have enough room for staff, vendors, and guests, away from smoke, falling debris, moving traffic, fire lanes, and emergency operations. OSHA recommends avoiding busy streets and choosing an upwind location. These points serve as the handoff locations for headcounts and recovery.
Walk each route before event day. Check for stable surfaces, lighting, curb cuts, and unlocked gates. Avoid lawns or parking areas where loose ground, parked vehicles, or narrow passages block mobility aids. An outdoor assembly point is not an area of refuge, where someone may wait for assistance under the venue’s approved plan.
Add both assembly points to the event map, with labels for accessible routes, landmarks, and zones. Share the map with staff and vendor instructions. Include a clear landmark or address, who can activate the alternate location, and how the change will be announced. Where space allows, give staff, vendors, and guests separate labeled zones, each with a lead. These labels help group leads report headcounts quickly in Step 6.
Check whether each location can still be used during extreme temperatures, storms, smoke, poor air quality, or flooding. Mark approved severe-weather shelter areas and share them in advance. List supplies for extended waits, including water, blankets, rain protection, and lighting.
If either assembly point becomes unsafe, follow directions from the incident commander, venue leadership, or public-safety officials. Move people even if the headcount is incomplete. The plan must name who coordinates relocation and explain how group leads will receive the new destination, including an off-site location if the incident expands.
At the assembly point, each supervisor should compare the current assignment roster with the people present. Mark each person as confirmed safe, missing, injured or needing assistance, assigned elsewhere, departed early, or unverified. OSHA requires emergency action plans to include procedures for accounting for employees after evacuation.
Confirm the safety of anyone posted elsewhere through direct contact or their on-site supervisor. Record their location, who confirmed their safety, and when. Unanswered texts or radio calls mean unverified - not safe. Report unresolved names immediately rather than waiting to reconcile the entire roster.
Send each team’s totals and unresolved names to the accountability lead, who reports to the venue’s incident commander or official in charge. For each missing person, provide their full name, employer, role, last known location, last contact time, and any relevant hazards or medical concerns. Never send untrained staff inside to search. Emergency officials control search and re-entry decisions. Carry the final roster and unresolved names into Step 7 for incident documentation and follow-up.
If your team uses Quickstaff, start with the event record. Update it to reflect actual arrivals, substitutions, vendor arrivals, reassignments, and early departures. Bring a printed or offline copy with staff and vendor contact details so headcounts can continue without connectivity. Keep a printed copy available in case batteries fail.
Label the roster with the event date, venue, assembly point, and supervisor. Include columns for each person’s status, location, verification time, and verifier. Follow the venue’s accountability procedure, and check again as people arrive or reports change. Save the final roster for Step 7, where it will support incident documentation and follow-up task assignments.
Once emergency officials permit documentation, the incident lead or designated safety coordinator should use the final roster from Step 6 to create a time-stamped incident record. Record the event, venue, date, trigger, authorization, warning method, notifications, routes used, and assembly points. Include the final verified headcounts and unresolved names from Step 6, plus injuries, responder contacts, blocked exits, communication failures, damage, loss, and service interruptions.
Complete all required venue, employer, insurer, and regulatory forms by their deadlines. Attach approved messages, official instructions, and photos only when permitted. Separate facts from observations. Leave out blame and unnecessary medical details. Use the record to complete the forms and guide the corrective-action review below.
Keep a decision log showing who approved resumption, relocation, or cancellation, when they approved it, and what information they used. Do not restart service or retrieve equipment before official clearance. Use this log during the debrief and when revising the plan.
Debrief while details are still clear:
Update the plan using the incident record, decision log, and debrief findings. Revise exit maps, role cards, contact lists, and communication steps after any evacuation, drill, near miss, or plan change. Brief affected workers before their next shift, confirm their understanding at check-in, and rehearse changed procedures when needed. OSHA requires emergency action plans to be reviewed when employee responsibilities or the plan changes.
Review the full evacuation plan with venue leadership before event day. Confirm that command, routes, staff posts, communication, assembly points, rosters, and incident review are complete. Get the venue lead’s approval, then distribute the plan to supervisors before doors open.
Complete one final walk-through and roster check. Walk every route, clear blocked exits, remove obstacles, and verify that every occupied area has a staff post. Check the roster each supervisor will carry.
Use Quickstaff to confirm scheduled workers, share assignments, and send reminders. Export or print the roster so you can account for workers without a live connection or device. Quickstaff supports preparation - not emergency response. Always put alarms, venue procedures, and official instructions first.
Run evacuation and escalation drills every quarter, adjusting the schedule to fit your organization’s workflow. Always announce drill dates in advance. Reinforce evacuation routes, assembly points, and chain-of-command procedures through role-playing, crisis simulations, and short pre-shift reminders during day-to-day work.
Quickstaff helps staff prepare by centralizing event management and providing clear, easy-to-access information about their safety responsibilities before each shift.
Without a guest list, plan floor coverage and assign clear staff roles. Train floor staff to direct guests to designated assembly points and sweep their assigned zones - including restricted areas - to make sure no one is left behind.
Quickstaff keeps event communication and role assignments in one place. Staff know their posts and duties before the event, which helps reduce confusion during an emergency.
Shelter in place when staying inside is safer than evacuating, such as during severe weather or certain security threats. The Incident Commander issues shelter-in-place orders in coordination with authorities such as the fire department, police, or EMS.
Always follow your Incident Commander’s or site lead’s specific instructions on whether to evacuate or shelter in place.