Crowd Safety Training: Evacuation Plan Checklist
September 18, 2026

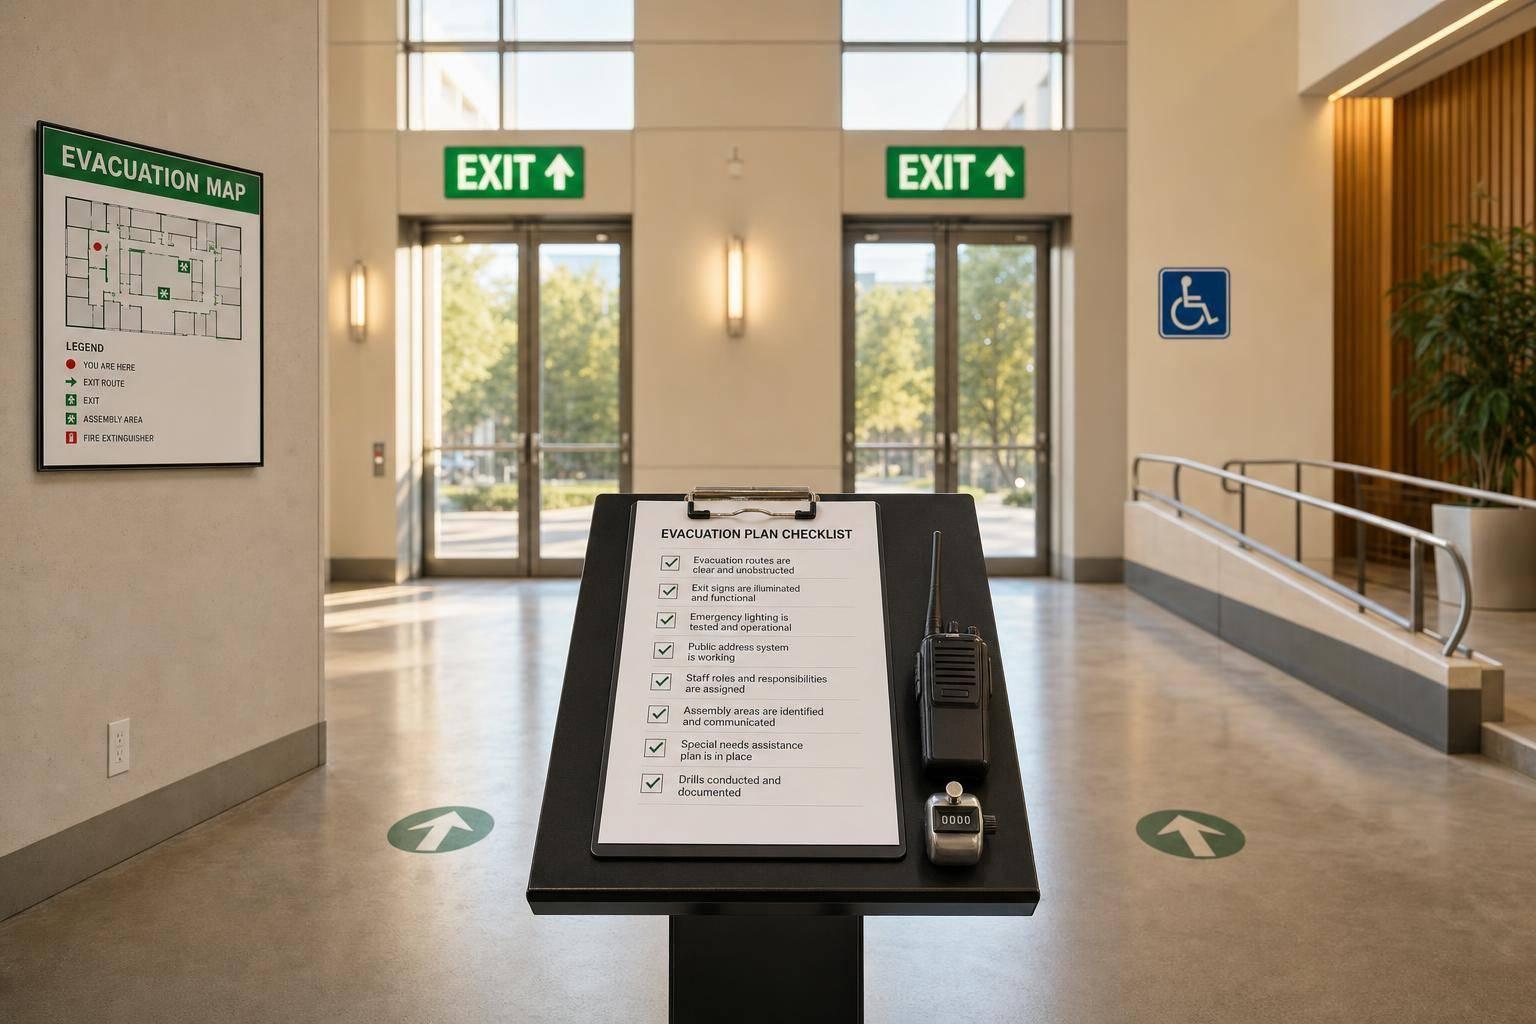
A short pre-event review can stop basic mistakes from turning into a bad evacuation. I’d use this checklist to confirm seven things before doors open: exits, signs, staff posts, accessible routes, hazard triggers, medical setup, and headcount control.
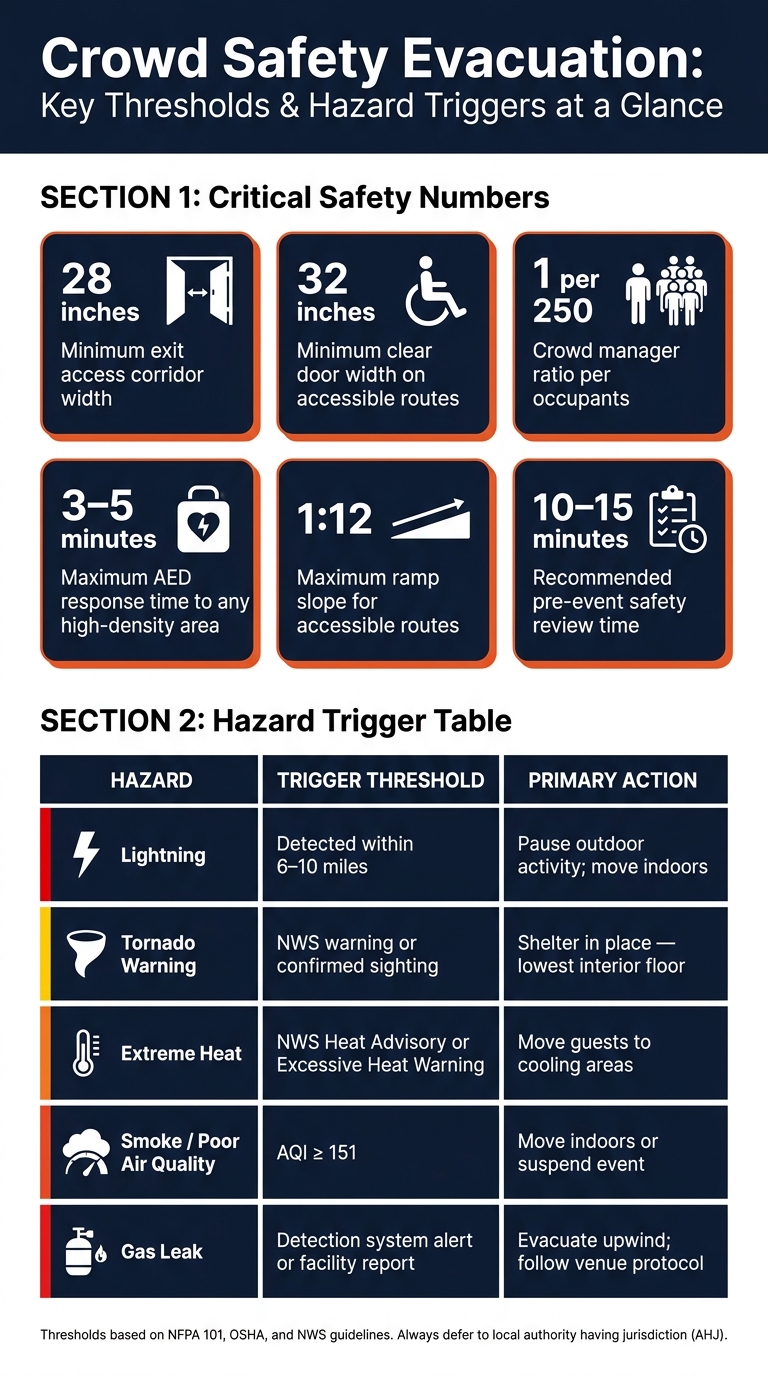
Here’s the core idea in plain terms: if any item gets a “no,” I’d fix it before guests arrive. The article also points to clear numbers staff can check on the spot, like 28-inch minimum exit access width, 32-inch clear door width on accessible routes, one crowd manager per 250 occupants, and a common lightning pause range of 6 to 10 miles with a 30-minute wait after the last strike.
If I had to sum it up fast, I’d check:
What I like about this piece is its focus: it doesn’t replace the venue’s main emergency plan or fire code. Instead, it checks whether the plan for Friday, September 18, 2026, works for this event, this crowd size, and this staff lineup.
Before you get into the main checklist, make sure today's setup still matches the plan and that staff know exactly where to find it. Keep one main copy and one backup copy in places people can get to fast, like a shared folder and a printed binder at the command post or staff check-in desk. Start with the written plan and the incident triggers.
Review the written evacuation plan and check the date, version number, and approval signature. If the layout changed, update the plan before doors open. Match the plan to today's floor plan.
Spell out the trigger and response for fire, severe weather, and security incidents, and name who can call each one. Use the person's name, not just the role title. Per NFPA 101 requirements, emergency action plans for assembly occupancies must cover procedures for each emergency type and designated staff roles.
Give each supervisor a one-page summary or pocket card with the top triggers, the response for each, and the name of the incident commander. Then use that sheet during the pre-event huddle to check that staff know the plan.
Once those triggers are clear, the next step is simple: make sure staff know how updates will reach them.
Set the main alert method and test it before attendees arrive. This could be two-way radios on an assigned channel, PA announcements, a group text, or a supervisor call tree. Don't just assume it works. Run a live test in the venue with normal background noise, and make sure announcements are clear and audible across all event areas, including restrooms and back-of-house spaces.
Write down a backup for each main channel. If the PA goes down, staff switch to radios. If radio coverage drops, supervisors move to direct contact at pre-assigned positions. Brief staff on these fallback steps ahead of time so no one is making it up on the spot during an incident.
Use standard emergency phrases and review them with staff before doors open. With alerts in place, move on to exits, signage, and staff placement.
Once your communication plan is set, walk the building like a guest and like a staff member. Follow every path someone might use during an evacuation. This part is about the physical setup: exits, signs, lighting, and where people need to stand.
Every event area - including front-of-house spaces, kitchens, service corridors, loading docks, and staff-only zones - needs two exits: a primary exit and a secondary exit. They should be spaced as far apart as practical. If one route is blocked by smoke, a crowd surge, or equipment, the backup route has to work in practice, not just on paper.
For each exit, record its exact name, such as Main Ballroom North Door, plus its location tied to a fixed landmark, such as left of stage near the sound booth. Also note whether the door is alarmed, needs panic hardware, or must remain unlocked during occupancy under local fire code.
OSHA requires exit access to be at least 28 inches wide, with a ceiling height of at least 7 ft 6 in. Before doors open, walk each route and clear anything that cuts into that path - catering racks, trash bins, décor, or stray furniture. A hallway can look fine at first glance, then turn into a choke point the minute people start moving.
Every exit - other than an obvious main exterior door - must have an illuminated EXIT sign that people can see from any direction of approach. If the route to that exit is not obvious, post directional arrows or TO EXIT signs along the way. And if a door could be mistaken for an exit but is not one, mark it NO EXIT.
Check visibility under actual event lighting, not just full house lights. Dim rooms, stage washes, or haze can make overhead signs hard to spot. In those cases, add low-level or directional signs so people can still follow the route.
It also helps to compare the posted evacuation maps with today’s floor plan. If a stage, bar setup, or vendor booth changes a route, fix the map or add temporary directional signs before attendees arrive.
Signs help, but people move better when staff are in the right places. Put crowd managers, ushers, and security at set posts using budget-friendly staff scheduling tools: main entrances, stairwells, corridor intersections, and each designated exit. For every post, record the staff member’s name, exact location - such as bottom of east stairwell - and their job. That job might be opening doors, slowing movement to prevent crushing, rerouting guests from a blocked path, or checking restrooms and side rooms.
Each person should also test the doors at their post before guests arrive. Don’t assume they work. Open them. Make sure the panic hardware releases smoothly, the door swings in the direction of egress, and nothing on the far side blocks the door from opening all the way.
In loud rooms, spoken directions may get lost. Give crowd managers whistles or loudhailers so they can cut through the noise.
Next, verify accessible routes, hazard triggers, medical coverage, and headcount control.
Crowd Safety Evacuation: Key Thresholds & Hazard Triggers at a Glance
Confirm accessible evacuation paths, refuge areas, and named mobility assistance for each zone.
Every evacuation route needs to work for guests with mobility limitations. That means accessible paths should be step-free, with ramps no steeper than 1:12 and landings placed at proper intervals. Doorways on those routes should give at least 32 inches of clear width when opened to 90 degrees so most wheelchairs can pass through.
For multi-level venues, mark areas of refuge on staff maps. These are protected spaces with two-way communication where guests who can't use stairs can wait for assisted evacuation. Don't count on elevators during a fire alarm. Instead, map stairwells, refuge areas, and evacuation-chair locations ahead of time.
Staff assignments matter here. Give each zone named team members who can help guests with mobility, hearing, vision, or cognitive disabilities. Use the same zone names already used for exit posts so there is no confusion. For guests who are deaf or hard of hearing, use visual cues and written instructions, not only spoken direction. For guests with cognitive disabilities, short and calm instructions tend to work better than long explanations.
Define one trigger and one action for each hazard: evacuate, pause service, or shelter in place.
For outdoor events, your weather plan can't be vague. Set a clear lightning threshold. Many weather planning guides call for pausing outdoor activity when lightning is detected within 6 to 10 miles, then waiting until 30 minutes after the last strike before resuming. If there's a tornado warning, move guests at once to interior rooms on the lowest floor, away from windows and large-span roofs. If smoke or wildfire conditions affect air quality, use the Air Quality Index (AQI) as your line in the sand. An AQI of 151 or above is considered unhealthy air, and that's the point where moving guests indoors or suspending the event is the right move.
Gas leaks and chemical hazards are different. In those cases, the rule is simple: evacuate fast and move upwind while following venue emergency protocols. For each hazard, write out the exact PA script or radio code staff will use so nobody has to improvise under pressure.
| Hazard | Trigger | Primary action |
|---|---|---|
| Lightning | Detected within 6–10 miles | Pause outdoor activity; move indoors |
| Tornado warning | NWS warning or confirmed sighting | Shelter in place - lowest interior floor |
| Extreme heat | NWS Heat Advisory or Excessive Heat Warning | Move guests to cooling areas; monitor vulnerable guests |
| Smoke / poor air quality | AQI ≥ 151 | Move indoors or suspend event |
| Gas leak | Detection system alert or facility report | Evacuate upwind; follow venue protocol |
Before doors open, confirm first aid stations, AED locations, and trained users.
AED placement can’t be an afterthought. Put AEDs within a 3- to 5-minute response of every high-density area. Mark those spots on staff maps, not just on venue walls. Use the same zone map already used for evacuation posts so staff are working from one shared layout. Assign at least one CPR/AED-trained staff member per shift, with security leads and zone supervisors as the best fit in many cases.
Also assign a named response liaison to meet EMS, fire, or police at the agreed access point. That person should know which gates need to be unlocked, which elevators responders can use, and the fastest internal route to likely incident locations. Name a backup liaison too, in case the first person is tied up or unavailable. At the command post, keep the nearest emergency department address, estimated drive time, and non-emergency contact numbers in print, not only in someone's phone.
Next, confirm headcount, all-clear authority, and the post-event recap.
Once your evacuation routes are set, move straight to accountability. Give each assembly point its own lead using event staff scheduling software, and start counting by zone right away.
Each zone needs a named lead. That person should have a printed or digital roster at the assembly point, check it against the expected count, and report any gap at once to the incident commander.
For attendees, set your baseline before the event starts. Use ticket counts, registration data, and room capacity limits. If the expected count for a zone doesn't match the number at the assembly point, report the gap right away to the incident commander, along with the name and last known location of anyone unaccounted for.
NFPA guidance recommends at least one trained crowd manager per 250 occupants for assembly occupancies. That's a practical benchmark for how many leads you need on the ground.
After headcount, tighten up re-entry authority.
No one goes back inside until the right person gives the all-clear. That decision should be written into the plan before the event, not figured out in the moment.
For most incidents, only emergency responders - fire department, law enforcement, or the authority having jurisdiction - can approve re-entry after a confirmed hazard. For minor false alarms with no confirmed hazard, your venue's safety manager or event director may be the person assigned to approve re-entry after checking with building systems.
Give every staff member one plain rule: do not resume service or send guests back inside until the official all-clear comes from the named authority. Send that all-clear through the channels already listed in your plan, such as radio, PA, and text alerts, so staff in every area get the same message fast and clearly. Controlled re-entry also matters. Bring people back in by zone, with staff at doors to avoid crowding and sudden surges.
A 10–15 minute pre-open review of exits, signage, staff placement, ADA access, and all-clear authority is what separates a prepared team from one improvising under pressure.
If you run a drill or deal with a live evacuation, use the post-brief to record what worked, where headcounts slowed down, and whether signage or assembly points caused confusion. Then update the written plan and training materials before the next event.
Treat the evacuation plan as a living document. Review it after every event and update it to fix any gaps or failures that came up.
It’s also standard practice to run emergency drills or system tests every quarter. When you make changes, label each version clearly, share the latest copy, and pull old versions out of circulation so no one is working from the wrong plan.
If an exit becomes unusable, security should act at once. Set a perimeter around the area and keep every other egress route open.
Staff should guide guests to designated muster points and help anyone who needs mobility support.
Use radios, PA announcements, and visual signage to keep people informed. Floor managers and the security lead should also make sure responder access stays open, with no equipment or breakdown work blocking the remaining exits.
The final all-clear to re-enter a venue after an emergency should come from Event Control or the Incident Commander.
Set this role in your Incident Command System (ICS) before the event. That way, everyone knows who has the final say, communication stays clear, and unauthorized reentry is blocked.