Venue Safety Checklist for Event Staff
August 27, 2026

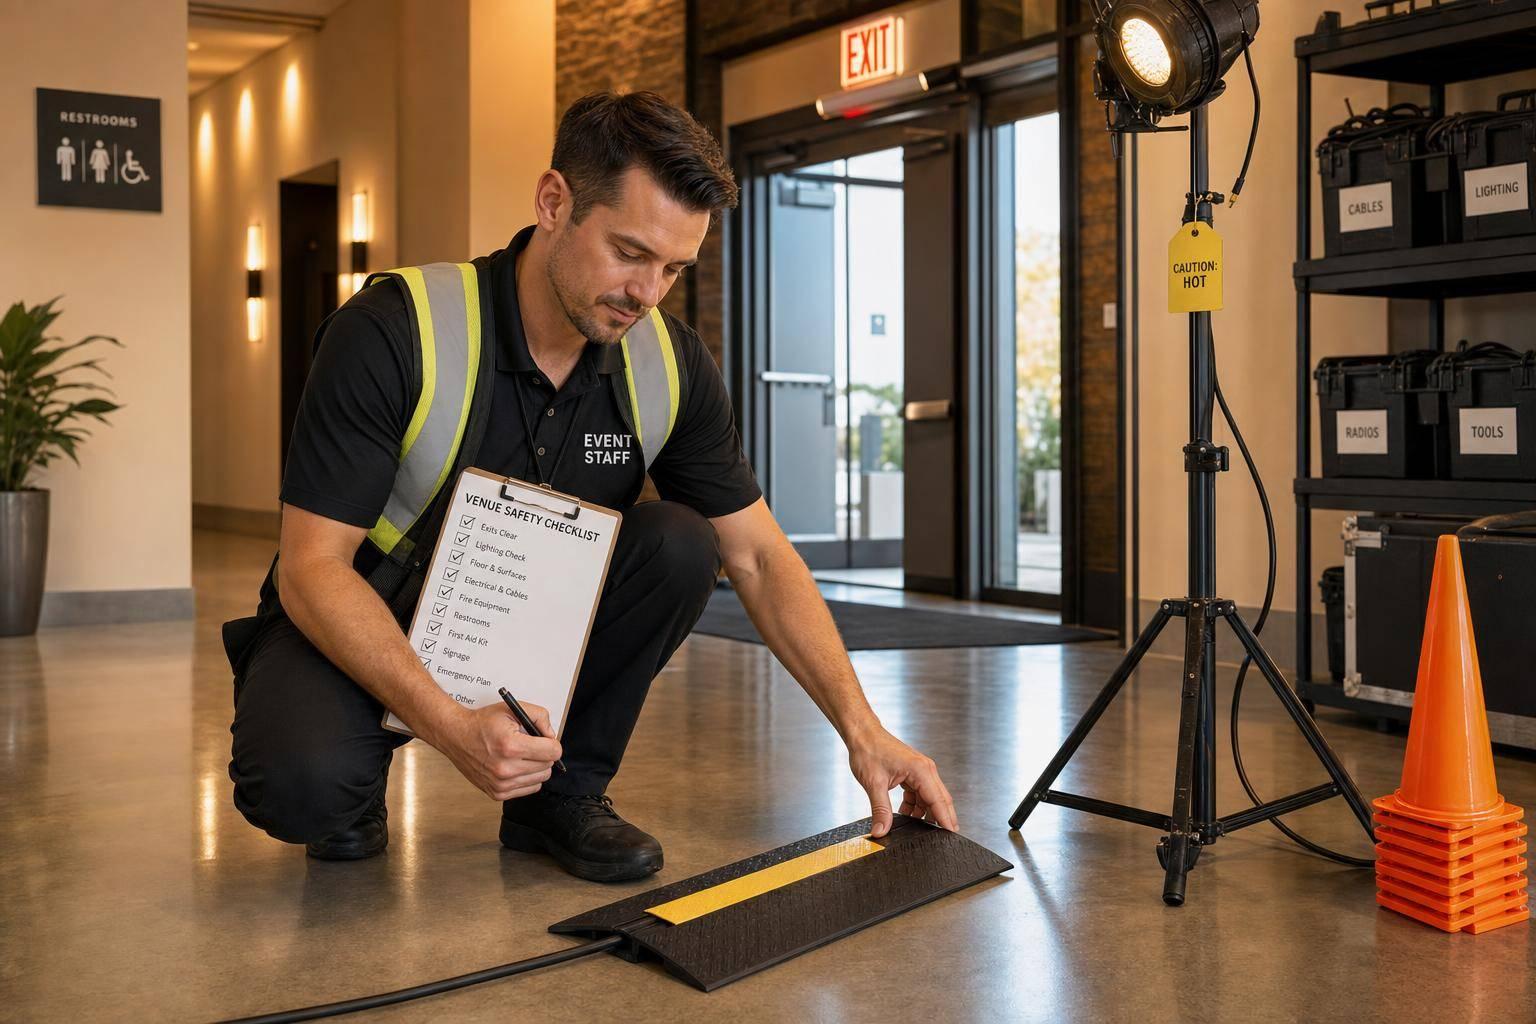
Most pre-event safety problems are small, visible, and fixable in 10–20 minutes if I check the venue before doors open. This checklist comes down to seven things: floors, paths, exits, lighting, hot equipment, storage, and restrooms. I also need to log each issue with the event name, venue, inspector, and the date and time in U.S. format, like 08/28/2026 at 3:30 PM.
Before guests arrive, I’m looking for the problems most likely to cause slips, trips, burns, blocked exits, or restroom trouble. That means I check for loose mats, wet spots, cords across walkways, dark stairs, blocked fire doors, hidden exit signs, hot catering gear, stored cases in halls, and wet restroom floors. If I find a problem, I fix it at once, block it off, or report it before opening.
My pre-open focus:
A last check matters because a clear aisle at 4:00 PM can be blocked again by 4:20 PM during setup. So I treat this as a short, final safety pass before doors open - not a code inspection, but a plain check for hazards staff can spot and handle fast.
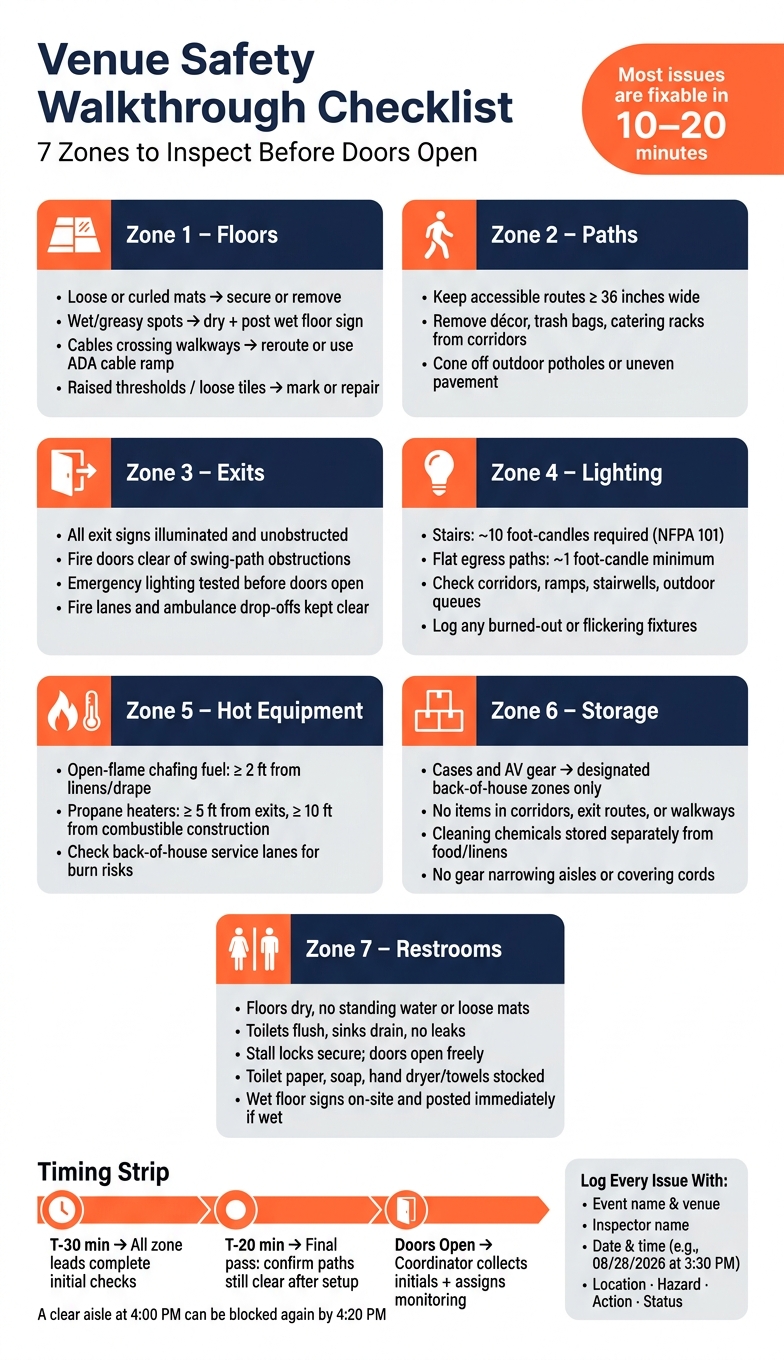
Venue Safety Walkthrough Checklist: 7 Zones to Inspect Before Doors Open
Start with floors, paths, and exits. These are the first hazards to deal with before doors open.
Walk every entrance, aisle, stair run, and outdoor approach path before guests arrive. The goal is simple: spot anything that could catch a foot or make someone slip.
Here are the most common issues and what to do about them right away:
| Common Trip Hazards | Quick Fix Before Doors |
|---|---|
| Loose or curled mats | Secure with non-slip backing or remove entirely |
| Wet or greasy spots | Dry immediately; post a "Caution – Wet Floor" sign |
| Cables crossing walkways | Reroute along walls; if unavoidable, cover with an ADA-compliant cable ramp |
| Raised thresholds or loose floor tiles | Mark or repair if possible |
| Outdoor potholes or uneven pavement | Cone off the area and redirect guest foot traffic |
| Boxes, cases, or clutter in aisles | Move to a designated storage zone immediately |
Pay extra attention to extension cords and AV cables. Temporary power setups tend to create problems fast, especially at registration desks, catering stations, and stages. Map each of those areas, then walk the route and look only for cords crossing places where guests will walk or stand in line.
If you can't reroute a cord, cover it with an ADA-compliant cable ramp and make sure the edges sit completely flat. A ramp that lifts at the edge can be just as risky as the cable itself.
Once you've cleared floor hazards, check that guest paths and exits are still open.
Keep accessible routes at least 36 inches wide. If you have room, make temporary routes wider.
During setup, corridors shrink fast. Décor, trash bags, catering racks, and vendor cases are usually the reason. Make it clear before load-in that nothing goes within the swing path of a fire door or inside a marked exit route. No wiggle room here.
Keep all exit routes open and usable at all times. For outside access points like fire lanes and ambulance drop-off areas, use cones and posted signs to keep vehicles out.
Next, make sure exits are easy to see and lit from every guest area.
Walk the space and confirm that every exit sign is illuminated and unobstructed. Temporary drape, banners, and branding often block them without anyone noticing at first. Check sightlines from registration, the bar, the stage, corridors, and stairs. If guests can't see the exit path from those spots, fix it before opening.
Work with venue facilities to briefly test emergency lighting before doors open. Stairwells, corridors, and primary egress paths need to stay adequately lit during a power failure.
If you find a burned-out sign or a failed backup unit, document it with the time, location, and name of the person notified. That paper trail helps push repairs through before guests enter.
This table shows the two route types staff need to inspect and who should own each check:
| Route Type | What to Check | Responsible Staff Role |
|---|---|---|
| Guest circulation routes | Smooth flooring, no clutter, no wet spots, safe stair treads, clear wayfinding | Front-of-house lead / venue coordinator |
| Emergency access routes | Unblocked exit doors, usable fire doors, visible exit signs, clear responder access | Safety lead / operations manager |
Assign roles before the walkthrough. Using event staff scheduling software can help streamline these assignments.
After floors, paths, and exits, move to lighting, heat sources, and storage.
Once exits and travel paths are clear, shift your focus to lighting, hot equipment, and storage. Use the same route map from the exit check so you cover the exact paths guests and staff will use.
Walk the guest and emergency routes again, this time looking for visibility issues. Go through every corridor, aisle, ramp, stairwell, outdoor queue path, and restroom corridor. Check that house lights, aisle lights, stairwell lights, and exterior path lights are on and bright enough to show steps, edges, and changes in floor level. Watch for burned-out bulbs, flickering fixtures, dark stairs, blocked lights, and shadowy spots.
Stairs need extra care. NFPA 101 calls for around 10 foot-candles of light on stair walking surfaces, compared with about 1 foot-candle on flat egress paths.
It’s easy for temporary drape, signage carts, décor stands, and cables to block fixtures or throw shadows across a route. That’s why you should check sightlines, not just whether the light itself works. If any light or emergency unit fails along a route, log the location and time, then fix it before doors open.
Next, look for any hot surface or open flame that a guest could touch. Chafing dishes, heat lamps, grills, and space heaters are common sources of burns at events.
For open-flame chafing fuel, set the unit on a non-combustible tray or mat. Keep it at least 2 feet from linens, paper goods, greenery, and drapery. Propane heaters need more space: keep them at least 5 feet from exits and 10 feet from combustible construction.
Back-of-house areas deserve a close look too. Tight corners near hot equipment can become a problem fast, especially when catering staff are moving through a busy service lane with trays, racks, or supplies in hand.
Move unused items into designated back-of-house storage. Don’t leave them in corridors, exits, or walkways. Storage can’t narrow or block any route that staff or guests may need to use. OSHA guidance and NFPA 101 both ban storing materials in exit routes or in any way that cuts into the required exit width.
Cleaning chemicals also need their own storage area, away from food, beverages, linens, and guest-contact supplies. Even a short-term mix-up between housekeeping products and food service items can create contamination risk and plain old confusion.
| Proper Equipment Storage Practices | Unsafe Practices |
|---|---|
| Cases and AV gear stored in designated back-of-house zones | Cases left in corridors, near exits, or in guest areas |
| Items stacked on level surfaces, with heavier items stored low | Unstable stacking or items leaning into walkways |
| Cleaning chemicals in a labeled, dedicated storage area | Chemicals stored near food, prep tables, or open shelves |
| Access paths to stored equipment kept clear | Stored items blocking utility access or service entrances |
| No equipment extending into aisles or egress routes | Gear or supplies narrowing hallways or covering cords |
Next, check restrooms and sanitation before guests arrive.
Next, check restrooms. They’re easy to overlook, but they can turn into slip-risk areas fast. Water, hard surfaces, and heavy foot traffic are a rough mix.
Start with the restroom entrance and the route leading to it. Then do a quick walk-through of the rest of the space: entrance, fixtures, lighting, supplies, and trash.
Make sure stall locks close securely. Check that ceiling lights, mirror lights, and the hallway lighting outside the restroom are bright enough to show wet spots, steps, and signs. If the floor is wet, post a wet floor sign right away and close the area until it’s dry. If the issue can’t be fixed on the spot, mark it, report it, and close the restroom until it is cleaned or repaired.
Check supplies at every station. Each stall should have toilet paper. Every sink should have liquid soap and paper towels or a working hand dryer. Trash cans should be lined and emptied before they overflow. If a restroom can’t be fully restocked before doors open, document it and assign someone to watch it during the event. This is a key part of scalable event scheduling for large venues.
Use this checklist to verify each restroom before doors open.
| Restroom Check | What to Look For |
|---|---|
| Floors & Entrances | Dry, clean floors; no standing water, debris, loose mats, or visible dirt; entrance and route clear and non-slip |
| Fixtures | Toilets flush; sinks run and drain; hand dryers or paper towel dispensers work; no leaks or clogs |
| Stall Locks & Doors | Latches close securely; doors open and close without obstruction |
| Supplies | Toilet paper, soap, and hand dryer or paper towels stocked at every station |
| Lighting | Ceiling, mirror, and hallway lights working; no dark or flickering areas |
| Trash | Cans lined and emptied before overflow |
| Wet Floor Signs | On-site and posted immediately when floors are wet |
A checklist only does its job when one person owns each part of it.
Split the venue into zones and name one lead for each area before doors open. That means one lead each for front of house, dining/stage, catering, back of house, and restrooms.
Have all zone checks done 30 minutes before doors open. Then run one last check 20 to 30 minutes before opening to make sure paths are still clear after setup ends. That last pass matters more than people think. A walkway can be clear at 4:00 PM and blocked again by 4:20 PM once carts, cords, or extra gear get moved around.
When a lead spots a problem, they should log four things:
If something still isn’t fixed, flag it to the event manager before opening, not after. That includes things like a broken sink, a dim stairwell light, or a cord that can’t be rerouted. The log should also serve as the handoff record for shift changes and venue follow-up.
Event staff scheduling tools help keep all of this visible and tied to a deadline. If your team uses Quickstaff, you can assign zone checks, set check-by times, and send reminders from the event record.
After all zone leads report back, the coordinator should do one final pass before opening. Have the event coordinator complete a 15- to 30-minute pre-open review, collect initials, and assign monitoring for entrances, stairs, restrooms, and other high-traffic spots.
At every event, assign named leads to each zone, document every hazard with its status, and complete a final pre-open pass. That pass should cover trip hazards, clear paths and exits, lighting, hot surfaces, equipment storage, restrooms, and emergency access, because slips, trips, and falls are common at live events.
Assign ownership before the event so accountability is clear. Each setup lead should own a specific area, make sure the equipment matches the logs, and verify that safety standards are met. In technical zones like power, assign a power coordinator.
For emergencies, use an ICS structure with clear task assignments and a designated Safety Officer who can spot hazards and stop unsafe activity. Clients still need to name an onsite supervisor for temporary staff safety questions and hazard reporting.
Prioritize guest and staff safety first. Alert the event commander or site lead through your escalation path, then make sure the area is clearly marked, blocked off, or watched so no one can enter.
Log the issue in the incident record, stay in contact with security or facilities, and if the hazard creates a serious life-safety risk, coordinate an immediate pause or partial shutdown of the affected area.
Do a full venue walkthrough 60 to 90 minutes before doors open. Then, about 30 minutes before opening, bring the whole team together for a staff briefing focused on emergency procedures. Cover evacuation routes and muster points so everyone knows where to go and what to do.
Once the event is live, have team leads check in during the busiest periods. During load-in, repeat those check-ins every 30 to 60 minutes. If the build is more complex, check in more often.