Event Workflow Standardization For Staff Booking
September 24, 2026


If your staff booking process lives in spreadsheets, texts, and inboxes, mistakes will happen. I’d standardize the work around one workflow, one record, one owner per stage, and one set of status labels (one of the many benefits of event staff scheduling software) so every booking moves the same way from inquiry to closeout.
Here’s the short version:
This matters because handoff problems are often small at first: one missing start time, one open role, one venue note left in a text. But those small gaps can turn into staffing misses, late changes, and event-day confusion. A shared system cuts that risk by giving every team the same view of the booking.
A few numbers in the process help keep it tight:
At its core, this article says one thing: I’d treat staff booking like a fixed workflow, not a chain of side messages. That means clear stages, required fields, standard labels, short handoff notes, and monthly checks to stop drift.
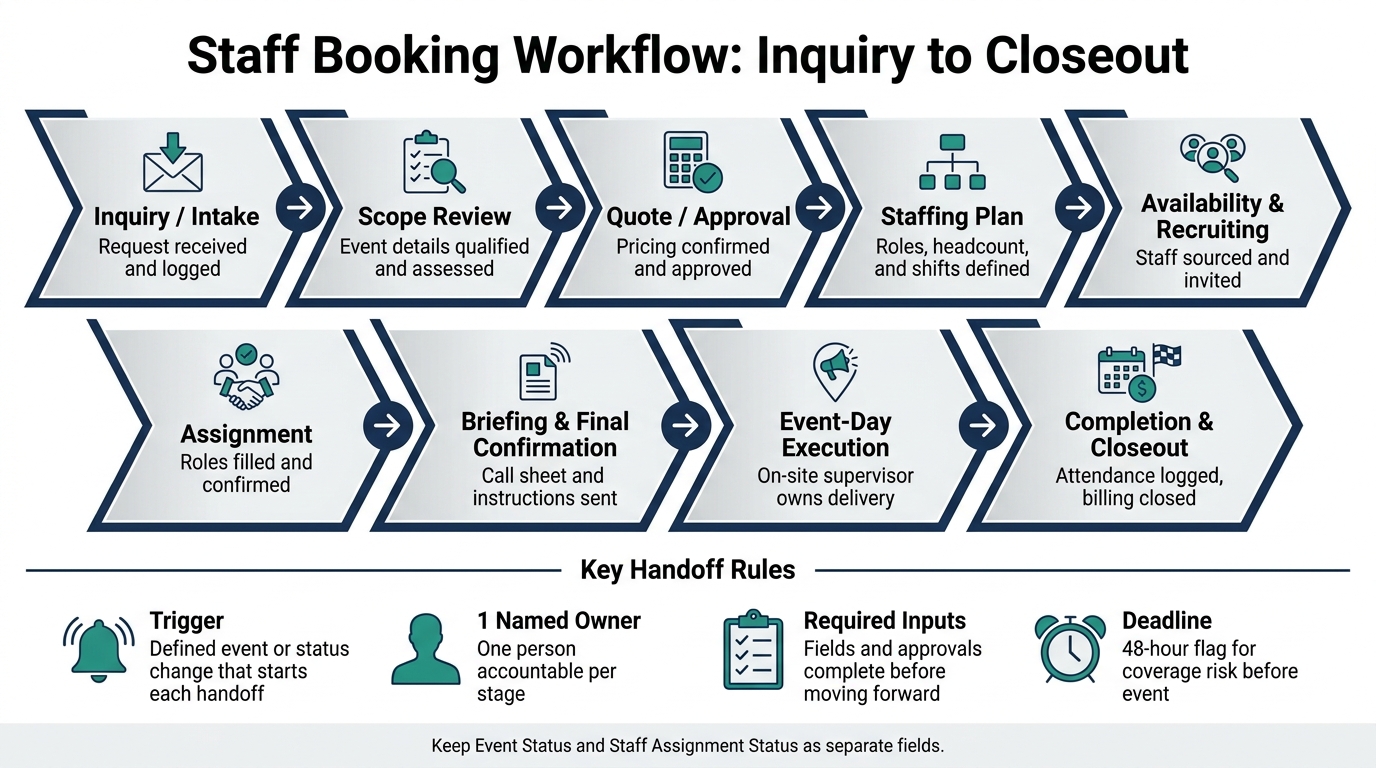
Staff Booking Workflow: 9 Stages From Inquiry to Closeout
Before you change any settings, write down how a booking moves through your business right now. Start with the real process, not the ideal one. That helps you separate must-do steps from old habits, spot duplicate entry, and see where info or approvals get stuck. The goal is to turn a shared understanding into a workflow map your team can use.
Use this sequence as the starting point: Inquiry or intake → Scope review → Quote or approval → Staffing plan → Availability and recruiting → Assignment → Briefing and final confirmation → Event-day execution → Completion and closeout. Each stage marks a handoff, from intake through closeout.
Once those stages are clear, define the minimum record fields needed at each one.
Event status tracks the booking itself. Staff assignment status tracks coverage. Those are not the same thing. A booking can be Confirmed while roles are still Open or Pending Acceptance. Keep those fields separate.
Every event record needs the same core details, no matter the event type or size. If you don’t set a required field standard, one coordinator enters the dress code, another skips it, and the staffing team may send workers in the wrong attire.
| Field Group | Required Fields |
|---|---|
| Event Identity | Event name, event type, client name, booking ID |
| Schedule | Date (MM/DD/YYYY), setup time, staff arrival time, service start/end, breakdown end (all with AM/PM) |
| Location | Venue name, full address, room or service area, access instructions, parking, onsite contact |
| Staffing Scope | Role names, headcount per role, shift times, required qualifications, relief coverage |
| Appearance & Materials | Dress code, uniform details, equipment, supplies, credentials |
| Service Instructions | Client priorities, agenda, special notes, accessibility needs, escalation procedures |
| Ownership & Contacts | Internal booking owner, client contact, venue contact, event manager, phone and email |
| Workflow Control | Event status, assignment status, next action, next-action owner, due date, change history |
Use structured fields, not free-text notes, for anything your team needs to filter, report on, or act on. That includes dates, times, roles, headcount, status, and owner. Save free text for unusual context, like a loading dock note or a specific escalation procedure.
Take one recent, typical booking and trace it from start to finish across emails, texts, contracts, spreadsheets, and scheduling records. At each step, note:
This is where gaps usually show up. A wedding booking, for example, might reveal that the same date and venue were entered three times, with no clear trigger for moving from Confirmed to Staffing in Progress. That gives you the workflow rules you need: enter the event record once, require the dress-code field before staffing release, and set one recorded trigger for each handoff.
After the workflow is mapped, assign one owner to each stage and define the handoff rules.
Once your stages are mapped, give each stage one owner. This is a core component of scalable event scheduling. Not a department. Not a shared inbox. One person.
Other people can pitch in, of course. But only one person should be on the hook for moving the record forward. Without that kind of clarity, records get stuck between sales, operations, and staffing. Everyone thinks someone else has the next step, and the event just sits there.
For most catering and staffing teams, a practical ownership flow looks like this: the sales or booking coordinator owns the inquiry, the event operations manager owns the confirmed booking review, the staffing coordinator owns the roster build, the on-site supervisor owns event-day execution, and the payroll or billing coordinator owns closeout. Job titles may change from one company to the next, but each stage still needs one named owner in the scheduling tool.
Each handoff should be defined by four things:
| Element | What it means |
|---|---|
| Trigger | The exact event or status change that starts the handoff, such as a signed contract, approved staffing budget, or confirmed roster |
| Owner | The one named person responsible for the next stage |
| Required inputs | The fields, attachments, and approvals that must be complete before the record moves |
| Deadline | The date and time by which the next owner must accept the handoff or flag an issue |
For example, sales should hand a booking to operations only after the record includes the client, date, venue, service type, guest count, times, staffing needs, budget, venue contact, and access restrictions. Then the next owner can accept it, flag missing information, or send it back with a correction request.
That same setup should apply at every transition. Staffing should close its stage only when every required role is confirmed, or when an authorized manager has accepted a documented exception. If one bartender is still unfilled 48 hours before the event, the record should stay in an exception status like Coverage Risk instead of moving to confirmed. That one label makes a big difference. It triggers the right escalation path instead of letting the gap slip by until the morning of the event.
Before any record is transferred, the outgoing owner should run through a short checklist. And that checklist should live inside the central scheduling record - not in a separate email thread or text chain.
Keep it short:
A short handoff note might look like this:
operations review required; confirm whether venue allows bartender setup at 4:00 PM; staffing plan due by 2:00 PM ET tomorrow; unresolved issue assigned to Jordan Lee.
That gives the next owner what they need right away, without forcing them to dig through scattered messages.
Once handoffs are defined, standardize event names, task names, and status labels.
Inconsistent naming hurts search, sorting, and handoffs. After ownership is clear, naming becomes the next control point that keeps handoffs easy to follow. These labels help every booking stay readable as it moves between sales, operations, and staffing.
Use one format for every record, with no exceptions: Event Type – Client or Organization – MM/DD/YYYY – Venue. A correct name looks like Corporate Dinner – Acme Corporation – 09/25/2026 – Union Station or Wedding Reception – Carter Family – 06/20/2026 – The Foundry.
That order gives coordinators enough context to spot the booking from a calendar view or search result without opening the record. It's simple, but it saves time.
Stick to an approved list of event type labels, such as Wedding Reception, Corporate Meeting, Private Party, and Festival. Do not allow custom variations. If two bookings share the same client, date, and venue, add a distinguisher like – 10:00 AM or – Ballroom.
Keep sensitive details out of the title. That includes payment amounts, access codes, and private guest information. Put those details in restricted fields or notes where access is controlled.
These two labels do different jobs, so don't mix them.
A task name tells someone what action comes next: Confirm final headcount with client, Assign two banquet servers, Send staff call sheet.
A status label shows where the booking stands in the workflow.
When teams mix the two - for example, using Send staffing proposal as a status - reporting gets messy. It also becomes harder to tell where work is stuck.
Use a small, fixed set of statuses:
| Status | Meaning | Required evidence |
|---|---|---|
| Inquiry | Request received, not yet qualified | Client name, event date, event type, contact record |
| Pending Details | Viable booking, but required information is missing | Open-items checklist and follow-up date |
| Ready to Staff | Booking is defined enough for staffing work to begin | Confirmed date, venue, time, headcount, roles, and client approval |
| Staffing in Progress | Team is actively sourcing or assigning workers | Current staffing plan, open roles, offers sent, or assignment notes |
| Confirmed | All required roles are covered and the booking is approved | Accepted assignments, call times, location details, and approval record |
| On Hold | Work is paused due to a documented dependency | Reason, decision-maker, review date, and next action |
| Completed | Event finished and closeout work is done | Attendance record, exceptions resolved, closeout submitted |
| Canceled | Booking will not proceed | Cancellation reason, date, approval, and any notifications sent |
Name each task with a verb and an outcome. Each status should mark a real decision point, not a fuzzy condition or someone's gut feeling about how things are going.
With names and labels fixed, configure them in Quickstaff and test one event type.
Once your stages, owners, naming rules, and status labels are set, it’s time to put them into Quickstaff. The goal here is simple: use the software to enforce the process, not to replace good process habits.
Start with one repeatable event category, like weddings or catered corporate events. That gives you a controlled way to spot scheduling problems early.
Build one standard event template with the approved naming format, then map all required fields into that template. Before you send invitations, check staff availability, block-out dates, and scheduling conflicts. From there, send role-based invitations only to staff who are eligible for that assignment.
Staff can accept or decline in the app, and Quickstaff updates the record in real time. If you need more people than are currently available, use the waitlist so qualified backups stay tied to the event. Also make sure reminders and updates go to the right people when call time, location, or instructions change.
Then test the workflow in three ways:
As you test, track stage time, manual follow-ups, and any missing fields, duplicate messages, or unresolved assignments. Don’t expand the setup until the pilot runs cleanly. After that, lock it in with a short monthly review.
Once the pilot is stable, use Quickstaff's event duplication feature to carry the proven setup - roles, instructions, naming format, and checklist expectations - into future bookings. At that point, only the date, venue, staffing quantities, and client details should need to change.
After the pilot is stable, run a brief monthly audit so the workflow doesn’t drift over time. A 20–30 minute review with the booking manager, scheduler, and one event lead is usually enough.
Pull a sample of completed and active bookings, then check them against a small set of measurable criteria:
| Check | Formula | Target |
|---|---|---|
| Naming compliance | Correctly named bookings ÷ bookings audited × 100 | ≥ 95% |
| Named-owner rate | Bookings with a named stage owner ÷ bookings audited × 100 | 100% |
| Complete-handoff rate | Handoffs containing all required information ÷ handoffs audited × 100 | ≥ 95% |
| Readiness confirmation rate | Roles confirmed before the readiness review ÷ roles required × 100 | All required roles confirmed |
| Overdue-record rate | Bookings past their stage deadline ÷ active bookings × 100 | 0 overdue high-risk handoffs |
If a metric misses its target, find the root cause before the next review. Put the issue into one of four buckets: rule, training, data-entry, or configuration. Then assign one corrective action, one owner, and one due date.
Test that fix on the next few bookings before you treat it as permanent.
Use the review results to keep the standard tight as the workflow grows.
Once the workflow is set up and tested, the goal isn't to make every event look the same. The goal is to make sure the work gets done the same way every time.
A standard booking workflow gives sales, operations, scheduling, and on-site teams a shared way to work. Everyone knows what's needed, who owns the next step, and where the record sits at any moment.
The four parts that keep this system together are stages, owners, labels, and handoffs. Miss one, and things can slip through the cracks.
The upside is simple: clearer accountability, fewer missed details, faster booking progress, and stronger event readiness.
That kind of standard only holds when the team works from one shared system. Quickstaff keeps the workflow out of inboxes and puts the process in one place, so the team can follow the same steps every time.
Start with one event type. Review the process each month. Fix drift before you expand. As the workflow grows, keep the same stages, owners, labels, and handoff rules in place.
Start with a master event task template that lays out the repeatable stages of your booking process. That might include reviewing client requests, qualifying leads, and building staffing plans. Then use a central scheduling tool so each new booking follows the same setup.
Add clear status labels like New Request, Confirmed, Staffing Needed, and Event Complete. Also make key fields required, including event date, start time, venue, and staff count.
Keeping these two separate makes the workflow clearer and easier to automate.
Event status shows the overall progress of the booking. Assignment status shows the progress of each staff role or shift.
That split means you can handle event-level updates and role-level details at the same time, without changes to one assignment throwing off the broader event workflow.
Audit your escalation matrix every month. Make sure it matches current roles and helps you spot repeat communication issues or gaps in ownership.
Review channel access and role assignments at the same time, so people keep only the permissions they need right now.
In Quickstaff, check the staff roster and availability trends to keep scheduling data accurate and in line with day-to-day operations.