How Dynamic Scheduling Improves Event Staffing
June 28, 2026

If your event schedule changes by the hour, static planning breaks fast. I’d sum this up simply: dynamic scheduling helps me cut double-bookings, fill call-outs faster, keep staff on the same version of the plan, and spend less time chasing texts and emails.
Here’s the core idea in plain English:
A few numbers stand out:
What this means for me is simple: when one person drops, the system can spot the gap, alert qualified backups, and update the schedule as soon as someone accepts. Staff see current shift details like dress code, venue notes, parking, and pay in one place, which cuts confusion on event day.
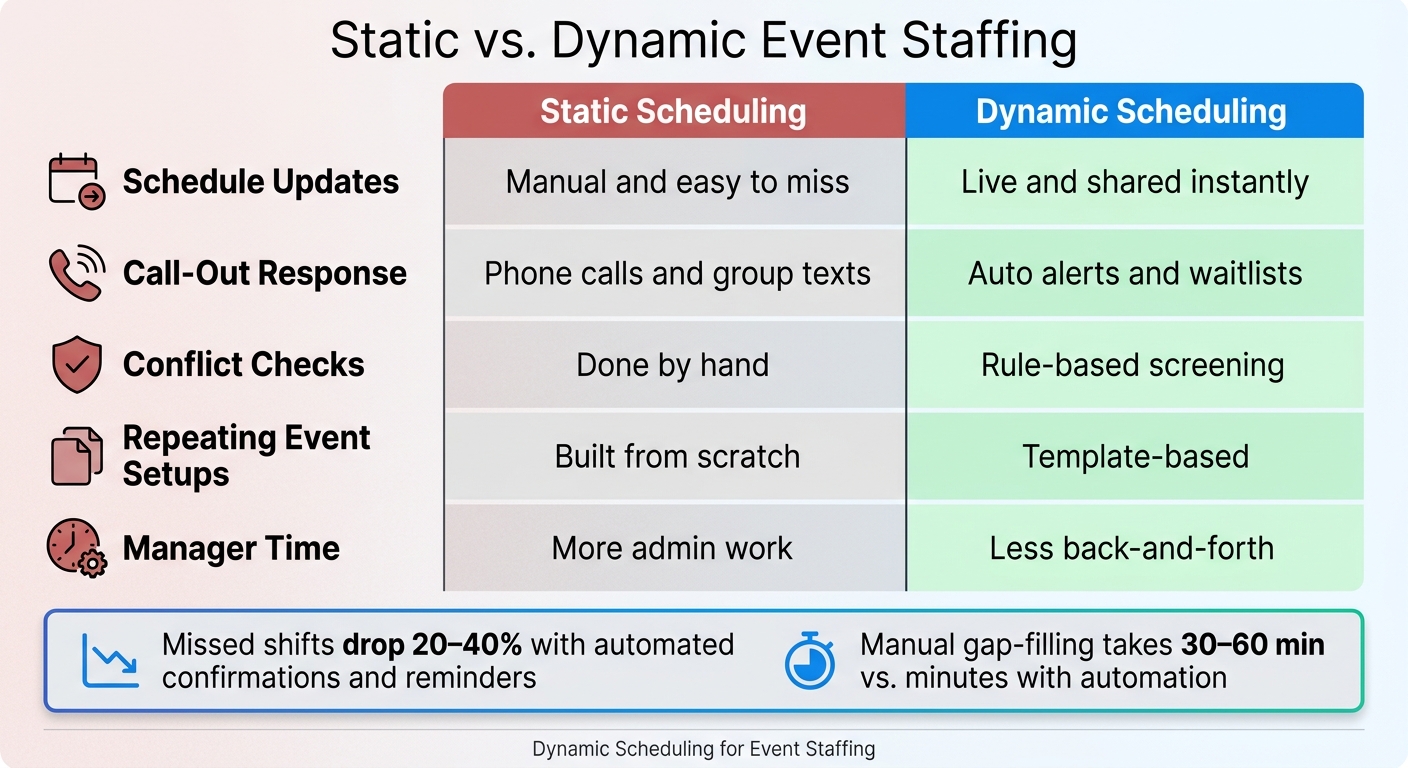
Static vs. Dynamic Event Staffing: Key Differences at a Glance
| Area | Static scheduling | Dynamic scheduling |
|---|---|---|
| Schedule updates | Manual and easy to miss | Live and shared instantly |
| Call-out response | Phone calls and group texts | Auto alerts and waitlists |
| Conflict checks | Done by hand | Rule-based screening |
| Repeating event setups | Built from scratch | Template-based |
| Manager time | More admin work | Less back-and-forth |
If I were putting this into practice, I’d focus on one thing first: build the rules once, then let the system handle the repeat work.
Before you put anyone on the schedule, map out every role, coverage window, and job requirement.
Start with the event timeline, then match each phase with the headcount it needs. For example: 4 setup staff, 1 captain, 8 banquet servers, and 2 bartenders across setup, service, and breakdown.
Next, spell out what each role requires: certification, minimum age, experience, lifting limit, and shift-length cap. It helps to keep a role profile list for every position. That way, each event starts from the same set of standards instead of making you check the same criteria all over again.
Those role details give your scheduling system the rules it needs to assign people on its own.
After the roles are mapped, set the rules that control who can work and when. Common examples include:
These guardrails help the system screen swaps, flag conflicts, and fill open shifts without someone having to review every change by hand.
For tools for last-minute changes, set the approval path ahead of time. Staff may request a swap up to 48 hours before the event, the replacement must meet all role requirements, and the change is not final until a manager approves it. Set a 4- to 6-hour cutoff for same-day call-outs, with a written process for what happens after that. A centralized scheduling system can then show only available, qualified staff and cut down on manual conflict checks.
Once those rules are in place, you can start collecting availability and building repeatable schedules from the same standards. This is a key reason why caterers need scheduling software to handle the unique demands of event-based staffing.
With roles and rules in place, the next move is simple: get availability into one system, then use that data to build schedules you can repeat.
Scattered availability is one of many common scheduling problems that lead to mistakes. When data lives in texts, emails, spreadsheets, and group chats, things slip through the cracks. A centralized system gives managers and staff one place to view, submit, and update availability.
In practice, staff can log in and mark their blackout dates, preferred shift windows, and time-off requests directly in the platform. That keeps availability and preferences separate, which gives managers a clearer view of who can work and when. You can also filter by date to see who is free and qualified for each role.
It helps to set a monthly deadline, such as the 20th, for staff to confirm or update their availability for the next month. For peak dates, ask for explicit opt-in. Teams that use one shared system usually spend less time putting schedules together and deal with fewer last-minute conflicts caused by old information.
Once availability is in one place, templates help turn that data into repeatable schedules.
Don’t build every schedule from scratch. Reusable templates give you a pre-set starting point for each common event type - weddings, corporate lunches, festival booths, and more.
A wedding template might include a banquet captain, eight servers, two bartenders, and a setup crew (you can calculate these roles using an event staffing needs analyzer), with shift windows like 12:00–4:00 PM for setup and 2:00–10:00 PM for service. A corporate lunch would need a different setup: shorter midday shifts, fewer bar staff, and more buffet attendants. Once those templates are built, you can duplicate them for each new booking, change the date and venue, and let the system assign available, qualified staff.
Quickstaff lets managers save event templates, duplicate them, and send mobile role-specific invites with event notes attached. That kind of repeatable setup also makes open shifts easier to fill later.
One practical tip: add a buffer to high-risk roles. One extra server in a wedding template, for example, can absorb a last-minute cancellation and save you from a scramble.
Once the schedule is built, the job shifts to filling gaps fast. At this stage, automation should do the first round of work so open spots get handled before call time.
After the schedule is live, automation should respond to every change first. Each assigned shift should send an immediate confirmation request. Staff can accept or decline on the spot, which gives you a clear view of actual coverage instead of guessed coverage.
Then set two reminders for every confirmed shift:
Each reminder should include the date, call time, venue, parking, dress code, pay rate, onsite contact, and weather notes. The flow is simple: confirmation first, reminder second, escalation third. Industry practitioners report that using confirmations with timed reminders can cut missed shifts by 20–40% for high-turnover event teams.
Alerts should stay tight and relevant. Only send open-shift notices to staff who are available, qualified, and opted in for that shift type. A message like "Open shift: Server, $25/hour, 6:00–11:00 PM, Sat., 07/11/2026" gives people what they need to reply fast.
If a shift still opens up, the waitlist is often the fastest way to fill it. When you send shift invites, invite more staff than you need. The first people to confirm get the spots, and everyone else moves to a waitlist automatically. If someone calls out, the system can notify the next qualified person right away.
Quickstaff supports this with automated waitlists. Coordinators can over-invite by role, and the platform fills the waitlist on its own. When a shift opens, waitlisted staff get a targeted alert with full event details attached, including dress code, directions, and any PDF documents. That takes minutes instead of 30–60 minutes of manual outreach. And because the replacement ties back to the staffing rules set in Step 1, only eligible staff get notified.
When a shift changes hands, send the lead the replacement’s name, ETA, and any coverage update. If a key role is still open 60 minutes before doors open, escalate it automatically.
With alerts and waitlists running, the next move is to track results and tighten the process.
Once alerts and waitlists are working, put the process into one live workflow before you expand it. Start with one team or one event type, then run that setup for 60 days while the rest of the business sticks with the current process. That smaller rollout gives you a clean way to compare pilot results against past averages and catch issues - like confusing shift-swap rules or the wrong role assignments - before they spread across the whole operation.
Before the first live event, train the people closest to scheduling decisions: event coordinators, staffing managers, team leads, and a sample of on-call staff. They should know how to approve or decline shift requests, update schedules when event details change, and manage shift swaps without confusion. A short pre-launch checklist helps here. It should confirm that:
After each pilot event, compare the planned schedule with what actually happened. Within 24 to 72 hours after the event, review the open-shift fill rate, no-show frequency, last-minute schedule changes, and the time spent coordinating schedules. If fill rates go up, that's a good sign the team is responding faster and staying more engaged. You can also compare coordination hours before and after automation to see where time is coming back.
Use Quickstaff's dashboard during the pilot to track coverage, open shifts, and last-minute replacements. Compare planned coverage with actual fills, then use the mobile view during the event to deal with late arrivals and plug gaps on the fly.
After each review, agree on one to three changes before the next event. That might mean moving the confirmation deadline to 48 hours before the event or adding a backup bartender for higher-risk events. Write those changes into a shared process doc so the workflow gets better based on what happened in the field. Once fill rates keep hitting your benchmark and no-show rates stay below past averages for three to five straight events, move the workflow to the next team or event type.
Once the pilot shows the workflow holds up, keep the progress going with a simple review cycle. Dynamic scheduling works best when each part is clear: rules, availability, templates, automation, rollout, and review. For U.S. event businesses working with tight margins, that sequence leads to fewer conflicts, faster fills, and smoother event-day execution.
Dynamic scheduling uses automated, centralized tools instead of manual methods like spreadsheets or text messages. That means less guesswork. The system tracks real-time availability, flags conflicts on its own, and matches staff to the right roles.
Unlike a regular schedule, it gives managers one up-to-date source of truth. At the same time, staff can update their availability and confirm shifts fast.
Start with clear operating rules:
This does a few things right away. It helps prevent burnout and no-shows, keeps you in line with labor rules, and makes it much easier to match the right people to the right event.
It also helps you spot understaffed events before they turn into a mess.
There’s no set testing period mentioned.
Before a full rollout, start by standardizing your data. Audit and normalize role names, skill levels, shift types, staff availability, preferences, and maximum weekly hours.
It’s a simple step, but it matters. If one person is labeled “Server” and another is labeled “Waitstaff” for the same role, the system can get messy fast.
It also helps to build your business rules and constraints early. That gives you a workflow that can scale, run with less manual work, and fit the way your event staffing operation works.