Event Incident Reporting Checklist for Staff
August 21, 2026

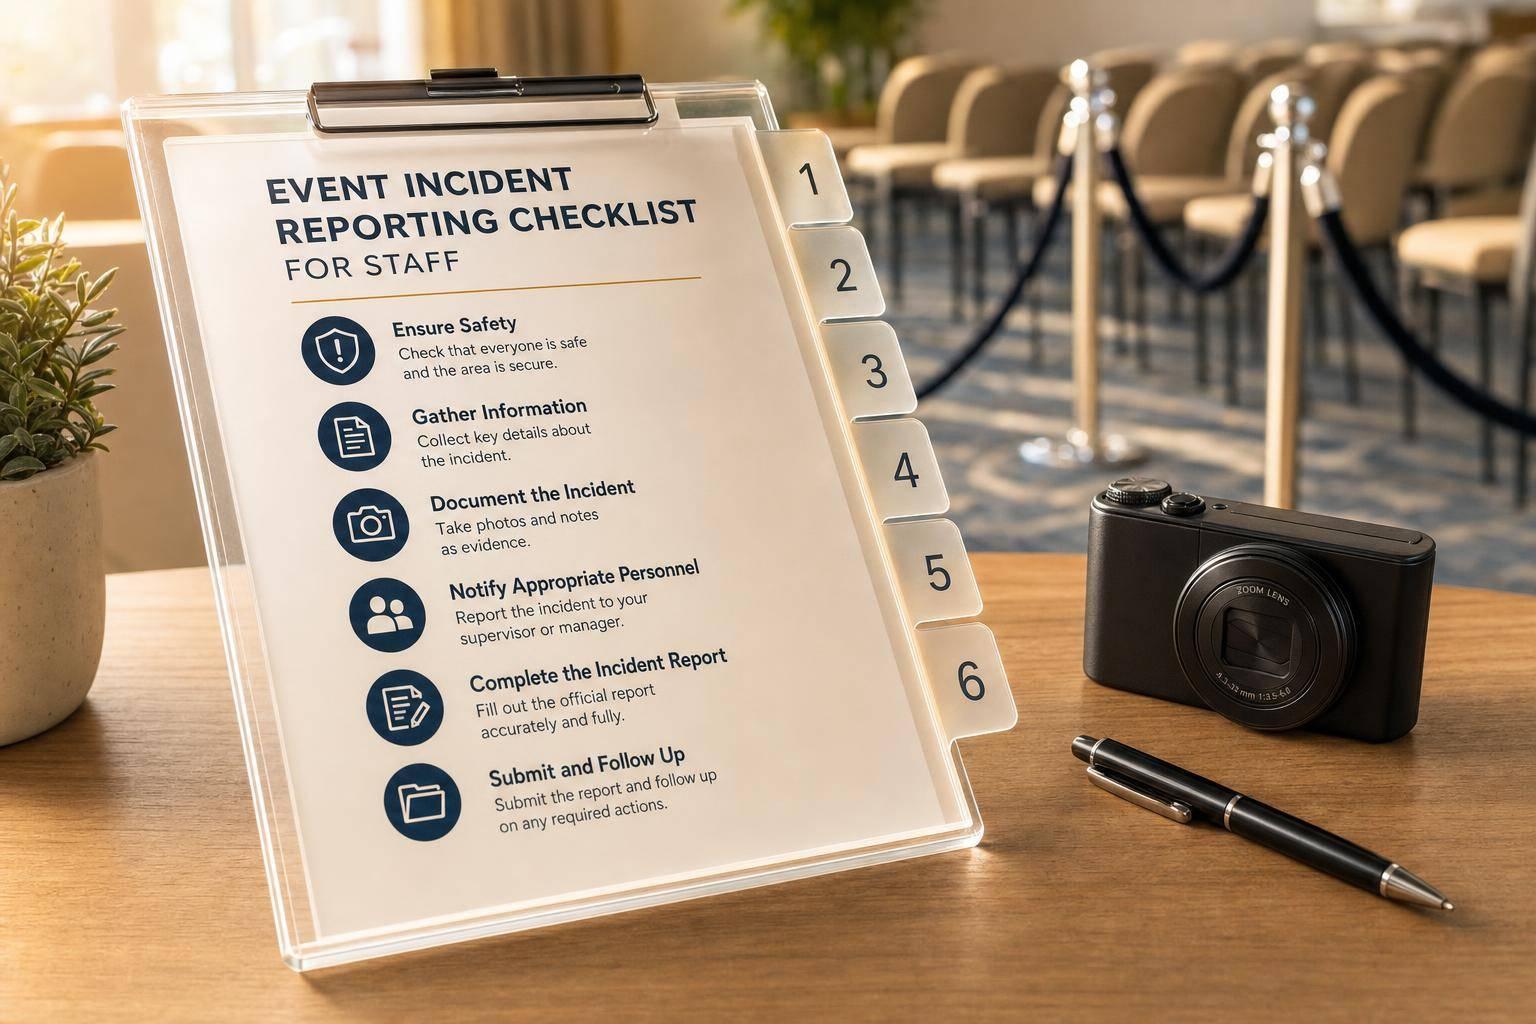
When an incident happens at an event, I need staff to do six things in order: make the area safe, get help, tell a supervisor, write down the facts, gather proof, and file the report before the shift ends or within 24 hours.
That’s the whole job in plain English. If someone is badly hurt, I call 911 first. If it’s a work-related fatality, the employer must report it to OSHA within 8 hours. If it’s an in-patient hospitalization, amputation, or loss of an eye, the employer must report it within 24 hours.
Here’s the checklist I’d want any staff member to follow:
A few details matter more than people think:
Bottom line: a good incident report is fast, factual, and complete. It helps protect guests, staff, and the event team, and it helps fix the same hazard before it hurts someone else.
The rest of the article walks through each step in more detail.
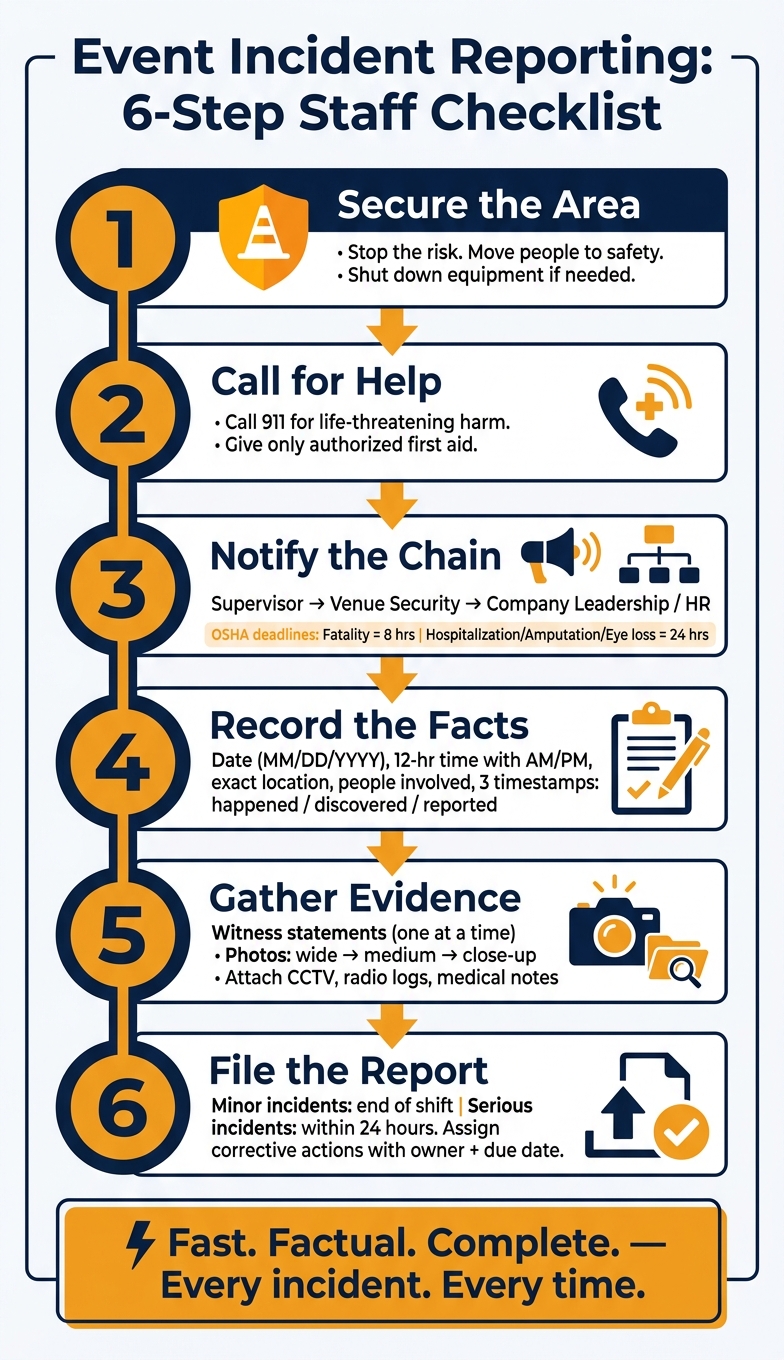
Event Incident Reporting: 6-Step Staff Checklist
Safety comes before paperwork.
Stop work in the affected area, shut down equipment if needed, and make sure the situation doesn’t get worse. Move guests and coworkers away from the danger in a calm, steady way. That could mean a spill, broken glass, an electrical issue, or an unstable structure. The goal is simple: get people to a safe spot without sparking panic.
If someone is hurt, call 911 right away for any sign of serious harm, including unconsciousness, suspected broken bones, chest pain, trouble breathing, fire, or any other life-threatening situation. If you need to log the call time for your report, use a 12-hour clock with AM/PM, such as 7:18 PM. Give only the first aid you’re trained and authorized to give. If staff members aren’t trained, they should stay with the injured person, help keep them calm, and watch their condition until EMS gets there.
Assign roles fast:
Once the area is safe, move the incident up through the right chain. Contact the supervisor or event manager first. Then notify venue security. After that, alert company leadership, HR, or your staffing agency.
For serious workplace injuries, OSHA reporting deadlines apply to employers. A work-related fatality must be reported within 8 hours, and an in-patient hospitalization, amputation, or loss of an eye must be reported within 24 hours of the employer learning about it. Be accurate when reporting injuries. Don’t downplay the severity.
After people are safe and the right people have been notified, leave the scene as is unless something there could cause more harm. Don’t clean, rearrange, or remove items unless safety calls for it. Use stanchions, cones, chairs, or other barriers to block the area, and keep emergency exits open.
If you have to turn off equipment, contain a spill, or move something to prevent more harm, write down exactly what changed and why as soon as you can. If part of a spill has to be cleaned, leave an untouched section in place and note what was removed. That helps keep the report tied to what was actually there.
Make a quick note on your phone right away. Record the time, the people involved, and any changes made to the scene. Write down both the time and what changed.
With the scene stable and left in place, move to the facts you’ll need for the written report.
Next, record the incident details while the facts are still fresh.
Once the scene is under control, write down the main facts in this order. A complete report helps keep the response clear and on time.
Every report should include the same basic fields. Use MM/DD/YYYY for dates and 12-hour time with AM/PM. Record at least three time stamps:
Those times may not match, and that gap can matter later during review.
For location, don’t stop at the venue name. Record the exact spot, like "Ballroom B - near the east bar" or "South stairwell between 2nd and 3rd floor." Include the event phase too - setup, guest arrival, dinner service, or teardown. Conditions can shift a lot from one part of the event to another.
For each person directly involved, include their full name, role at the event (such as "banquet server", "security contractor," or "guest"), employer, and a phone number or email address. Add the manager or supervisor on duty at the time.
Describe injuries based on what you saw, not what you think happened. Note the type of injury - for example, "swelling", "cut," or "loss of consciousness" - and the body part affected, like "left ankle" or "back of head." Then record what care was given: first aid on-site, EMS called, or hospital transport. If EMS responded, log both the call time and arrival time.
Scene conditions should appear in every report. Note whether the floor was wet or dry, how the lighting looked, how crowded the area was, and any weather or noise issues that matter. Small details like these can help later follow-up.
Write the narrative in time order using who, what, where, when, and how. Start with what was happening just before the incident. Then describe the incident itself. After that, record the immediate response.
Use neutral, specific wording:
| Instead of this | Write this |
|---|---|
| "The guest was careless and not watching where he was going." | "The guest was looking at his phone while walking toward the buffet and did not look down before stepping on the spill." |
| "The bartender ignored the spill for a long time." | "The spill was first observed at approximately 7:38 PM. The bartender was notified at 7:40 PM and began cleanup at 7:42 PM." |
| "She must have been drinking too much." | "The guest had been at the bar shortly before the incident. I did not observe how many drinks she consumed." |
Keep direct observations separate from witness statements. Use "I observed…" for what you saw and "According to [Name]…" for secondhand information. If something is unclear, write "not confirmed" or "estimated." Don’t plug holes with a guess.
After the core details are down, move to witness notes and evidence while the scene is still fresh.
Once the main facts are on paper, move fast to gather witness statements and other evidence before the scene shifts or people forget small details.
After the area is under control and the core facts are logged, collect witness accounts. Do it as soon as you can. Memory slips fast, and even honest people can mix things up.
Speak with witnesses one at a time in a quiet spot. For each statement, record:
Use open-ended prompts. Don’t steer the answer. Stick to what the witness personally saw or heard, and mark anything uncertain as speculation. Write factual notes in time order. Use a separate form for each witness so accounts don’t blur together. If you can, ask the witness to review the statement before leaving and sign or initial it.
Use a wide → medium → close-up sequence.
Start with wide shots that show the full room layout and where the incident happened in relation to major landmarks like the stage, bar, or nearest exit. Then take medium shots of the exact area, such as the section of floor where a fall happened, the table that collapsed, or the equipment that failed. Finish with close-ups of the exact condition: a spill, frayed cable, broken glass, or missing signage.
Each photo set should also show the surrounding conditions. Include things like floor condition, lighting, warning signs, and any barriers or cones already in place. Before photographing injuries, follow company policy and consent rules. Store incident photos only on approved company devices and systems.
Label every image the same way each time. A simple format is EventName_YYYY-MM-DD_IncidentID_PhotoNumber - for example, RiversideGala_2026-08-22_INC-031_04.
Add a short caption to each image, like:
wide view of ballroom showing spill location near the east bar
close-up of broken stage step edge
Handle the full evidence set - witness statements, photos, and other records - as one incident file tied to a single incident ID.
Then attach related records such as CCTV, radio logs, and medical notes. For CCTV, note the camera ID and time range. Also confirm with the venue who controls access and how long the footage will be kept. Add or reference radio logs, text messages, staff schedules, maintenance reports, and medical response notes when they’re available.
Access should stay limited to people who need it, such as supervisors, HR, risk management, or venue security. Keep files in secure, access-controlled systems. Lock up physical records, and restrict digital files to authorized staff. A simple cover sheet that lists needed attachments and lets staff check them off as they come in can help keep the file complete.
With statements, photos, and records attached, file the report and track follow-up.
Once you’ve gathered the facts, photos, and witness notes, the next job is simple: submit the report, assign follow-up, and track it until it’s closed.
Send minor incidents by the end of the shift. Send serious incidents within 24 hours.
Before you hit send, do a quick check to make sure nothing’s missing. Confirm the incident type, date and time (for example, 08/22/2026, 7:15 PM), location, people involved, immediate actions taken, witness names, and any attached documents. For serious incidents, have a second person review the report first.
Then send it to the right contact based on the issue:
If you’re not sure where it should go, send it to your direct supervisor and let them escalate it.
A report that gets filed and ignored doesn’t make the next event safer. Each incident should lead to a short action list, and each action needs two things: a clear owner and a due date. Tie every action back to the incident ID so anyone reviewing the file later can see what happened and what changed.
Set up a short debrief with the staff involved within 48–72 hours. Use that meeting to review what happened and confirm who owns each next step. After that, do a follow-up check, ideally within 10 working days, to make sure the fix worked and the hazard has been controlled or removed.
Use the event record to see who was on site and who needs follow-up. In Quickstaff, you can review who was scheduled, message involved staff through staff messaging, and keep incident follow-up tied to the same event record.
That matters more than it sounds. When you’re running a large temporary crew, loose texts and buried emails can turn a simple follow-up into a mess. Keeping everything in the event record makes it much easier to see who was there, what was said, and what still needs action.
Incident reporting only works when staff follow the same steps, in the same order, every time.
Use this sequence for every incident:
Used this way, the checklist helps keep every report fast, complete, and consistent.
This is not just paperwork. It is how teams spot recurring hazards and cut risk.
First, stay calm and keep things organized. Document the incident right away, including the date, time, location, staff involved, and exactly what happened.
If safety is involved, note whether first aid was given, whether the person was sent home, or whether they were taken for medical evaluation. If the issue involves lost items, move out of the flow of traffic, contact the affected person, and start the report at once. If the situation is urgent, alert a supervisor right away.
Include the date and time (MM/DD/YYYY), the exact location, and a clear description of what happened. Record the staff involved, any affected guests or witnesses, their contact details, and who filed the report.
If safety was involved, note any injuries, any first aid given, and the immediate corrective actions taken. Check the details against records such as radio logs, security footage, and call logs.
File reports as soon as possible. Write up general safety incidents right away, including near-misses, and open records for lost items or guest reports as soon as they come in.
For OSHA-reportable incidents, the clock matters. Report fatalities within 8 hours and in-patient hospitalizations, amputations, or eye loss within 24 hours of learning about the incident.
Formal debriefs or after-action reports should usually take place within 24–72 hours.