Best Practices for Automating Staff Scheduling
June 17, 2026


Staff scheduling automation works when I set clear rules, clean up staff data, and roll it out in stages. If I skip those steps, software just moves the same scheduling mess into a new system.
Here’s the short version:
If I want automation to help event teams, I need to focus on a few things:
This article explains how I’d set up those rules, prepare the data, test the system, and keep improving results after launch.
Before you set up any tool, get clear on what the automation is supposed to fix. Start with the scheduling problems that slow your team down or cost you money. Then turn those problems into rules the system can apply every time.
The goal is simple: cut admin time, reduce mistakes, avoid overtime surprises, and shorten response delays. Start with numbers you can track. Then build rules that support those targets.
Set goals you can measure. Instead of saying "schedule faster", use something specific, like reducing overtime spend by a set dollar amount or publishing schedules 14 days in advance. In places like Seattle, New York City, and Chicago, schedule changes made with less than 14 days' notice can lead to penalty payments.
Focus on two metrics that match your biggest scheduling issue right now. For example:
That gives you a clear way to judge whether the setup is doing its job after rollout.
Once you know the target, the next step is to define the limits that protect it.
Automation only works as well as the rules behind it. Before you configure anything, write down the non-negotiables: minimum staffing levels by event type, which you can calculate using an event staffing needs analyzer, role-based requirements like a certified bartender or licensed food handler, maximum weekly hours, break rules, and overtime thresholds. These are the guardrails your system will use.
Then go a step further. Spell out how less popular shifts, like Friday nights, holiday weekends, or early morning setups, should rotate across the team. Add fatigue rules too, such as blocking clopening shifts or limiting consecutive workdays. That helps reduce burnout and unsafe schedules.
For high-risk roles, it also makes sense to use hard-locks. These rules stop a manager from assigning someone who doesn't have the right certification or license. In plain English, they block invalid assignments before they happen.
"Staffing automation... is designed to learn your rules, follow HR automation best practices, and adapt quickly to changing demands, so your managers can focus on higher-value work." - Teambridge Team
These rules become the base for your templates and assignment logic.
After you’ve set your goals and rules, the next step is to clean up the data and policies the system will rely on. Clean data and written policies are what make automation accurate. Start with the fields that drive assignment logic most: roles, events, and availability.
Each role needs one fixed definition. That definition should spell out duties, required skills, and minimum qualifications. If managers or event leads use the same role name in different ways, the system won’t be able to match the right person to the right job with much confidence.
Apply the same thinking to event categories. A corporate gala, a wedding reception, and a casual outdoor picnic all run differently. Define each category clearly, then build repeatable shift templates for them. Each template should include fixed start and end times in U.S. format, plus a travel buffer between venues. That structure helps the system avoid common scheduling problems and last-minute conflicts.
Once that structure is in place, you can fill it with staff data.
A useful staff profile should include contact details, skills, availability, and constraints. The system needs to track each person’s certifications, primary and secondary skills, default availability, approved time-off requests, preferred roles, travel limits, and hour caps.
Platforms like Quickstaff support availability tracking, centralized event management, and mobile access, which makes it easier for staff to update availability.
Here’s how each field shapes what the automation does:
| Required Data Field | How Automation Uses It |
|---|---|
| Availability | Prevents scheduling conflicts and double-booking, e.g., Monday–Friday, 8:00 AM – 5:00 PM |
| Certifications | Ensures only qualified staff are assigned to regulated roles, e.g., Food Safety Handler, CPR certification |
| Preferred Roles | Prioritizes assignments based on staff strengths to boost retention, e.g., prefers "Setup Crew" over "Server" |
| Pay Rates (USD) | Calculates real-time labor costs and flags budget variances, e.g., $25.00/hour |
| Blackout Dates | Automatically blocks assignments during approved time-off, e.g., July 4, 2026 |
| Travel Limits | Restricts assignments to venues within a set radius, e.g., max 30-mile radius from home |
| Hour Caps | Prevents unauthorized overtime and manages fatigue, e.g., max 40 hrs/week, max 10 hrs/day |
Those fields become the rules the system uses when assigning shifts.
Turn both written and unwritten labor policies into hard scheduling rules the system can apply every single time. In plain terms, document the rules your team already follows informally, then encode them as system constraints.
This is one of those steps that sounds simple but often isn’t. Frontline managers should be part of it, because they usually know the side agreements, workarounds, and edge cases that never made it into a policy document.
With clean data and clear rules in place, set up the system in three steps. Then turn those rules into templates, alerts, and approval flows.
Start with a reusable event template for each event type you run often. That keeps events consistent and cuts setup time. Each template should include roles, headcount, shift times, and pay codes. Use U.S. time format throughout, such as 3:00 PM–11:00 PM. Once the template is saved, planners can clone it for a new event instead of building everything again.
Next, add eligibility rules. Use an event staff scheduling system so the same rules apply to every assignment. Common filters include:
Then add a priority rule on top. For example, offer shifts first to staff with under 20 hours that week before opening the shift to a larger group.
Once the assignment logic is steady, automate staff communication.
These automations cut the back-and-forth and help fill shifts faster. Send three messages: an assignment notice, a 48-hour reminder, and a final reminder 2–3 hours before the shift starts. The first notice should include the date, time, location, role, expected attire, and pay rate. It should also require staff to confirm or decline by a set deadline. If no one responds by that deadline, move the shift to the waitlist.
Staff should also be able to submit time-off requests, update availability, and request approved shift swaps. But there’s a catch: any swap still needs to meet the same eligibility rules and get manager sign-off.
Here’s what those features do in day-to-day operations:
| Automation Feature | Operational Benefit |
|---|---|
| Automated waitlists | Speeds up backfilling when staff cancel or headcount increases last-minute |
| Availability tracking | Eliminates double-bookings without manual cross-checking |
| Mobile messaging | Keeps all communication in one place so last-minute changes reach staff quickly |
| Approved shift swaps | Reduces coordinator follow-up while keeping eligibility rules intact |
Quickstaff handles this communication layer - reminders, mobile messaging, and waitlist management - inside the same platform used to create events and assign staff, which keeps everything centralized.
Run a pilot before applying those rules across every event.
Before rolling automation across your full operation, test it on one predictable event type or one venue. A recurring Saturday wedding is a good example. The point of the pilot is simple: catch bad rules before they hit the full schedule.
Let the system build the schedule, but have a coordinator review every assignment before publishing. Track:
After several events, fix the rules that caused trouble. Maybe skill filters were too strict and left shifts open. Maybe reminder timing was off. Maybe hour caps blocked shifts from being filled. Use the pilot to tighten the rules, then expand one event type at a time.
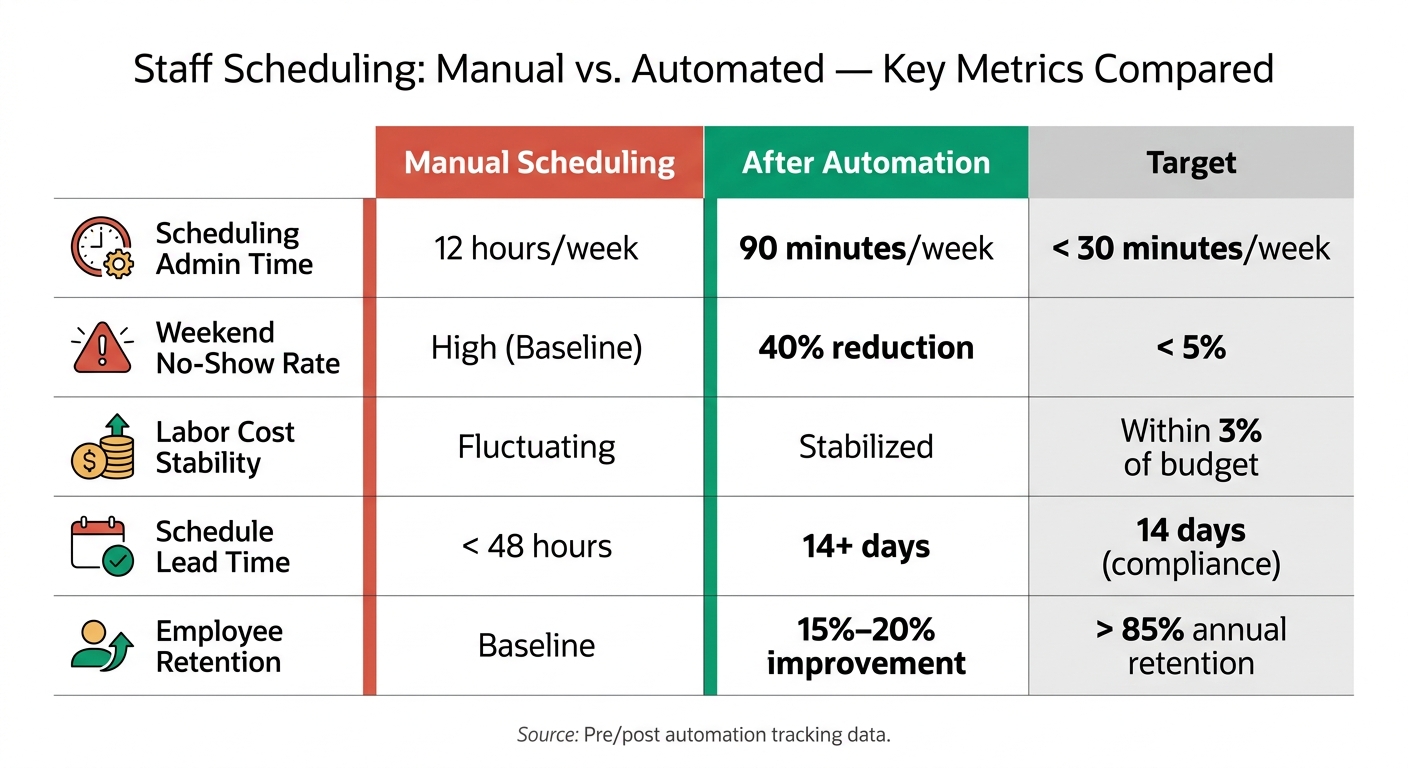
Staff Scheduling: Manual vs. Automated - Key Metrics Compared
Use your pilot results as the starting point, then tighten the rules that still fall short.
Once automation is live, pull a simple report every month. Focus on scheduling admin time, labor cost as a share of revenue, weekend no-show rates, and schedule lead time. Then compare each report against your pre-automation baseline.
| Metric | Manual Baseline | After Automation | Target |
|---|---|---|---|
| Scheduling admin time | 12 hours/week | 90 minutes/week | < 30 minutes |
| Weekend no-show rate | High/Baseline | 40% reduction | < 5% |
| Labor cost stability | Fluctuating | Stabilized | Within 3% of budget |
| Schedule lead time | < 48 hours | 14+ days | 14 days (compliance) |
| Employee retention | Baseline | 15%–20% improvement | > 85% annual retention |
Watch labor costs and weekend no-shows from one month to the next. If costs jump or attendance starts to slip, that usually means the rules need a tune-up. This monthly check also shows whether employees are getting enough notice before schedules go out.
For the first monthly review, use the pilot as your baseline. After 90 days, look at shift distribution. Are the same people getting opening shifts and weekends over and over? If so, that’s a problem worth fixing. You can also let employees rank shift types, so the system gives priority to their top picks when it can.
A few guardrails help a lot:
That kind of balance matters. Predictable schedules help cut burnout and make it easier to keep experienced people on the roster.
"In 2026, the primary reason hourly workers leave their jobs isn't always wages - it is schedule unpredictability." - CrewHR
Research points in the same direction: hourly workers with stable, predictable schedules are 15%–20% less likely to leave within a year than workers with erratic hours.
Peak dates and multi-venue events are a good stress test for your rules. If the system works there, it’s probably in good shape.
For peak dates, use past event data, weather, and local event calendars to set headcount before the schedule opens. That beats scrambling at the last minute.
For multi-venue events, set skill-based rules so each location gets the right people first. If one venue needs a CPR-certified staff member and another needs general floor staff, fill the critical role before sending out secondary assignments. If employees are covering more than one location in a day, add travel buffers so the schedule doesn’t fall apart.
Last-minute callouts are where waitlists do their job. When a scheduled employee cancels, the system should send a mobile alert to qualified, available staff right away. If you operate in a jurisdiction with predictive scheduling rules, flag changes made with less than 14 days' notice so you can avoid penalty payments.
Once the rules, data, and rollout are in place, the next job is simple to say and harder to do: keep the system disciplined.
Scheduling automation works best when the basics are solid. That means clear goals, clean data, and rules the system can actually enforce. Policies can't stay vague or live only in someone's head. They need to be turned into hard rules the platform can follow.
It also helps to roll things out in phases instead of flipping the switch all at once. Then use monthly reporting to spot drift before it turns into a mess. This proactive approach helps you avoid the biggest event staff scheduling challenges that often derail manual systems. Even with that structure, people still need to stay involved. Human review matters most when exceptions pop up or last-minute changes hit.
Here's the big idea: automation makes good processes better, and bad processes worse.
Use budget-friendly staff scheduling tools for repeatable work. Let managers handle exceptions, venue-specific rules, and day-of changes.
Standardize first. Automate second. Then keep refining after launch.
Start by identifying the admin tasks your team repeats most often. A simple workflow review or a quick team survey can help you spot them fast.
Good places to start include:
Quickstaff helps by putting these tasks in one place. Start with one simple workflow first, like automated availability collection, then add more complex tasks over time.
Before automating schedules, clean up and standardize your data so the system runs the way it should. If the data is messy, the output will be messy too.
Start with a close review of your master records. Merge similar roles, remove duplicate entries, and clear out old information that no longer applies. Employee profiles should also follow the same format across the board, including:
It also helps to standardize the rules and records the system will rely on every day. That includes role codes, break rules, time entries, past demand data, coverage requirements, staff availability, and compliance rules such as state labor laws and overtime thresholds.
Run a controlled pilot for 4 to 6 weeks so you can gather solid feedback from managers and employees and catch issues early.
Some teams use a 30- to 90-day sprint with 2-week cycles instead. Either way, the pilot gives you room to fine-tune workflows, rules, and preferences before a full rollout.