Google Sheets for Event Shift Planning
August 26, 2026

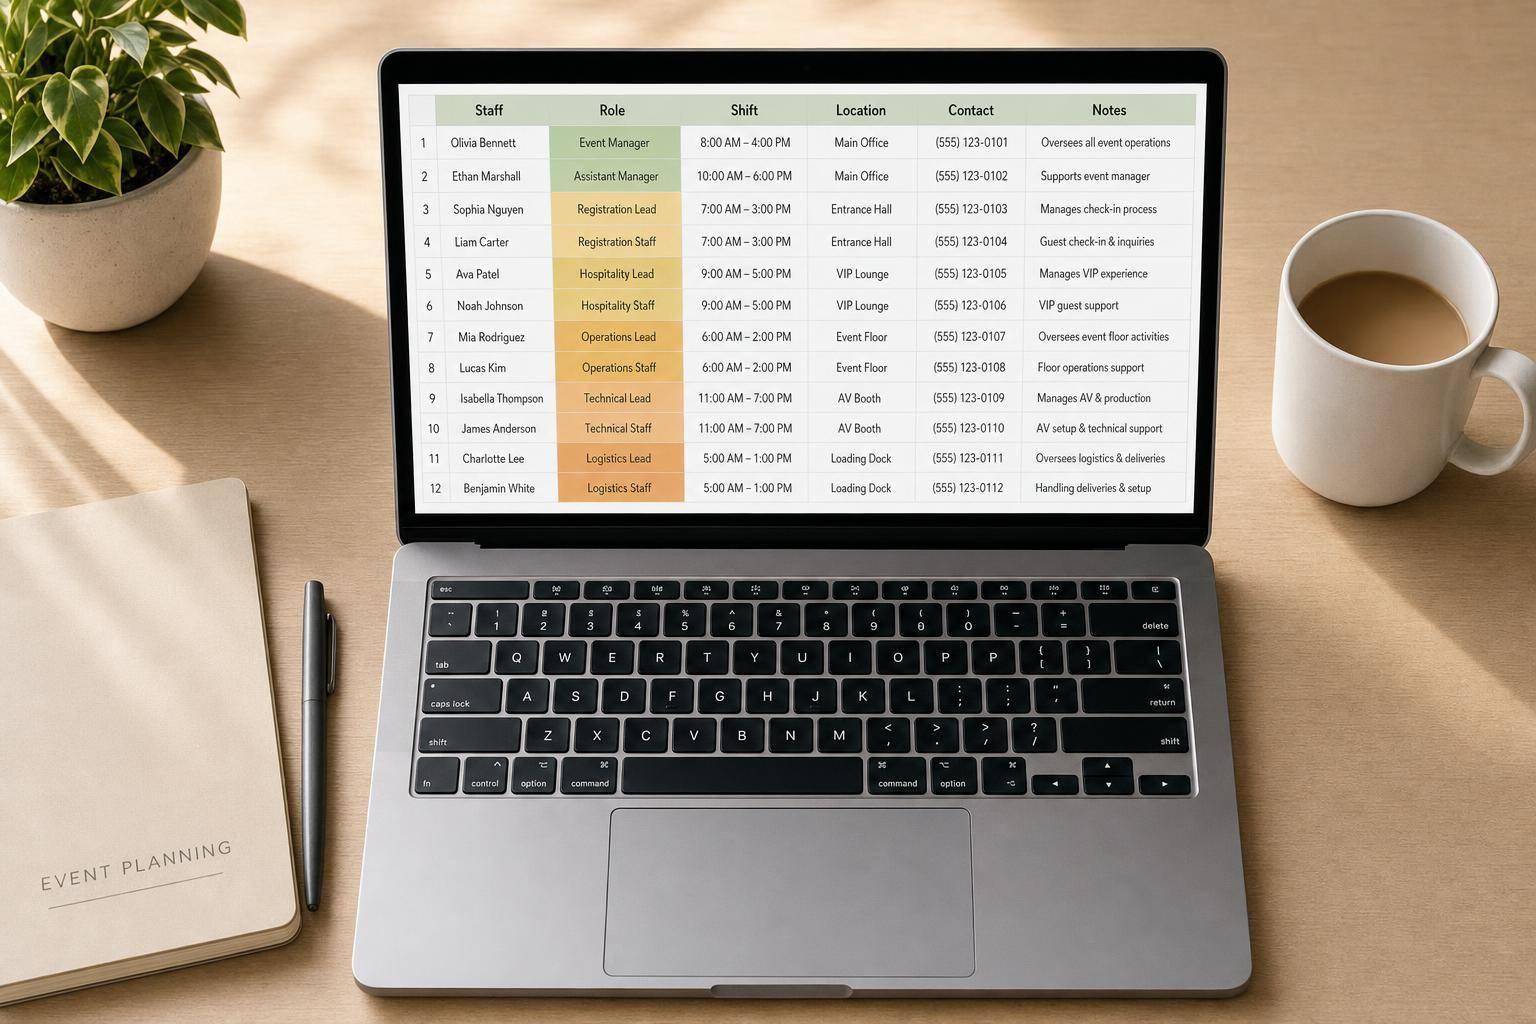
If your event schedule lives in texts, PDFs, and email threads, Google Sheets can fix that with one live file. I’d use a 4-tab workbook to track staff, roles, shifts, and the event-day call sheet so everyone looks at the same schedule.
Here’s the short version:
A setup like this helps cut version mix-ups and staffing gaps, which is one of the benefits of scheduling software. That matters when labor can make up 35% to 50% of an event budget. It also helps when a day-of change hits, like a bartender calling out at 9:00 AM, requiring last-minute scheduling tools.
What I like about this approach is that it stays simple:
This article explains how I’d set up each tab, which columns to use, which formulas to add, how to format the call sheet, and how to keep edits under control without making a second file by mistake.
Google Sheets Event Staffing: 4-Tab Workbook Setup Guide
Figure out the event’s staffing needs before you even open Google Sheets. Write down the guest count, setup and teardown windows, budget cap, and any venue headcount rules first, or use an event staffing needs analyzer to calculate requirements. Those details shape the sheet itself: the columns you need, the dropdowns you’ll use, and the coverage checks you’ll build into the workbook.
Start with every area where staff will be posted. That could include Registration, Ballroom Front-of-House, Ballroom Back-of-House, Bar 1, Bar 2, Kitchen, Load-in Dock, and Coat Check. Give each zone a short, consistent code, like BAR1 for Main Lobby Bar or REG for Registration, and use that exact code across every tab. If your naming shifts from tab to tab, filtering and sorting get messy fast.
Next, break the event into time blocks that match how the day moves. For example: Load-in 7:00 AM–9:00 AM, Registration 8:00 AM–10:00 AM, Dinner Service 7:00 PM–9:00 PM, and Tear-Down 9:30 PM–11:00 PM. Then set a minimum headcount for each zone in each block. Registration may need 3 staff from 8:00–10:00 AM, then only 1 floater from 10:00–11:00 AM. A bar may need 2 bartenders from 5:00–7:00 PM and 3 from 7:00–10:00 PM during peak service. When you spell this out early, the schedule reflects actual coverage needs, not just whoever happens to be free.
Use these zone codes and time blocks as the labels and dropdown values in your schedule tabs.
Each tab has a different job, so the columns should match that job.
The Staff List tab should include: Staff Name, Role, Mobile Number in U.S. format like (555) 555-1234, Email, Pay Type, Pay Rate such as $22.00/hour, and Notes like "Food handler certified" or "Spanish-speaking."
The Shift Schedule tab should include: Shift Date (MM/DD/YYYY), Zone, Shift Role, Start Time, End Time, Total Hours (calculated with a formula), Supervisor, Status (Confirmed, Pending, or Cancelled), and Notes.
Keep Shift Role and Zone in separate columns instead of stuffing them into one field. That way, you can filter for all bartenders assigned to Bar 1 between 7:00 PM and 10:00 PM without doing spreadsheet gymnastics.
Once those fields are set, build the Staff List first so the other tabs can pull from it.
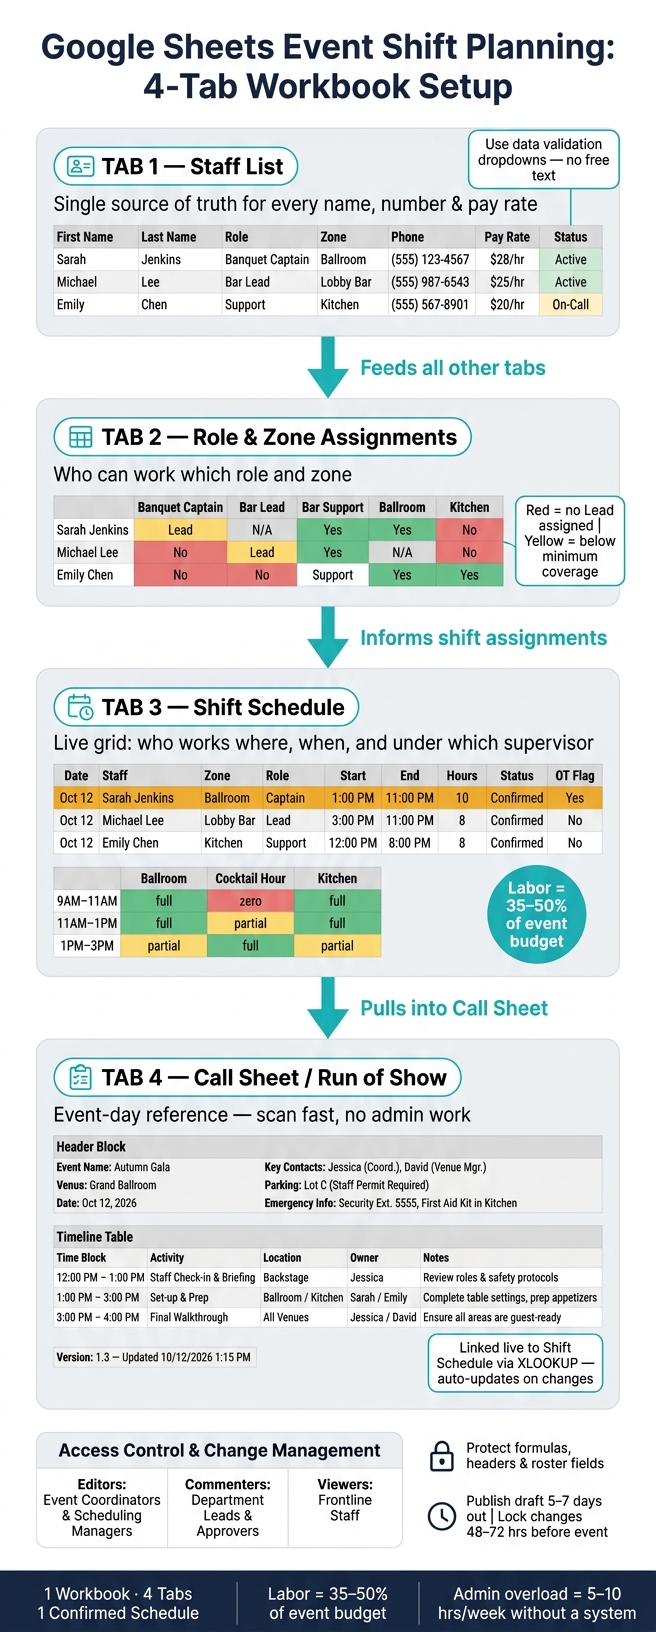
Use one workbook with four tabs:
| Tab | Purpose |
|---|---|
| Staff List | Master record for every person: name, contact info, role, pay rate, notes |
| Role & Zone Assignments | Who can work which roles and zones, skill levels, availability patterns |
| Shift Schedule | The actual schedule: who works where, when, under which supervisor |
| Call Sheet / Run of Show | Event-day reference: call times, zone rosters, supervisor contacts, key timeline |
Start with the staff list. Then build the role matrix. Then move to the shift grid. If you jump around, you'll end up with mismatched data and formulas that fall apart.
The Staff List tab is the single source of truth for every name, number, and pay rate in the workbook. Set up these columns in this exact order: First Name, Last Name, Preferred Name, Primary Role, Secondary Role(s), Primary Zone, Phone (formatted as (555) 123-4567), Email, Hourly Rate (formatted as $22.00), Status (Active or Inactive), and Notes.
Use data validation dropdowns for role, zone, and status. Don't use free text here. One small typo can break VLOOKUP or XLOOKUP references in other tabs.
Use email or employee ID as your lookup key so updates stay lined up across the workbook. Freeze Row 1 and Column A so headers and names stay on screen while you scroll. It also helps to assign one person to manage this tab. If a phone number or pay rate changes, update it here once and let your formulas pull that change into the role matrix and shift grid. That's how you keep the whole workbook from drifting apart.
The Role & Zone Assignments tab does one thing: it shows who can work each role and zone, so every area has the right lead and support mix for the event.
Rows should list staff names pulled from the master list. Columns should cover the roles and zones you use again and again, like:
Use the same validation values in each column every time. For role columns, use values like Lead and Support. For zone columns, use Yes, No, and N/A. So if a server can run the Ballroom on their own, that cell should show Lead.
Conditional formatting makes staffing gaps stand out fast. Set a rule that turns any role column red if no cell in that column contains Lead. That tells you the role has no clear lead assigned.
Add a helper row at the bottom to count coverage in each zone with COUNTIF. Then format that total yellow if it drops below your minimum coverage target. Once qualifications are mapped, the shift grid becomes much easier to fill in without guesswork.
The Shift Schedule tab is your live assignment grid. Each row stands for one staff assignment. Use these columns: Shift Date (formatted Sat 09/13/2026), Staff, Zone, Shift Role, Start Time, End Time, Total Hours, Status, and Notes.
Use dropdowns for Staff, Zone, Shift Role, and Status so entries stay consistent. Format start and end times as 12-hour times with AM/PM, like 9:00 AM and 5:00 PM.
For total hours, use a formula like =(EndTime - StartTime) * 24 so Sheets returns a decimal hour value. Use XLOOKUP to pull hourly rates and calculate labor cost. Then add an OT flag column with =IF(TotalHours > 8, "OT", "") and format that column yellow.
Below the main grid, add a small coverage summary table. Use rows for each time block, columns for each zone, and COUNTIFS formulas to count confirmed staff in each cell.
| Time Block | Ballroom | Cocktail Hour | Kitchen |
|---|---|---|---|
| 9:00 AM–11:00 AM | COUNTIFS(...) |
COUNTIFS(...) |
COUNTIFS(...) |
| 11:00 AM–1:00 PM | COUNTIFS(...) |
COUNTIFS(...) |
COUNTIFS(...) |
| 1:00 PM–3:00 PM | COUNTIFS(...) |
COUNTIFS(...) |
COUNTIFS(...) |
Format cells green when they hit minimum coverage and a lead is present, yellow for partial coverage, and red for zero. Staffing can account for 35–50% of event budgets, so catching a gap here matters. This same grid also becomes the source for the event-day call sheet. Next, use that live schedule to build a clean call sheet for event day.
Turn your shift grid into a call sheet for event day. Use the shift schedule as the source, then strip it down so people can scan it fast. On event day, speed matters more than admin work.
Add a new tab called Call Sheet. Split it into two parts: a header info block at the top and a timeline table underneath.
In the header block, include the event details your team needs right away:
Then add the day-of logistics people always end up asking for:
Keep this header block within the top 10–15 rows. Use bold labels and light fill colors for the header area and the timeline header row. That keeps the sheet easy to read without turning it into a rainbow mess.
Below that, build a timeline table with these columns:
Use the same time format as the main schedule. Break the day into setup, event, and breakdown so each row shows what's happening, where it's happening, and who owns it.
Try to keep the whole sheet to one page. Use 10–11 pt body text with bold headers so it still reads well in print and on a phone.
Don't retype call sheet details by hand. Pull fields from the live schedule so the call sheet stays in sync.
Use XLOOKUP or VLOOKUP to bring in names and roles from the Shift Schedule tab. For example, if you want the name tied to the Bar Captain role, use:
=IFERROR(XLOOKUP("Bar Captain",Schedule!RoleRange,Schedule!NameRange),"TBD")
That way, if the scalable event scheduling plan changes, the call sheet updates with it.
Keep the layout simple enough to read on paper and on a phone. When you're ready to share it, go to File → Print, set paper size to U.S. Letter (8.5" x 11"), choose Current sheet, and use Fit to width scaling. Narrow margins can help the timeline table fit without cutting off text. Then export it through Download → PDF.
Last-minute changes happen. The trick is making them easy to spot without making the sheet chaotic.
Add a version label at the top of the call sheet and keep a separate Change Log tab. Use this format for the version label:
Version: 1.3 – Updated 10/12/2026 1:15 PM
Update that label any time staffing, timing, or contact info changes. In the Change Log tab, include these columns:
Use the Notes / Day-of Updates column for changes the team needs to see right away, and keep deeper internal context in notes. Short entries work best.
Dessert station moved to lobby.
Set up conditional formatting to highlight any cell containing UPDATED or NEW in yellow. That gives people a fast visual cue without cluttering the sheet.
Once the call sheet is stable, lock down access so only the right people can edit it.
Lock the workbook down before anyone starts editing. If too many people can change too many things, your call sheet, change log, and live schedule can drift out of sync fast.
Stick with one master workbook and set access by role. Editors should be limited to event coordinators and scheduling managers who are actively building and adjusting the staffing plan. Give Commenter access to department leads and approvers who need to review coverage and suggest changes without editing cells. Frontline staff should get Viewer access to the workbook or a shared call sheet. They should not have edit access.
In the Share settings, turn off the option that lets Editors change permissions and share the file. That adds a simple guardrail: no one can invite new people or change access without approval.
Once access is under control, lock the parts of the sheet that keep the schedule working.
Use Data → Protect sheets and ranges to lock totals, coverage formulas, headers, and roster fields so the staffing plan stays accurate. Limit those ranges to the coordinators who need to work in them.
Leave the shift grid’s assignment cells open so leads can move people between zones or time blocks without breaking the workbook. A simple visual cue helps here:
That way, people can tell at a glance where they can work and where they need to stay out.
That setup helps stop last-minute edits from breaking totals, coverage checks, and lookup formulas.
Separate files, stale exports, and offline edits are where things start to go sideways. Keep it simple: one workbook, one URL, one confirmed schedule. Make the rule clear - if a shift is not confirmed in the master sheet, it is not confirmed at all.
Publish a draft schedule at least 5–7 days before the event, then lock in major changes 48–72 hours out so staff have time to review and respond.
If the event is big enough that manual edits start slowing the team down, move the work into a dedicated system. Quickstaff handles availability tracking, waitlists, automated reminders, and centralized event management in a mobile-friendly interface.
A single workbook keeps staffing, coverage, and event-day changes tied to one source of truth. For that to work, a few choices need to happen in the right order: define the data once, keep one live workbook, and lock the ranges that matter. Every tab should pull from the same set of roles, zones, and live schedule. When those parts match, the workbook holds up when things get hectic.
That setup cuts down on the event staff scheduling challenges that lead to wasted labor and last-minute confusion. And when events start happening more often, or your staff pool gets larger, the admin load can climb fast. It can add up to 5 to 10 hours per week spent managing conflicts and answering questions. At that stage, Quickstaff makes sense. Quickstaff adds availability tracking, reminders, waitlists, and mobile-friendly scheduling.
One workbook. One confirmed schedule. One place to look.
Split the overnight shift into two entries so Sheets calculates the duration correctly. When one shift runs past midnight, a single row can trigger an error or show a negative value.
Use one row from the start time to 11:59 PM and a second row from 12:00 AM to the end time. It’s a simple fix, but it keeps your staff list tidy and helps your scheduling and payroll formulas stay accurate.
Use one central platform for role-based assignments. Skip the separate spreadsheets. Set up roles like server, bartender, or technician, then assign team members right inside the event record.
That makes day-to-day staffing much cleaner. It cuts down on overlap, makes ownership clear, and gives you a better view of availability across different functions.
With Quickstaff, you can also send role-specific updates and instructions in real time, so staff know exactly what they’re responsible for.
Move from Google Sheets to Quickstaff when spreadsheets start creating too much manual work and friction.
That switch usually makes sense when you’re dealing with double-bookings, missed messages, changing staff availability, or last-minute updates that are tough to keep straight. Quickstaff helps by putting event management in one place, giving you real-time updates, and automating reminders, waitlists, and conflict resolution.