Event Setup Staff: 7 Load-In Steps
August 13, 2026

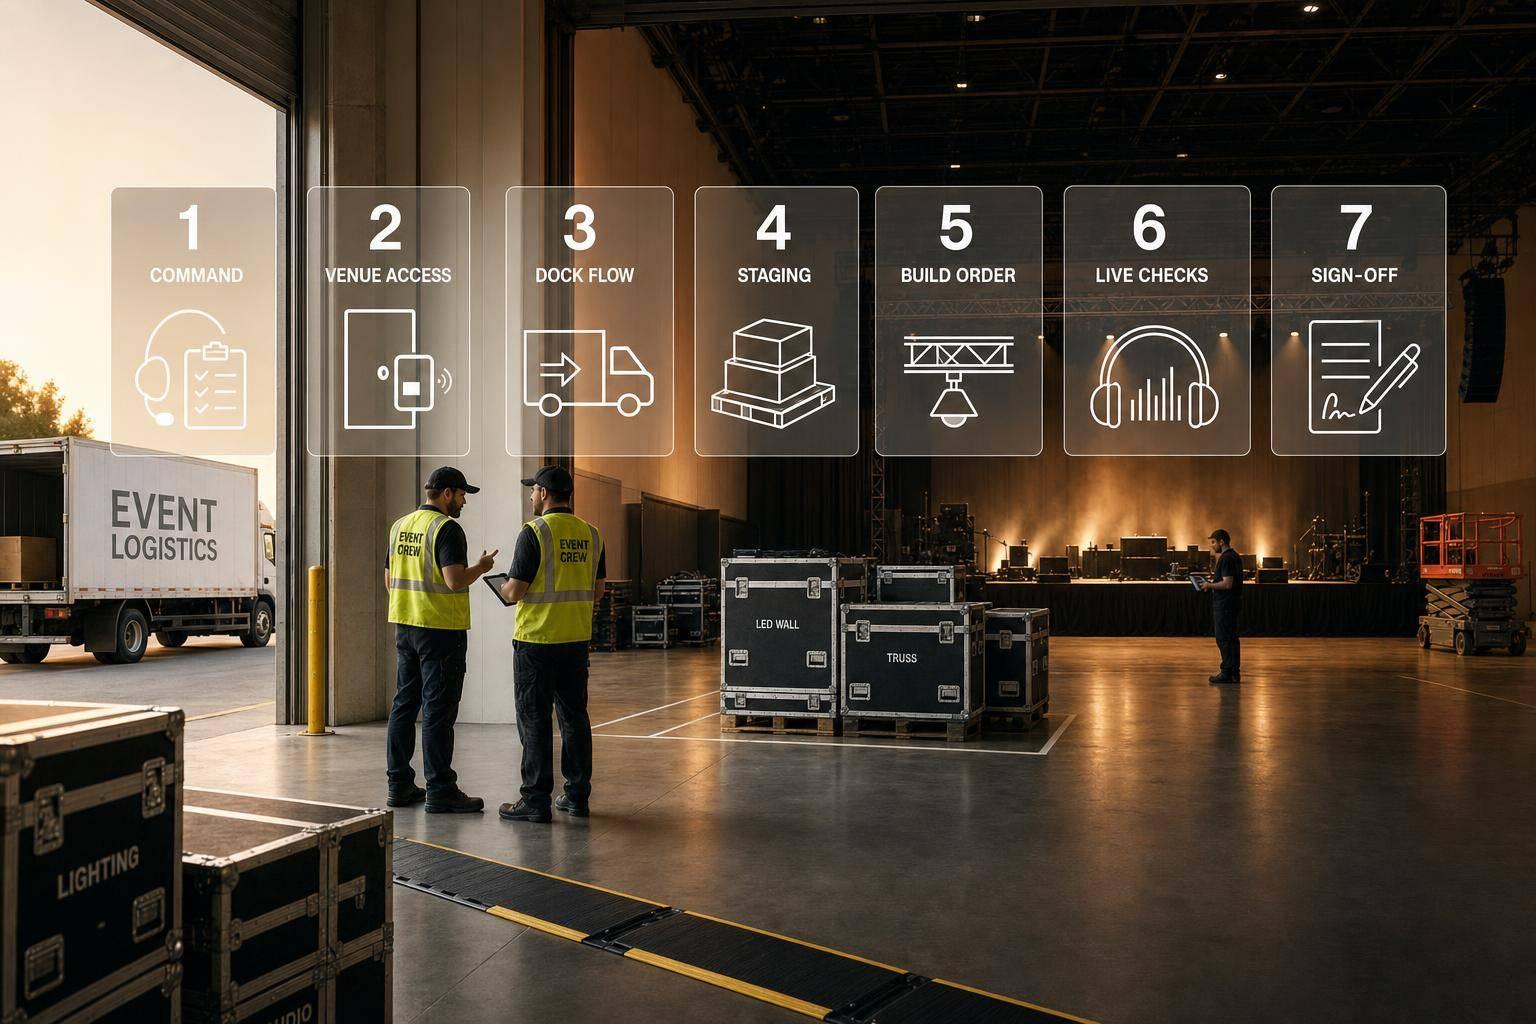
A smooth load-in comes down to 7 steps: assign leads, control venue access, time trucks, stage gear by build order, build in the right sequence, run live check-ins, and finish with a floor-ready sign-off.
If I had to boil the article down to one point, it’s this: load-in fails when teams treat it like a loose arrival window instead of a timed process. One delay at the dock, one blocked hallway, or one skipped check can push the whole day off track. On many event builds, even a 15%–20% slip at one checkpoint is enough to force staff moves and schedule changes.
Here’s the full process in plain English:
| Step | Main focus | What I’d check first |
|---|---|---|
| 1 | Chain of command | Who makes decisions |
| 2 | Venue entry | Access window, doors, elevators |
| 3 | Truck flow | Arrival blocks, bay use, manifests |
| 4 | Staging | Clear lanes, labeled zones, open exits |
| 5 | Build order | Dependencies between teams |
| 6 | Live coordination | Blockers, timing, staff shifts |
| 7 | Final walkthrough | Safety, floor plan, guest-readiness |
The article’s core message is simple: each step depends on the one before it. So if you want fewer delays, fewer crossed wires, and a cleaner handoff before guests arrive, this is the sequence to follow.
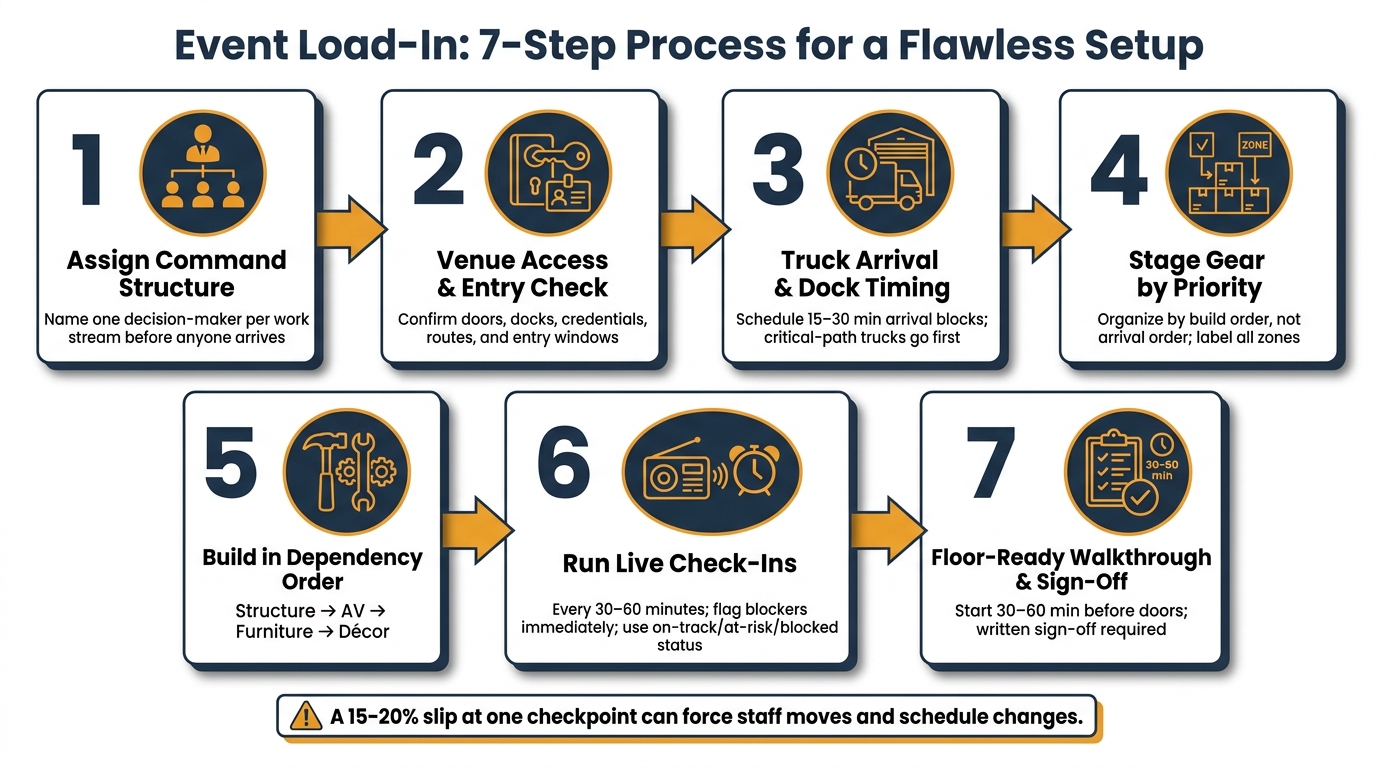
Event Load-In: 7-Step Process for a Flawless Setup
Step 1 turns the load-in plan into a live chain of command.
Before anyone arrives, assign the Load-In Lead, crew leads, dock coordinator, and venue contact. The Load-In Lead owns the full sequence, makes the final call when tasks clash, and handles problems as they pop up. Crew leads run their own areas - AV, decor, catering, and logistics - then report status back to the Load-In Lead. The dock coordinator manages vehicle flow and unloading order. The venue contact confirms access, safety rules, and any building limits.
The core rule is simple: one decision-maker per task stream. If several vendors show up at once, mixed directions can jam the whole process. In that moment, the dock coordinator makes the call so the crew can keep moving.
Set the call time, truck order, and cleared-to-stage time before the crew gets on-site. That timing plan decides who arrives first, when each truck unloads, and when staging can start.
Equipment should move in one direction only:
The Load-In Lead assigns lanes or zones to stop cross-traffic when carts, dollies, pallets, and soft goods all come through the same entrance.
Move to Step 2 only when three things are true: the right gear is on-site, the right crew is in place, and the space is clear. Once those boxes are checked, move to Step 2: venue access and entry check.
Step 2 is about control: who gets in, when they get in, and which entrance they use.
Once the command structure is in place, lock down venue access. Put an Access & Security Lead in charge, and name a backup too. That person should handle keys, access cards, vendor check-in, and any schedule shifts tied to early or late truck arrivals.
Write the entry window into the load-in schedule in U.S. format. For example: Load-in window: 08/21/2026, 7:00 AM–11:00 AM. Add any blackout periods and overtime rules too. Some venues want staff and vehicle lists far ahead of time. Miss those deadlines, and entry can be delayed or denied. If the venue charges for overruns, list that cost in the schedule as well.
Before any equipment goes past the dock, do a quick entry check:
At the start of the access window, the Access Lead should sync with venue staff and confirm that doors and docks are unlocked, alarms are adjusted, freight elevators are set aside for event use, and lighting and HVAC are on in back-of-house corridors. No staging or unloading starts until credentials, routes, and approved zones are confirmed. Once doors, routes, and back-of-house systems are clear, trucks can move in and Step 3 begins.
Once venue access is locked in, the next task is simple in theory and messy in practice: get trucks through the dock without turning load-in into a traffic jam. After the dock schedule is set, the focus shifts to getting every load to the right zone fast.
This schedule needs one clear owner. The Dock Coordinator assigns arrival windows, tracks each truck, and reports status to the Load-In Lead. On bigger shows, a dock marshal may stay at the bay to handle check-ins, direct traffic, and send radio updates to the Load-In Lead.
Dock times are set during pre-production and matched to the build sequence. Critical-path trucks - staging, rigging, and core AV - take the earliest windows. Decor, soft goods, and catering come after the heavy work is in motion. Use 15- to 30-minute arrival blocks, and leave buffer time between them so one late truck doesn’t throw off the next.
The gear flow should be clear and repeatable:
Each unload should go straight to its assigned zone. Floor plans should mark areas like "AV Staging", "Rigging Prep," and "Decor Storage" so the dock crew knows exactly where each load belongs.
A clean handoff means the manifest matches the unload, the gear reaches the staging zone, and the area lead confirms receipt. Then the dock marshal marks the truck complete, logs arrival and departure times, and clears the bay for the next vehicle. Once the dock is clear, staging can start in priority order.
With dock timing done, staging becomes the handoff from transport to build. As soon as the dock clears, the Load-In Supervisor or Floor Captain assigns staging zones and makes sure each department stays in its own area. The goal is simple: keep emergency exits and ADA routes open while putting gear where the build crew can get to it fast.
Staging should follow the build sequence, not the truck sequence. Put rigging and structural pieces in place first. Then stage lighting, video, audio, power, and cabling. Keep décor, furniture, soft goods, and catering gear in separate zones until the main build is in motion.
A finished staging area should look clean and easy to read. Zones need floor tape or signs. Roadcase labels should face the aisle. Carts should sit in straight rows with handles facing out. Critical-path items should be placed closest to where they'll be installed. Egress paths and ADA routes must stay open, and pallets should not be mixed.
Before the build starts, the Load-In Supervisor walks the zone map against the checklist and confirms that the dock, corridors, and placement order are clear. Once staging is signed off, crews can begin the build in dependency order.
Once staging is clear, the team can move into build order. The build lead owns the sequence, clears each phase, manages handoffs, and keeps department leads lined up as work moves through the room.
The order is simple: infrastructure, technical systems, furniture, then decor.
In practice, overhead and rigging work happen first. Stage platforms and risers come next, but only after rigging has been inspected and approved. Core AV systems - sound, video, lighting, and cabling - go in after the structure is stable. Control positions, like the front-of-house audio position, are set after core systems are cabled. Seating and tables come in only when the heavy technical moves are finished. Florals, linens, signage, and other soft goods are last.
Gear should arrive in the same order the work will happen. That means rigging cases and stage decks first, then lighting and audio gear, then furniture, and finally decor. Labeled carts and dollies help each department move in build order without doubling back.
Role clarity keeps the chain from breaking. The build lead watches the floor, solves conflicts, and calls phase handoffs. Department leads - rigging, lighting, audio, and decor - run their crews and confirm when their part is done so the next team can start. General labor handles support work like cable runs, riser assembly, and chair placement. That keeps specialists focused on safety-critical tasks.
The build phase is done when all structures are assembled, all core systems are installed and cabled, furniture matches the floor plan, and egress paths are clear. Then the team hands off to live coordination and testing, which sets up the next floor check.
As the build moves forward, one person should run the floor-wide checkpoint process. That might be the floor lead, technical production manager, event setup supervisor, lead banquet captain, production stage manager, or technical director, depending on the event.
That person owns live decisions and escalations between the client, venue, and crew. They’re also the only person who can shift staff during load-in, approve changes to the plan, or move tasks up or down the priority list. Make this person easy to spot. Use one clear identifier, like a vest, a radio channel, or a call-sheet label, so the crew knows exactly who has decision authority.
From there, the floor lead uses checkpoints to keep the build lined up with the schedule.
Check in at milestones, not just by the clock. For a 4–6 hour load-in, run a check-in every 30–60 minutes. On more complex builds, tighten that gap. Each check-in should connect to finished build phases from Step 5, especially after major handoffs like risers installed, AV patched, or the room reaching the halfway-furnished point.
Keep each check-in short and practical:
Communication also needs clear lanes. Use separate channels for urgent and nonurgent updates. Radios should handle dock conflicts, safety issues, and same-day schedule changes. A dedicated event control channel should keep the coordinator, production manager, and department leads in sync, while separate channels cover security, medical, and dock operations. Messaging apps or shared run sheets can handle nonurgent details like updated layouts, task notes, or reminders.
You’ll know the crew is on track when milestones hit on time and no blockers stay open. Good signs include stage decks fully assembled, primary power drops tested, the main audio system powered and passed line check, and the furniture layout 80% complete before décor crews move in.
If one team slips 15–20% behind at a checkpoint, deal with the cause right away and reassign the work.
After the final build milestone, run the floor-ready walkthrough. This is the last full check before guests arrive. It closes the build phase and turns the room over for sign-off.
Start the walkthrough 30–60 minutes before doors open. Don’t leave it until the last minute.
The right people need to be in the room. That usually includes the event operations manager or production manager, the client rep, the venue manager, and the lead from each major vendor. The AV lead should confirm audio coverage, lighting focus, and video playback. The catering captain should check service stations and back-of-house routes. The security chief should verify crowd flow, emergency access, and entry control. If the event leans heavily on entertainment, the technical director or stage manager should also join to confirm show readiness.
Inspect the room in this order:
Walk the same route a guest would take. That makes it easier to spot sightline issues, pinch points, and slow-moving areas before they turn into a problem.
Once the room passes inspection, move to formal sign-off. Use written or digital sign-off, not a verbal thumbs-up. Sign-off confirms that setup is complete, tools and cases are out of guest areas, safety checks are done, and the room matches the contracted floor plan and event specs.
After sign-off, any major change becomes a change order. At union venues or touring productions, sign-off may also mark the handoff from build crew hours to show crew hours, which can affect payroll and labor rules.
Record the basics every time:
Log the walkthrough and all corrections in the same system used to track load-in status and scheduling.
Use the same system that handles sign-off to run the live load-in schedule too. Scheduling software ties each load-in step to an owner, role, and time block. With Quickstaff, managers can set roles like dock marshal, floor lead, AV tech, décor crew, catering staff, and runners, then assign staff right inside the event record.
Availability filters help fill early-arrival shifts with qualified staff. If someone drops out, pre-approved backup waitlists make it simple to slot a qualified replacement into the opening.
After assignments are in place, that same record can handle schedule changes as they happen. It can also communicate with staff via role-based updates while keeping dock location, truck sequence, client requirements, and staging priorities in one mobile-accessible place.
A mobile dashboard keeps assignments, notes, and schedule changes visible on-site.
For mobile crews, that means every load-in step stays visible and on schedule.
These steps turn load-in from a scramble into a controlled sequence. Smooth load-in depends on seven connected parts: command, access, timing, staging, build order, live coordination, and sign-off.
Miss one step, and you invite delays and safety issues. The impact shows up right away.
When the process is handled well, teams cut idle time, move handoffs along faster, and give clients a clear sign-off before doors open. That’s the practical upside.
Put the sequence into SOPs, assign a clear owner for each part, and debrief after every event to fine-tune timing and checklists. Once the process is documented and owned, it’s much easier to repeat from one event to the next. A tool like Quickstaff keeps roles, schedules, updates, and sign-off in one place.
A designated logistics or project lead should own the full load-in timeline and act as the single source of truth. That cuts down on confusion fast.
They can still hand off parts of the work. But each task needs clear ownership. When you pair that with a central tool like Quickstaff, everyone can see who’s doing what, what depends on what, and when each part needs to happen.
If a truck misses its dock window, managers need to move fast to prevent load-in delays. With Quickstaff, they can shift staff assignments and reorder tasks in real time based on equipment availability.
Platform updates help keep the team aligned with the new timeline, and mobile access makes it easier to track priorities and alert only the staff affected.
Scheduling software helps managers keep load-in on track in real time. It gives them one mobile-friendly place to see staff, roles, locations, and tasks as setup moves forward. With Quickstaff, the roster stays up to date throughout the process.
Teams on-site can update task status right from their phones. At the same time, managers can watch check-ins, shifts, and live progress without bouncing between tools. Real-time messaging also makes it easier for coordinators to share changes fast, so the crew stays on the same page.