Event Vendor Communication Guide for Teams
August 5, 2026

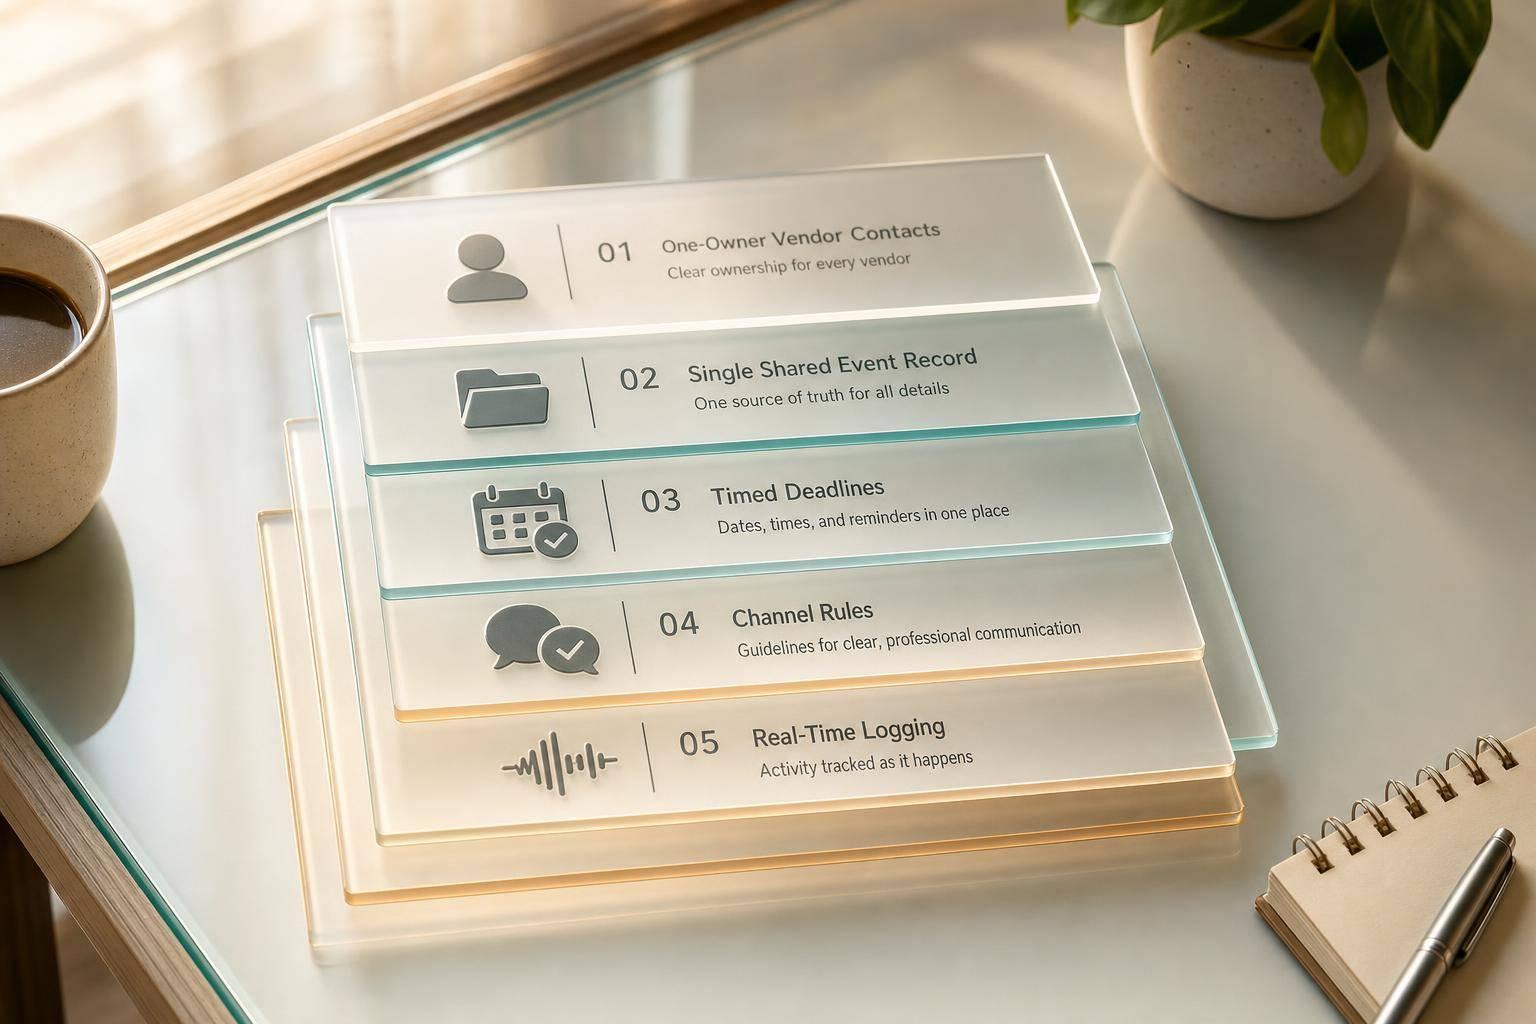
Most event vendor problems come from one issue: too many messages, too many owners, and no single current plan.
If I had to sum up this guide in a few lines, it would be this: pick one contact for each vendor, keep one shared event record, set deadlines at 60–90 days, 30 days, 14 days, 7 days, and 48 hours out, and use the right channel for each message. That alone can cut missed handoffs, late arrivals, and event-day confusion.
Here’s the article in plain English:
A few details stand out. The guide treats 14 days before the event as the last major change point. It also suggests 10–20 minute morning briefings and 15-minute load-in windows to keep arrivals in order. For delays, it separates routine, urgent, and critical issues so the team knows who acts first.
This is not about sending more emails or texts. It’s about sending fewer, clearer updates from the right person and keeping the whole team on the same page.
If I were using this guide, I’d treat it as a simple rulebook: one message, one owner, one current record.
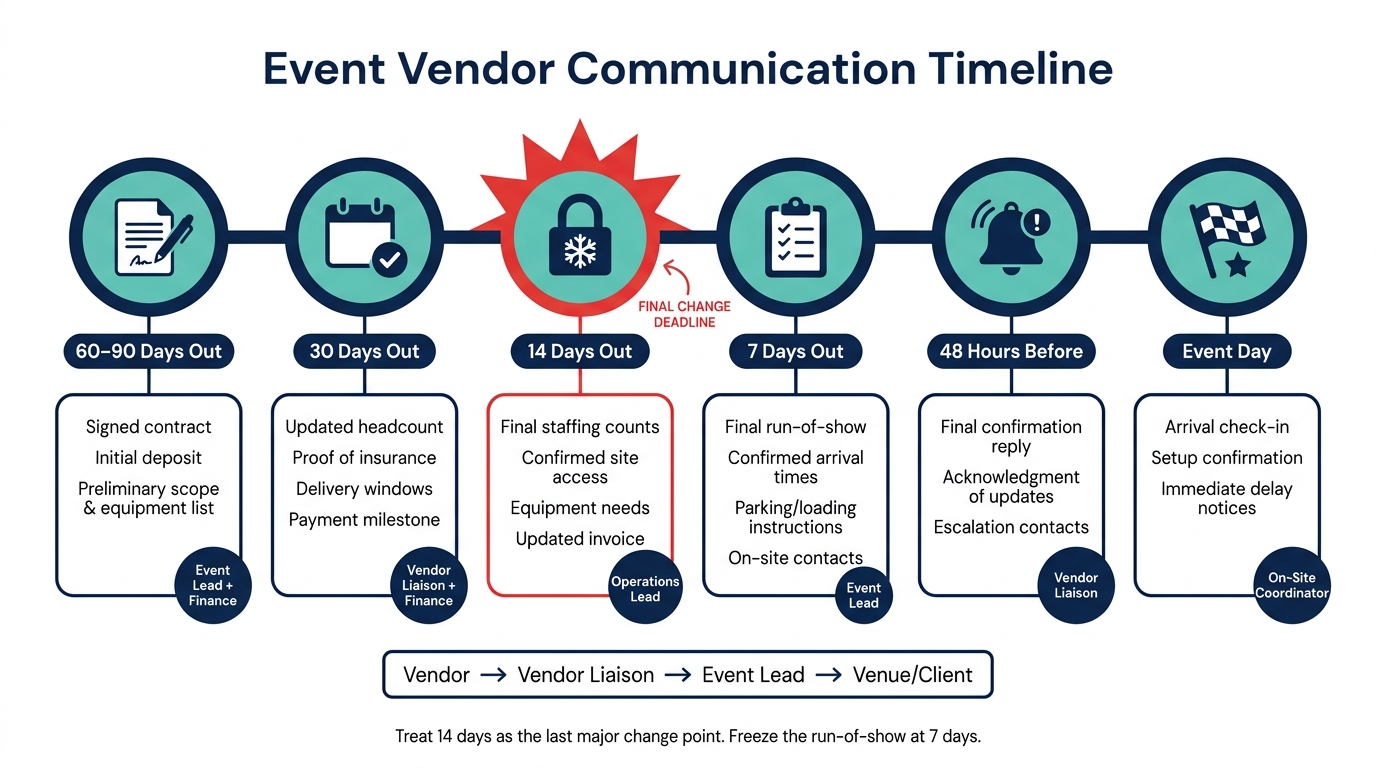
Event Vendor Communication Timeline: Key Milestones & Deadlines
A vendor communication plan is a timeline-based system. Each stage should have one owner, one due date, and one required update. Build it backward from event day so nothing slips through the cracks.
Each milestone helps stop a specific problem before it turns into a mess: contract drift, late headcount changes, missed access details, or day-of confusion.
At 60–90 days out, lock in signed contracts and initial deposits. At 30 days out, tighten headcount estimates, share early staffing numbers, and hit payment milestones. By 14 days out, confirm near-final guest counts, load-in windows, site access details, and staffing rosters. Treat the 14-day mark as the final change deadline.
Then comes the last stretch. At 7 days out, do final checks: freeze the run-of-show, reconfirm arrival times, and verify each vendor’s on-site contact and backup number. At 48 hours before, send one last confirmation that covers any recent changes and contingency plans. On event day, use an event day checklist to stay prepared, as communication becomes real-time: check-ins, arrival logging, and documenting changes as they happen.
| Planning Stage | Vendor Deliverables | Internal Owner | Response Deadline |
|---|---|---|---|
| 60–90 days out | Signed contract, initial deposit, preliminary scope and equipment list | Event lead + Finance | Within 5–10 business days |
| 30 days out | Updated headcount, proof of insurance, delivery windows, payment milestone | Vendor liaison + Finance | By 30 days before the event; internal deadline 2–3 days earlier |
| 14 days out | Final staffing counts, confirmed site access, equipment needs, updated invoice | Operations lead | 10–14 days before the event; internal deadline 24–48 hours earlier |
| 7 days out | Final run-of-show, confirmed arrival times, parking/loading instructions, on-site contacts | Event lead | 5–7 days before the event; internal deadline 1–2 days earlier |
| 48 hours before | Reply to final confirmation email, acknowledgment of any updates, escalation contacts | Vendor liaison | Within 24 hours |
| Event day | Arrival check-in, setup confirmation, immediate notice of delays or issues | On-site coordinator | Immediate |
Once the timeline is in place, match each update to the channel that fits the moment.
Not every message belongs in email. And not every urgent issue can wait for one. Use the channel that fits the stakes and the speed you need.
Email should be your default for anything that needs a paper trail: contracts, scope changes, payment confirmations, and run-of-show updates. Phone calls are best when you need a fast answer to something messy or time-sensitive, but follow up with a recap email so everyone has the same record. Text messages work well for short day-of updates, like arriving at the loading dock or running 10 minutes late. Radios and group messaging apps help with live on-site coordination, but if a decision gets made there, log it in writing afterward.
| Channel | Best Use Case | Documentation Value | Expected Response Time |
|---|---|---|---|
| Approvals, contracts, scope changes, written confirmations | High | Same day to 1 business day | |
| Phone call | Urgent clarifications, complex problem-solving | Medium (follow up with recap email) | Immediate |
| Text message | Short day-of updates, arrival alerts, timing changes | Low to medium | Minutes |
| Radio / group messaging | On-site coordination among crews and leads | Low unless logged afterward | Immediate |
Then put every decision in one shared place. That way, texts, calls, and emails don’t start telling different stories.
Keep one current run-of-show, one master vendor list, one contact per vendor, one shared floor plan, and one change log. If those items are scattered across inboxes, spreadsheets, and chat threads, details drift fast. What your team decided on Monday can easily clash with what a vendor heard on Friday.
Quickstaff can centralize staff schedules, event details, reminders, and availability in one mobile-friendly system. With that setup in place, the next step is simple: assign who sends each update and who steps in when problems need to be escalated.
Once the master plan is set, decide who sends each update and who approves exceptions. A plan on paper doesn't do much unless someone clearly owns confirmations, check-ins, and escalation.
Assign one owner to each vendor communication role before the event starts. Smaller teams often combine roles, and that's fine. But each function still needs one person in charge, and the Event Lead should stay the final decision-maker.
The four core roles are the Event Lead, Vendor Liaison, Zone Lead, and Runner. Here’s the breakdown:
| Role | Core Vendor Duties | Decision Authority |
|---|---|---|
| Event Lead (Event Manager) | Approves vendor selections and contracts; locks the final timeline; leads pre-event briefings; handles client-facing decisions | Can approve minor cost, timing, or staffing changes within preset limits |
| Vendor Liaison | Maintains the vendor contact list; sends confirmations; manages load-in and load-out; logs every change; handles routine issues | Can approve minor cost, timing, or staffing changes within preset limits |
| Zone Lead | Oversees a specific area such as the ballroom, kitchen, or bar; monitors service quality; flags emerging issues to the liaison | Makes local layout adjustments; reassigns staff within the zone; can pause vendor activity for safety concerns |
| Runner | Escorts vendors to load-in; relays messages between zones; picks up backup supplies; delivers printed updates | Minimal formal authority; executes instructions from the liaison and zone leads; escalates unsafe or off-plan issues immediately |
For small, compact events, one person can cover both Vendor Liaison and Zone Lead. You can also combine Event Lead and Vendor Liaison, but only for simple events with a low vendor count. Put the contact chain in the run sheet so every vendor follows the same escalation path. That avoids the classic event-day mess where one vendor texts the client, another calls the venue, and nobody knows who’s making the call.
The communication chain should be: Vendor → Vendor Liaison → Event Lead → Venue representative or client, if needed. Tell vendors to contact the named liaison first, not the client or venue. Put the liaison’s cell number on every vendor brief and run sheet, and include a backup contact in case that person can’t be reached.
Not every issue needs to climb the full ladder. Split problems into three levels so the team knows who decides and how fast to act:
On event day, vendors should go to the liaison first. The liaison then handles communication with the client.
With roles and escalation set, the next step is to standardize the messages themselves.
Ad hoc messages often leave out the details that matter most: the load-in window, the parking note, the reply deadline. That’s how small mix-ups turn into day-of problems. Templates help keep the current plan in front of everyone, in every message. They also make vendor communication faster, more consistent, and much easier to check.
Three email types can handle the full pre-event cycle, and each one does a different job.
Outreach emails should stay light. Include the event date, city, rough scope, and one clear call to action, such as: "Are you available for October 12, 2026?"
Information request emails come next, after the vendor is chosen. These should ask for the details you need to run the event well, like staff count, arrival time, equipment needs, and insurance certificates. A bullet-point format works best here because vendors can reply fast without writing long paragraphs.
Final confirmation emails should go out 48–72 hours before the event. This email becomes the main day-of reference, so it needs to be complete and easy to scan.
Every final confirmation should include:
Subject lines should be easy to search and built for action. For example: [ACTION REQUIRED] Final Details – Smith Wedding – Oct 12, 2026 – Catering.
Once the event starts, email gives way to text. Day-of updates need to be short and direct. Each text should answer four things: who, what, where, and when.
A morning check-in might look like this: "Good morning! This is Alex, event lead for the Smith Wedding at Grand Oaks today. Can you confirm your arrival time for catering load-in between 2:00 PM–3:30 PM?"
A delay reply could say: "Thanks for the update. We can accommodate a 2:50 PM arrival; please go directly to the main dock and call me when you arrive."
And when the schedule shifts, send the new timing in plain language: "Quick update: Toasts moved to 7:15 PM, cake cutting to 8:00 PM. All other timing stays the same. Reply 'Got it'."
Phone calls still matter, especially when timing is tight. During the call, confirm the arrival time, the entry point, and what the vendor should do next. Then send a short text or email recap right away so there’s a written record of the agreement.
The same template mindset should apply to corrections and schedule changes. Every approved change needs to be logged right away with a timestamp, requester, approver, and short recap. For example: "As discussed on our call at 2:30 PM today, your new arrival time is 2:15 PM, and dessert service is moved to 8:00 PM."
That recap should update the master record, not just sit in one person’s inbox. If the change lives only in a single email thread, the team can still end up working from two different versions of the plan.
Quickstaff keeps internal staffing updates aligned when vendor timelines shift.
Once the communication plan is set, event day is all about execution. Check in vendors, track changes, and escalate fast. When the event starts, stop planning and start running the play: follow the run sheet, checkpoints, and escalation chain.
Start the day with a short pre-shift briefing, about 10–20 minutes. Go over the main run-of-show time anchors, like when doors open, when meal service starts, and when the program ends. Cover communication rules, zone assignments, and emergency exits too.
As vendors arrive, send them through a designated check-in station staffed by the Vendor Liaison. Log each arrival, give them a printed or digital floor plan, and walk them to the right zone. Before setup begins, confirm power, access, and venue rules, including fire marshal, union, and ADA requirements. Use a clearance check, and only clear the vendor after the technical check is done and the setup area is confirmed.
Use staggered load-in windows in 15-minute blocks for each vendor so the loading dock doesn't turn into a traffic jam. Assign one contact per vendor or zone. At the briefing, set clear rules for radios and group chats:
After vendors are in place, stick to the same chain for every issue instead of opening a new line of communication each time.
Try every contact channel and log each attempt with a timestamp. Here's how to handle each type of issue and who owns the next move:
| Problem | Severity | Immediate Action | Responsible Role |
|---|---|---|---|
| Vendor running 10–15 min late (critical service) | High | Call + text; assess schedule impact; notify Event Lead | Vendor Liaison |
| Vendor running 20–30 min late (ancillary service) | Medium | Text vendor; adjust signage or activation timing | Zone Lead |
| Complete no-show | Critical | Document all contact attempts; activate backup plan; brief Event Lead | Event Lead + Vendor Liaison |
| Service failure (e.g., AV outage, food shortage) | High | Triage on-site fix; pause service if needed; brief the client on the fix and next step | Event Lead |
Escalate critical vendors after 10–15 minutes with no contact. For ancillary vendors, allow 20–30 minutes. The Event Lead decides when and how to update the client. The Vendor Liaison handles all direct vendor communication. That split matters. It keeps vendors from getting mixed messages and shields the client from day-of operational noise.
Log every issue in real time. Include the vendor name, scheduled time, actual arrival or issue time, contact attempts, actions taken, and any client notifications. When things get messy, this log helps the team make clear calls on the spot and makes the debrief far easier later.
The habits that cut event-day confusion start long before doors open. Keep a clear escalation path so issues move through set levels - Zone Lead to Vendor Liaison to Event Lead - without clashing instructions reaching vendors or clients. The most important habit is simple: update the master record the moment anything changes, then alert the right people through the agreed channel. Quickstaff keeps internal staffing updates visible when vendor timelines change.
Move away from scattered texts and verbal check-ins. Use a centralized digital tool instead.
Platforms like Quickstaff keep rosters, shift assignments, and message history in one place. That means your team can check live, accurate info on mobile without chasing updates or piecing things together from old messages.
You can also link event notes, floor plans, and equipment lists directly to each assignment. Pair that with a clear chain of command, standard logs, and handling every shift change inside the platform.
Set clear communication protocols before the event. Give each vendor group one named contact, and make that person the ONLY point of contact.
Let vendors know that every question needs to go through their assigned contact or lead coordinator. That keeps things simple. It cuts down on confusion, stops mixed messages, and makes sure everyone gets the same direction.
Small event teams can keep communication tight by combining roles and working from one shared system. It’s common for one person to cover more than one job, like serving as both Incident Commander and Operations.
To cut down on confusion, give each vendor stream one named decision-maker. Then use Quickstaff as the single source of truth for rosters, shift assignments, and live updates, so your team isn’t stuck chasing old info or digging through scattered text messages.