Event Emergency Training: Program Design Guide
August 3, 2026


If your team can’t explain who does what in the first few minutes of an emergency, your plan isn’t ready. I’d boil this guide down to six steps: rank the main risks, assign each task by role, train people in short modules, lock down communication paths, run drills on a set schedule, and keep records current.
Here’s the short version:
A few numbers stand out. The guide points to alcohol-related medical cases making up as much as 25% of presentations at some large public events. It also suggests core training blocks of 30–60 minutes, refreshers of 30–45 minutes, and after-action reviews within 24–72 hours.
| Area | What I’d focus on |
|---|---|
| Risks | Weather, crowd issues, power loss, medical calls, active threats |
| Roles | Clear task owner for every emergency action |
| Training | Short core training plus job-specific practice |
| Communication | One command lead, one main channel, backup methods |
| Drills | Monthly, quarterly, pre-season, and event-week practice |
| Records | Training logs, drill logs, action items, plan updates |
In short, this article is about building a training program your staff can repeat before every season, every big event, and after every lesson learned. For larger operations, following an ultimate guide to scalable event scheduling ensures your training and staffing systems grow together.
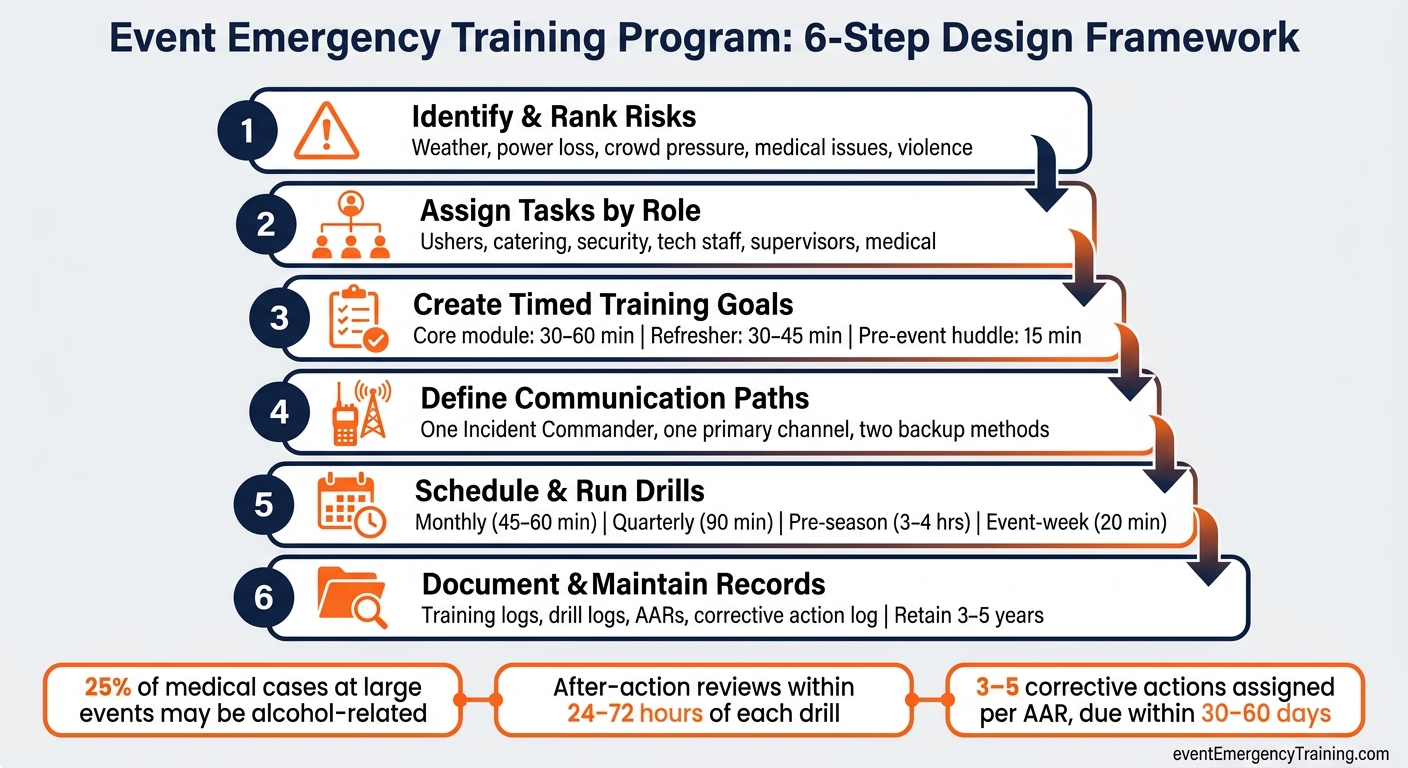
Event Emergency Training Program: 6-Step Design Framework
Program design starts here, before you put a single drill on the calendar. Once you have event staff scheduling in place, you can begin mapping out the training timeline. If this part is loose, the rest of the training usually drifts. If it’s solid, your team trains for the emergencies they’re most likely to face.
Event risk changes based on the venue, season, crowd size, and the kind of activity taking place. That’s why a structured hazard assessment should come first in any program design process.
In the U.S., common event hazards usually fall into three broad groups. Natural hazards include severe weather, extreme heat, tornadoes, and floods. Technological hazards include power failures, equipment malfunctions, and hazardous materials incidents. Human-caused hazards include crowd surges, active threats, and civil disturbances.
Crowd management should be near the top of the list for dense or high-energy events. The risks that deserve the most attention often depend on a few practical factors:
Alcohol can shift the medical picture in a big way. At some large public events, alcohol-related medical presentations account for up to 25% of cases.
The goal is simple: rank your credible hazards by likelihood and potential impact. That way, training time goes to the scenarios that matter most, not just the ones people talk about the most.
Use that ranking to assign responsibilities in the next step.
Start by listing the emergency actions your event may require. Then assign each action to the staff group best placed to handle it. After that, check whether each group has the tools, access, and skills needed to do the job. Record those assignments in the emergency action plan and in role cards. Each task should line up with the highest-priority risks from your hazard ranking.
Here’s how responsibilities often break down across common event staff groups:
| Staff Group | Primary Emergency Responsibilities |
|---|---|
| Event Command / Incident Commander | Overall decisions, activating the emergency plan, coordinating with police, fire, and EMS |
| Front-of-House (ushers, guest services) | Recognizing early warning signs, directing guests to exits, assisting guests with disabilities |
| Catering Crews | Shutting down open flames and equipment, monitoring alcohol service, reporting medical or behavioral concerns |
| Supervisors | Confirming zone accountability, relaying status updates to command |
| Security | Crowd control, perimeter management, access control, initial response to disturbances |
| Medical Personnel | Triage, treatment, EMS handoff |
| Technical / Production Staff | Managing power systems, AV/lighting, switching to backup systems, supporting emergency announcements |
| Volunteers | Wayfinding, crowd direction, distributing water or supplies under supervision |
Any gap you find during the capability check should move straight into your training plan. If a team owns a task but lacks the skill, access, or equipment to carry it out, that’s not just a planning note. It’s a training priority.
From there, turn each assignment into measurable role-based objectives.
Write objectives that trainers can see, time, and score during drills. Weak objectives lead to weak training. The fix is straightforward: write each one as an observable action with a time limit and a performance standard.
Each objective should do three things:
For example: Ushers will verbally direct guests to the nearest exit and lead them to the assembly point within 5 minutes of an evacuation order, using the scripted phrases and route maps provided.
For security: During drills, security personnel will establish a secure perimeter at designated access points within 3 minutes of a lockdown call and prevent unauthorized entry 100% of the time.
For technical staff: Given a simulated power failure, AV technicians will switch to backup power and broadcast the emergency message within 2 minutes of the outage.
Time-bound criteria matter because they give you something concrete to measure during drills. A 4-minute zone-clearance target can be scored. It can also be checked later for compliance. That’s what makes these objectives the link between planning and evaluation: they keep the program tied to a clear start-to-finish training workflow.
Take your hazard rankings and role assignments and turn them into a lean training plan. The aim is NOT a giant safety binder nobody finishes. You want training your team can actually get through without taking people off the floor for an entire day.
Before anyone works an event, every staff member should complete the same basic training. Build one combined 30–60 minute core module around your top hazards.
Six topics should be part of every event team's baseline training:
Split this between onboarding and refreshers. New hires should get the full baseline block before their first event. Returning staff can complete a shorter refresher, usually 30–45 minutes, once or twice a year or before a new season starts.
For a high-risk event, such as a large outdoor wedding or a corporate gala, a quick 15-minute emergency huddle can help a lot. It gives staff a fast review of routes and responsibilities without pulling them away from setup.
After the baseline training, each group should learn the tasks it will actually carry out. The depth and focus change a lot by role.
Supervisors, banquet captains, and venue coordinators need more than basic procedure knowledge. They need practice making calls under pressure. Their training should cover incident command basics, escalation thresholds, and how to delegate clearly when things get tense. A short event scenario works well here. It gives supervisors a chance to practice fast decisions in a low-stakes setting, which helps them act faster and speak more clearly during a live incident.
Frontline service staff - servers, bartenders, banquet assistants, and lead servers - need steps they can remember and repeat under pressure. Focus their training on how to notify a supervisor, what to say to guests, and how to clear obstacles without causing confusion. Sample guest-facing language can include: Please follow me calmly to the nearest exit. Role-play common event issues, like a fainting guest or a fight near the bar, so the process feels concrete instead of vague.
Specialist and contractor crews need to line up with the venue's full emergency plan, not just their own technical procedures. AV and production teams should know safe shutdown sequences and how to support emergency announcements. Security teams need detailed protocols for access control and coordination with law enforcement. Rigging and staging contractors must understand wind and load limits for outdoor setups and know what to do if a temporary structure becomes unsafe. Contractors should review the house emergency plan during onboarding, sign off on key procedures, and take part in one annual drill.
Use each training format for the skill it teaches best: decision-making, task execution, or full-response coordination.
Tabletop exercises are best for building understanding and helping people make decisions. Use them when you're rolling out new procedures or training supervisors on escalation choices. They can usually be done in 30–45 minutes with a floor plan and a few "What would you do?" prompts. No major disruption to operations.
Hands-on station practice fits practical skills. That includes escorting guests with mobility aids along accessible routes, setting up emergency signage for alternate exits, or running communication drills where staff use standard radio phrases and check-backs. These sessions can be short and targeted, which makes them easier to fit into a slower setup window.
Scenario-based drills are the closest thing to the real event day, but they also take the most time. Save them for quarterly or semiannual scheduling when your calendar has room. A weather evacuation drill before an outdoor reception can track how fast staff move guests indoors. A simulated medical emergency during dinner service, with a staff volunteer as the patient and a timer running from recognition to EMS handoff, shows you where the team is ready and where the weak spots still are.
Start with tabletops. Add hands-on practice next. Then use full drills to test whether people can carry out the plan when the pressure is on. Once staff are used to the training format, the next step is to spell out how they will report problems, escalate issues, and get updates during an incident.
Once training is in place, communication becomes the next job to lock down. People need to know who to contact, what to say, and which channel to use. Start with command structure. Then map channels and contacts.
Name one Incident Commander, set a clear chain of command, and assign decision-making and notification duties by role.
Put that chain of command on a notification chart and review it in pre-event huddles. The chart should show who calls 911, who notifies command, and in what order. This works best when each person reports to one supervisor, with a clear path from front-line staff up to the IC.
The notification chart should record:
A simple rule helps here: if there is a life-safety threat or serious injury, call 911 right away, then notify event command and venue management. In other cases, information should move up the chain before outside agencies are contacted.
Define who has the authority to declare an emergency for threats such as fire, severe weather, structural failure, or other life-safety risks. If the IC is unavailable, the plan should name a backup and spell out who takes over.
Use two-way radios as the main internal channel, and keep cell phones for external calls.
Build the plan around one primary channel and two backups. Here’s how the most common event communication tools compare:
| Tool | Speed | Reach | Reliability | Training Required |
|---|---|---|---|---|
| Two-way radios | Very fast | Internal staff and volunteers with radios | High; less dependent on public networks | Moderate (channels, etiquette, clear text) |
| Cell phones (voice/text) | Moderate | Individuals with service | Variable; networks can overload | Low; focus on call order and key contacts |
| PA system | Fast once activated | Attendees and staff in coverage area | High if power and equipment are tested | Moderate (scripts, equipment operation) |
| Bullhorns | Fast for localized areas | Best for small outdoor zones | High for small zones | Low to moderate |
| Runners | Slower | Specific zones when technology fails | High as a backup method | Low; needs clear instructions and site maps |
| Briefing sheets | Pre-event only | All staff given copies | High as reference material | Low; walk through key sections at briefing |
If radios fail, runners should carry messages to pre-arranged meeting points. If PA power is lost, bullhorns and signage take over. Don’t leave that to chance. Test these backup methods during drills by simulating a failure, so staff practice switching tools without breaking the command structure.
Train all radio users on three rules:
A clear radio call should identify the sender, recipient, location, issue, and requested action. Laminated quick-reference cards can help make that routine stick.
Once channels are set, use the same system to schedule training and send reminders.
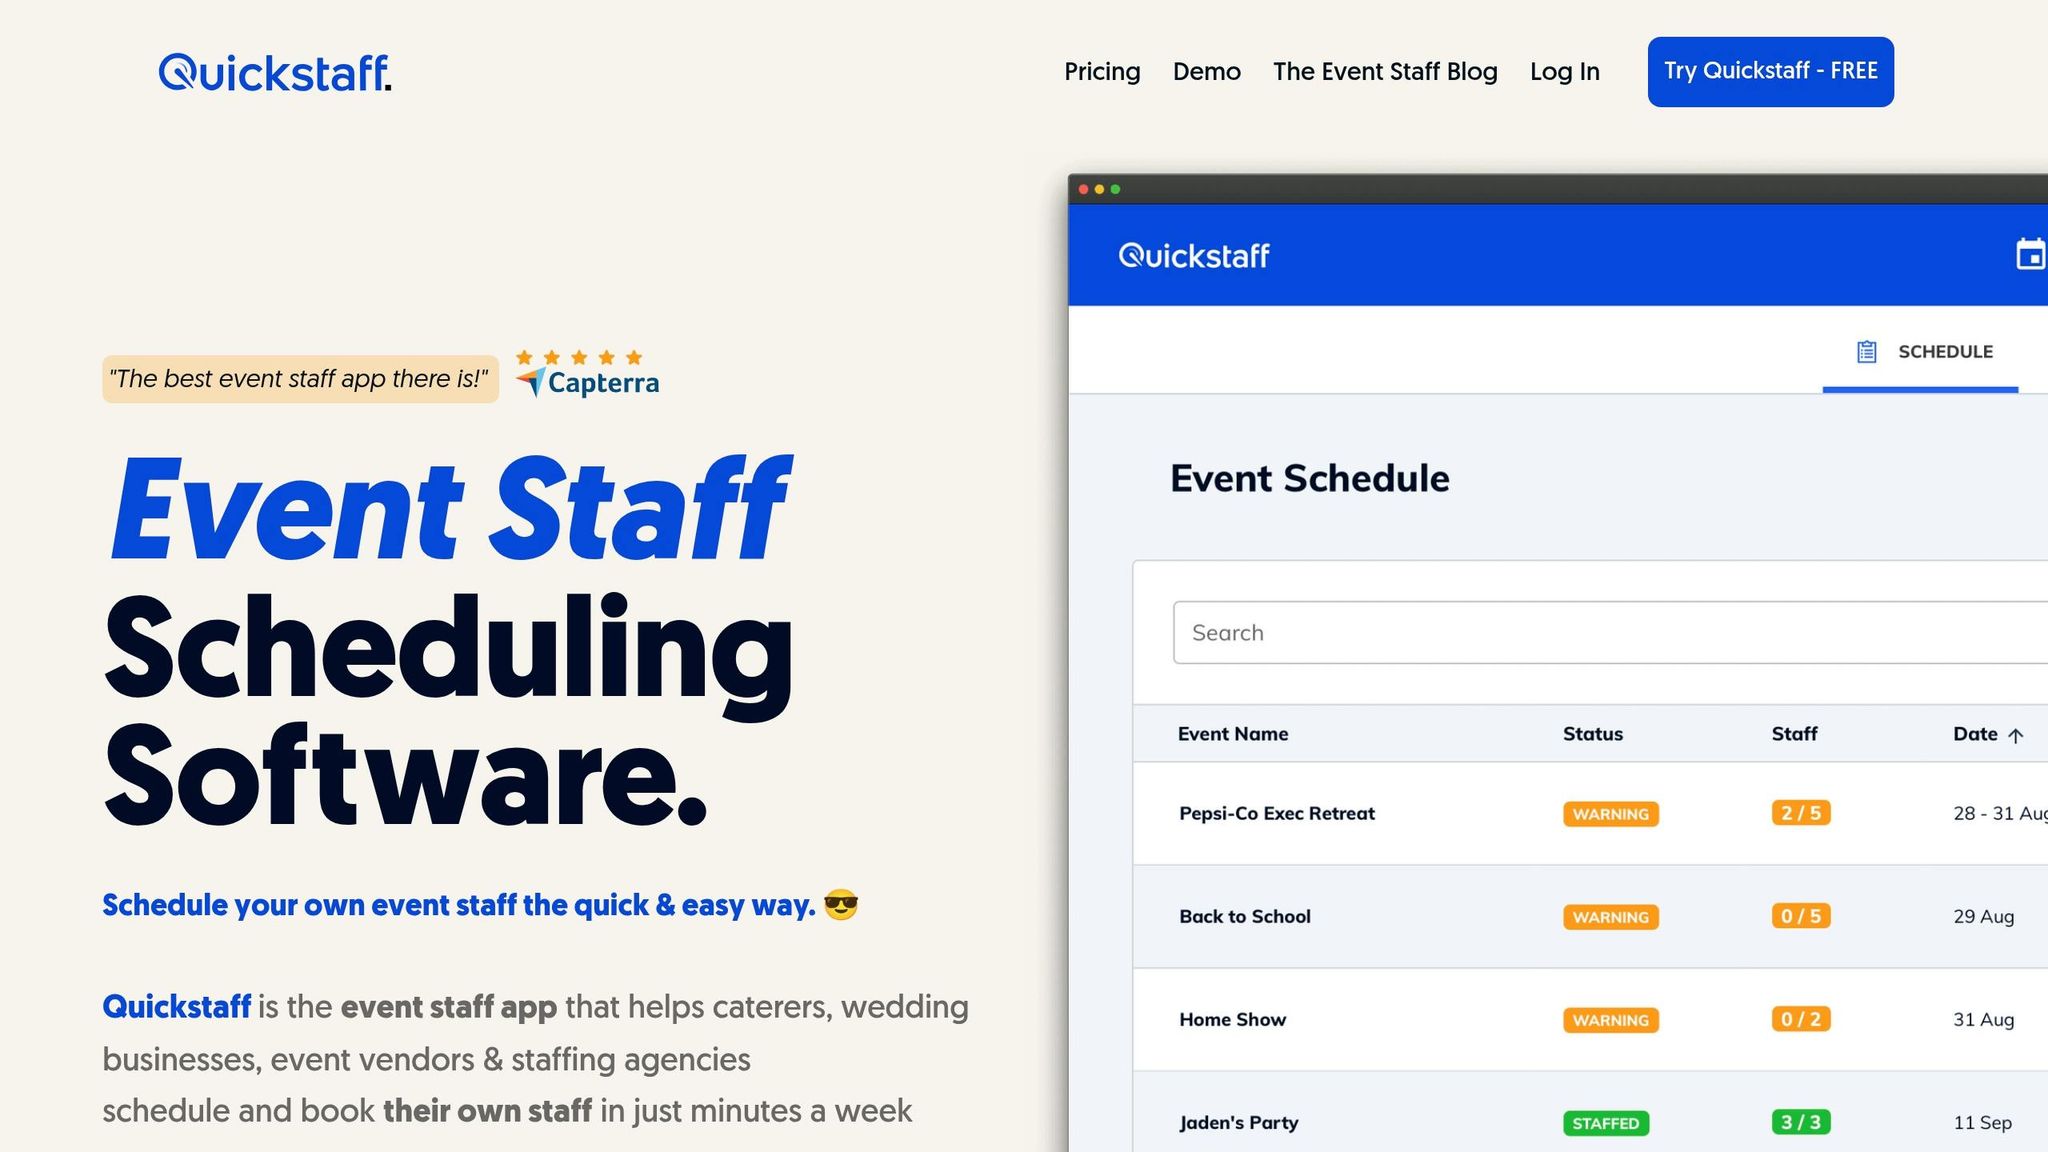
Use Quickstaff to create training sessions, assign staff by role, track availability, and send reminders from one mobile-friendly system.
With the messaging structure in place, the next step is testing it during drills.
Once your communication channels and chain of command are set, the next move is simple: test the plan before you need it. A drill program doesn't have to cost a lot or throw operations off track. It just has to happen on a steady rhythm and build over time.
After roles and channels are set, put them on a drill calendar.
The strongest schedules usually revolve around three anchors: peak seasons, major events, and turnover periods.
Plan drills on lower-volume days, usually Monday through Wednesday, so disruption and overtime stay in check. It also helps to match dates in MM/DD/YYYY format with your booking system and payroll periods. That small step can cut down on schedule clashes.
Start small, then build. Go from tabletop exercises to focused drills, then to functional coordination, and finally to full-scale rehearsals.
For most small to mid-sized event businesses, repeating the first three levels a few times each year is usually a better fit than leaning on full-scale simulations.
| Exercise Type | Realism | Cost Level | Operational Disruption | Best Use |
|---|---|---|---|---|
| Tabletop discussion | Low | Low | Very low | Review plans, clarify roles, onboard new staff |
| Focused drill | Moderate | Low–Moderate | Low–Moderate | Practice specific skills (evacuation, medical) |
| Functional coordination | High (coordination) | Moderate | Moderate | Test multi-team communication and decision-making |
| Full-scale rehearsal | Very high | High | High | Large venues, complex or high-risk events |
There are a few easy ways to keep costs under control. Run evacuation drills right after teardown, when guests are gone. Use printed scenario cards and floor plans instead of special gear. Have supervisors send mock radio traffic during practice without setting off alarms. And don't feel like every staff member has to attend every drill. Start with supervisors and people in key roles, then pass the learning down through shift briefings.
The idea is to move from discussion, to hands-on practice, to full coordination.
Every drill should end with a short review and a written list of fixes.
Set an after-action review, or AAR, within 24–72 hours of each exercise while people still remember the details clearly. Bring together supervisors, lead servers, and any outside partners for a 30–60 minute discussion built around four questions: what was planned, what happened, what worked, and what needs fixing?
Keep the findings in a one-page template. For each issue - for example, "Radio channel confusion at 9:15 PM" - record the impact and the root cause. Then set 3–5 corrective actions due within 30–60 days. Put the most urgent attention on fixes tied to your top hazards. Give each action one owner - never “the team” - and assign a clear due date that matches your event calendar. For example: "Update shift briefing checklist by 08/20/2026 – Owner: Banquet Manager."
Track open items in a shared log with columns for issue, action, owner, due date, status, and verification method, such as "Observed in next drill on 09/10/2026". Review that log briefly during monthly manager meetings so items don't sit untouched.
AARs should stay non-punitive. The goal is to fix systems, not point fingers. When people know they won't be blamed for speaking up, they're more likely to give honest feedback and take part fully.
Use the next drill to check whether the fixes worked.
Drill findings only matter if people write them down and can find them later.
Keep these five core documents up to date:
| Document Type | Contents |
|---|---|
| Emergency Action Plan | Procedures, evacuation routes, roles, outside contacts |
| Training Record | Date, modules, objectives, trainer, attendees, roles |
| Drill/Exercise Log | Drill type, objectives, participants, timeline, equipment notes, issues |
| After-Action Report | Goals vs. outcomes, strengths, gaps, corrective actions |
| Corrective Action Log | Issue, fix, owner, due date, status |
Each record should connect to the next training cycle. If you use the same format across events, it's much easier to compare performance and keep records clean.
OSHA emphasizes that an Emergency Action Plan "is an operational document, not a filing artifact". Training records should also show the date, attendees, and topics covered. Retain key training and drill records for 3–5 years.
Update these records after each drill, incident, or staffing change. That way, the program reflects what's happening on the ground, not what used to be true six months ago.
After you define the record set, put it in one central location so managers can check training status fast before each event. Paper sign-in sheets and long email threads make that much harder than it should be.
Quickstaff can centralize training events, role assignments, confirmations, attendance, and event notes in one place. You can also use reminders and messaging for drill instructions and follow-up.
When records sit in one place, the program becomes easier to audit, refresh, and repeat. A strong event emergency training program doesn't need to be complicated. Identify real risks, assign clear responsibilities, build role-based training, set up communication with defined escalation paths, run recurring drills, follow each exercise with a structured review, and document all of it.
The goal is simple: use clear, current procedures that staff can carry out under pressure.
Start with a formal risk assessment before the event. Use it to match your ICS structure to the event’s risk level: higher-risk events need a stronger setup, while lower-risk events can use a leaner one.
Run pre-event tabletop exercises to spot gaps, settle priorities, and define escalation thresholds. During planning, assign a Safety Officer to escalate hazards, use standard logs such as ICS 214, and put training first for staff in high-risk roles.
Every event staff member should be trained on emergency alert procedures. That means knowing their role, understanding evacuation plans, and being able to use emergency communication tools without hesitation.
Staff should also get basic safety training on hazard recognition and proper PPE use. On top of that, regular drills help people practice workflows and get comfortable with system interfaces, so they’re not figuring things out in the middle of a stressful moment.
Running safety drills and testing emergency alerts quarterly is a solid baseline. It helps you check that your system works the way it should and keeps your team ready when it matters.
You can shift that schedule based on your organization’s needs. Whatever cadence you pick, announce tests ahead of time so people aren’t caught off guard. Then document each drill so you can spot gaps and fine-tune your emergency plans.