Event Emergency Response Team Training Guide
September 23, 2026

If your team cannot answer who leads, where to go, how to call for help, and when to stop, your emergency plan is not ready for event day.
When I look at this guide, the big takeaway is simple: I need to train people for the actual event, not just hand them a policy. That means picking team leads, setting one chain of command, briefing temp staff, checking the venue in person, running drills, and fixing gaps after each test or incident.
Here’s the whole article in plain English:
A few facts stand out. The Event Safety Guide spans 39 chapters, which shows how many risk areas live events can involve. The article also gives hard timing targets, like 30 minutes for a hotwash, 60–120 minutes for onboarding, and 20–45 minutes for a pre-event briefing.
In short: I build the team, train by role, check the site, drill the weak spots, and update the plan every time something changes.
That’s the framework the rest of the article walks through.
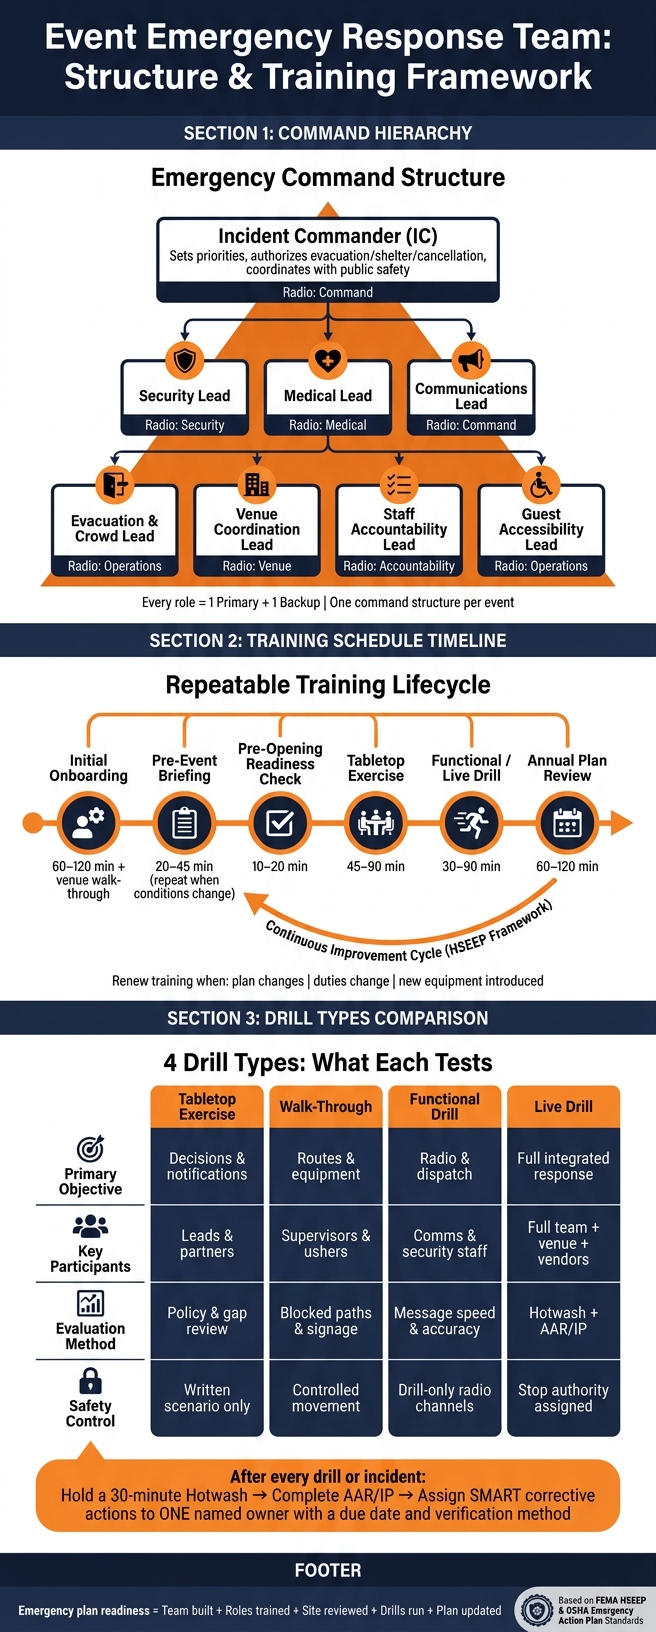
Event Emergency Response Team Structure & Training Framework
Set your emergency leadership structure before training begins. Every critical role needs a primary person, a backup, and a clear scope of authority. No gray area, no guessing in the moment.
Pick leads who stay calm under pressure, can direct staff, give clear instructions, show up for the full shift, and know the venue well. Some roles also need specific credentials.
For example:
Use a 1–5 scoring checklist for each candidate. Score them on judgment, authority, communication, site knowledge, reliability, and role-specific qualifications. Set a minimum score for both primary and backup selections. If someone falls short in one area, document that training gap and close it before the event.
After the structure is in place, spell out command and handoff rules.
Use one command structure per event. The Incident Commander (IC) sets priorities, authorizes protective actions such as evacuation, shelter-in-place, an event pause, or cancellation, and coordinates with public safety agencies. The venue manager controls building systems. When fire, police, or EMS arrive, the IC gives a short briefing and transfers or shares command as directed.
Vendors and caterers should report through their assigned event or zone lead, not straight to the IC. Contracted security follows the event plan unless law enforcement gives other direction. Any weapons concern or serious threat should be escalated at once.
When a lead steps away, announce the handoff out loud. The outgoing lead should tell the IC who is taking over, share the current status, and confirm the replacement has the radio, contact list, and current priorities. That simple habit can save a lot of confusion.
Don’t send temporary staff into the venue without a briefing. Before they start work, give each person a short, event-specific rundown that covers:
A one-page contact card, or a mobile version, works well for quick reference on site.
Show people the actual exits. Put the assembly area on a map. Then do a quick knowledge check. Ask each worker to point out their nearest exit and name who they’d contact if a guest needed medical help. You can also use a mobile-friendly briefing tool to send assignments before arrival. This helps maintain a scalable event scheduling system as your team grows. That cuts down delays when someone needs help and the team has to move fast.
With roles assigned, turn them into a training schedule and checklist.
Use this matrix during the venue walk-through and staff briefing.
| Role | Primary duties | Decision authority | Radio channel | Backup person | Required training |
|---|---|---|---|---|---|
| Incident Commander | Set priorities; authorize evacuation, shelter, event pause, re-entry, and outside assistance | Overall event emergency authority, subject to venue and public-agency authority | Command | Deputy event manager | ICS orientation; emergency action plan; venue procedures; decision-making |
| Security Lead | Access control; crowd movement; suspicious-activity response; coordination with contracted security or law enforcement | Direct contracted security within the event plan; escalate major threats | Security | Senior security supervisor | Crowd management; de-escalation; radio protocol |
| Medical Lead | First aid; medical supplies; EMS access; patient handoff; medical documentation | Assign qualified medical resources; request EMS; escalate beyond scope | Medical | Certified first-aid or medical designee | First aid/CPR/AED; incident reporting |
| Evacuation and Crowd-Movement Lead | Direct staff to exits and assembly areas; manage crowd flow; prevent unsafe re-entry | Direct evacuation teams within assigned areas; report blocked or unsafe routes | Operations | Floor or zone lead | Evacuation; sheltering; accessibility assistance; venue routes |
| Communications Lead | Radio discipline; verified updates; staff notifications; public messaging | Issue approved staff messages; obtain approval for public statements | Command or Communications | Venue communications contact | Radio protocol; message verification; rumor control |
| Venue Coordination Lead | Coordinate with venue management, building engineers, fire/life-safety staff, and property security | Access venue systems and representatives; escalate building decisions | Venue or Command | Venue manager's designated alternate | Site orientation; building emergency systems; vendor coordination |
| Staff Accountability Lead | Track staff assignments, check-ins, missing personnel, and team status at assembly areas | Require status reports and escalate missing personnel | Accountability | Staffing coordinator | Roster control; check-in procedures; privacy-aware recordkeeping |
| Guest Accessibility Lead | Coordinate assistance for guests with disabilities and other access or functional needs | Assign trained assistance and request additional resources | Operations | Guest-services supervisor | ADA awareness; accessible evacuation; respectful communication |
These assignments are your starting point for training, drills, and event-day handoffs.
With your command structure in place, the next step is simple: make sure every person in that structure knows exactly what to do. That starts with a baseline level of knowledge and a schedule that delivers it the same way every time - before each event and after any change.
Use each role to define the minimum training a person must finish before working an event.
Every response-team member needs to show a clear baseline before they work an event. That baseline includes how to report emergencies, individual responsibilities, who to contact for plan questions and escalation, alarm and notification methods, evacuation and shelter procedures, accountability after evacuation, and who answers plan questions.
Then go a step further. Each person should be able to physically find - and explain the basic use of - exits, alarms, extinguishers, AEDs, first-aid kits, radios, backup communications, utility shutoffs, assembly areas, shelter locations, command posts, and accessible evacuation equipment.
Map knowledge alone doesn’t hold up well under pressure. A short venue walk-through, followed by a competency check, helps fix that. Ask each trainee to explain how they would:
Document what they got right and what needs follow-up.
Training also needs to be site-specific. A general emergency course will not tell staff which shelter area has accessible entry, which exits are actually open, or which radio channel reaches the venue’s command post. Those details come from the venue itself.
Once the baseline is clear, put it on a fixed schedule so it happens before every event.
Use five repeating training checkpoints. Start with onboarding before the first assignment. Repeat event briefings before each event and after material changes. Run a short pre-opening readiness check right before doors open. Schedule periodic refreshers to fix observed gaps. Then hold a post-drill or post-incident review after any major exercise or live event.
OSHA guidance also lists clear triggers for renewed training: when the plan changes, when an employee’s duties change, and when new equipment or processes are introduced. If something shifts mid-season, don’t wait for the annual review.
The table below lays out each training activity by purpose, participants, duration, and required documentation.
| Training activity | Purpose | Participants | Typical duration | Required documentation |
|---|---|---|---|---|
| Initial onboarding | Establish baseline knowledge, roles, equipment awareness, and communication expectations - required before check-in | New response-team members; temporary staff with assigned emergency duties | 60–120 minutes, plus a venue walk-through | Attendance, topics, competency check, certifications, assigned role |
| Event-specific pre-event briefing | Translate the plan into the current venue layout, schedule, crowd profile, weather, staffing, and hazards - repeated when conditions change | Response leads, supervisors, venue representatives, security, medical personnel, and relevant temporary staff | 20–45 minutes | Date, attendees, current maps, assignments, contacts, unresolved questions |
| Pre-opening readiness check | Confirm exits, radios, alarms, equipment, routes, posts, and accountability systems are ready | Incident lead, operations lead, venue or security lead, medical lead, and assigned checkers | 10–20 minutes | Checklist, equipment status, corrective actions, sign-off |
| Tabletop exercise | Test decisions, notifications, coordination, and role understanding | Leads and key partners across operations, security, medical, facilities, and communications | 45–90 minutes | Scenario, objectives, participant list, decisions, gaps, improvement actions |
| Functional or live drill | Validate actions, timing, radio traffic, movement, accountability, and coordination | Assigned responders and affected departments; include venue partners when authorized | 30–90 minutes, depending on scope | Exercise plan, safety controls, evaluator notes, attendance, timing data, after-action report |
| Periodic refresher | Reinforce high-risk tasks and close observed gaps | Current team members and staff whose duties changed | 15–30 minutes | Completion record, topic, updated competency or gap |
| Annual plan review | Confirm that the plan, contacts, maps, roles, equipment, and training requirements remain accurate | Management, response leads, venue representatives, security, medical, facilities, and other authorities having jurisdiction as appropriate | 60–120 minutes | Version-controlled plan, review date, approvals, revision log, training changes |
FEMA’s HSEEP framework supports this kind of continuous cycle - planning, training, exercising, evaluating, and improving - instead of treating training like a one-time box to check. Every session should have a clear objective, named participants, and documented outcomes.
Attendance and competency are not the same thing. A signed roster shows that someone was in the room. A practical demonstration or knowledge check shows whether they can do the task.
Keep a training register for each team member that includes name, role, event, date, instructor, topics, competency result, certifications, gaps, and refresher due date. Track availability in a separate place. Someone may be available to work and still not be trained for the role.
A simple status system makes this easy to scan:
That gives you a quick read on who is ready and who is not before event day.
Use Quickstaff to assign trained staff, track availability, and send pre-event reminders. That keeps readiness visible and cuts down on the chance that an untrained person shows up in a response role. It does not replace your emergency action plan, formal training records, or official emergency procedures - but it does make the scheduling and communication around them much easier.
Once roles are set, match them to the site itself.
A general emergency plan gives you a base. But it isn't finished. After you book a venue for a specific event, rebuild the plan around that space: the layout, the crowd, the vendors, the weather risk, and any temporary setup.
Walk the venue before any staff briefing. Check every entrance and exit, stairway, elevator, kitchen, loading zone, parking area, tent, stage, vendor space, storage room, and restricted area. Then check them again as they will exist during the event. A route that works on an empty day may fail once tables, pipe-and-drape, or equipment are in place.
A lot of event risk comes from temporary features. A registration table that squeezes a lobby can create a bottleneck. A cooking station near a tent wall changes the fire risk. A generator behind the stage can create a vehicle-pedestrian conflict if load-in routes aren't clearly separated.
Event planning materials also point to many hazards beyond fire, including electrical hazards, crowd rush, structure collapse, vehicle incidents, missing persons, unattended packages, and mass-casualty events. Radio coverage can also become a problem. Basements, metal buildings, concrete structures, and large outdoor sites may block signal, so test radios from the spots where people will actually work.
Record each hazard in a venue-risk register. Use the same definitions for likelihood and impact every time so different reviewers judge risks the same way. And for each row, assign a named response owner, not just a generic job title.
| Hazard | Location | Likelihood | Potential Impact | Preventive Controls | Response Owner |
|---|---|---|---|---|---|
| Crowd congestion | Main entrance and check-in | Medium | Delayed evacuation, falls, crowd surge | Separate entry and exit lanes; maintain clear egress width; assign crowd monitors | Guest-services lead |
| Cooking fire or grease flare-up | Catering kitchen | Medium | Burns, smoke inhalation, fire spread | Keep extinguishers accessible; inspect hood system; train catering staff; control fuel sources | Catering lead |
| Lightning or high winds | Outdoor tent and stage | Medium | Injury, structural failure, event interruption | Monitor weather; establish shelter trigger; secure or remove temporary structures | Event manager |
| Vehicle-pedestrian collision | Loading zone and parking entrance | Low to Medium | Serious injury or fatality | Schedule deliveries; use barriers and spotters; separate vehicles from guests | Site-operations lead |
| Radio dead zone | Basement stairwell | Medium | Delayed notification and accountability | Test radios; designate a runner or relay point; post emergency contacts | Communications lead |
Review this register before each event and after any change to the layout, staffing, vendors, weather conditions, or operating hours.
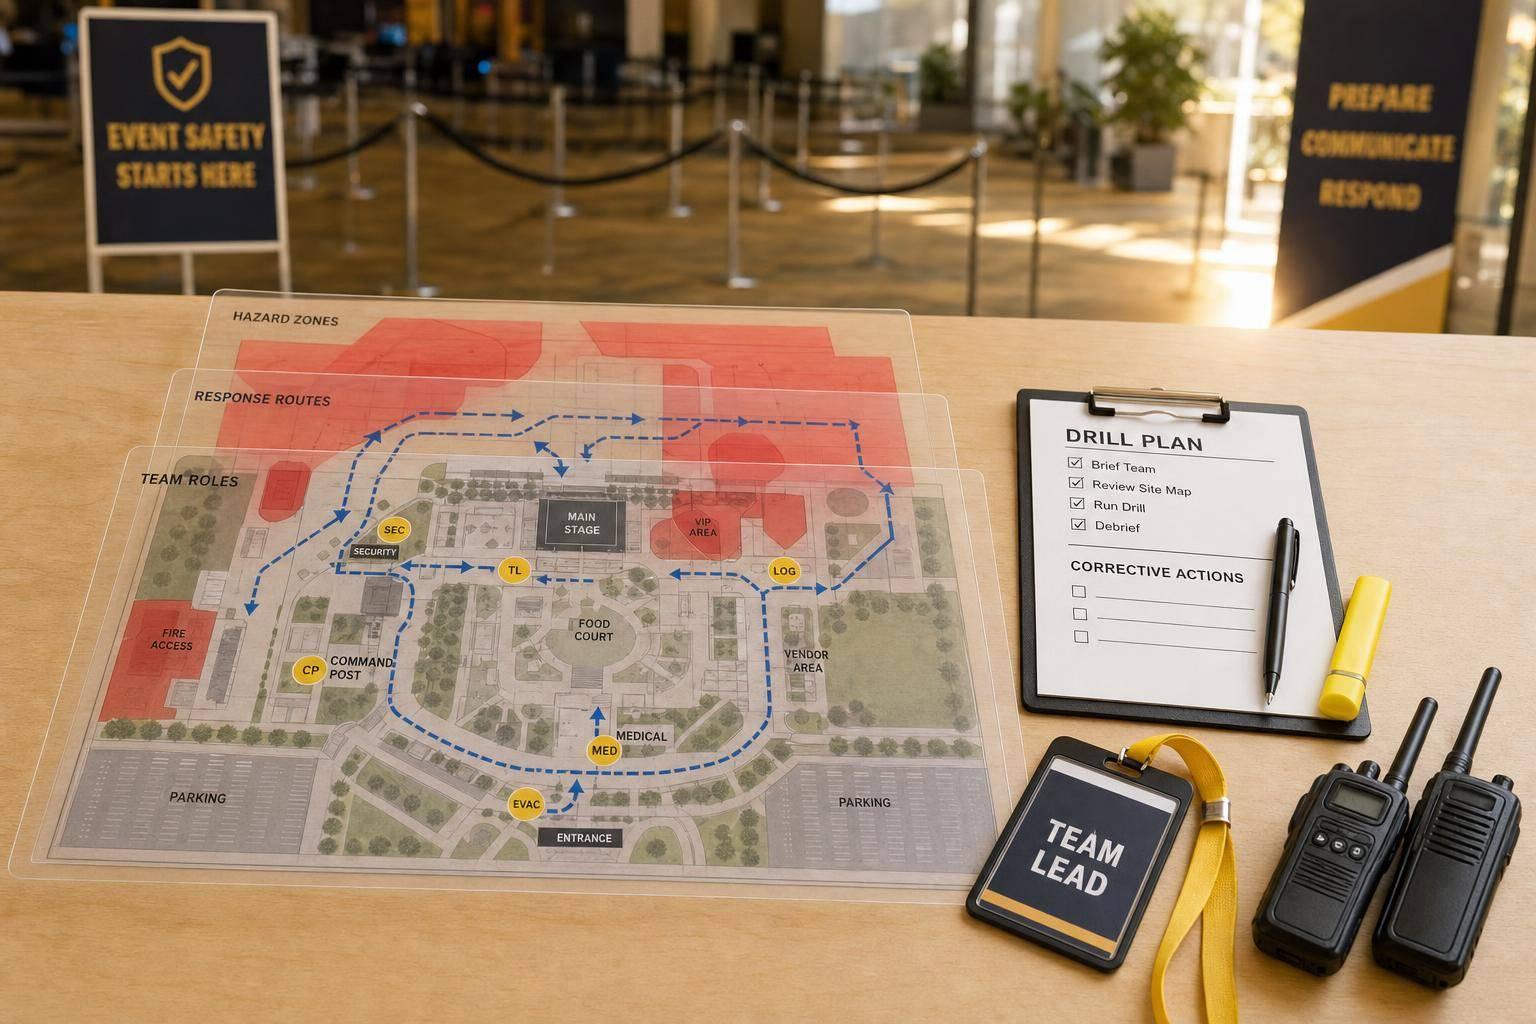
Mark primary and backup evacuation routes on a current floor plan, not the venue's generic diagram. Show exits, stairways, accessible routes, assembly points, shelter areas, AED locations, first-aid kits, emergency lighting, fire equipment, radio relay locations, utility shutoffs, and responder access lanes. Keep assembly areas away from fire lanes and emergency staging areas so guests don't end up blocking responders.
Set decision triggers before the event opens. Who calls for shelter-in-place during a tornado warning? Who can approve a partial evacuation if smoke is limited to one room? Write those decisions down and assign one person to each. At the assembly point, track employees, temporary staff, vendors, and performers separately.
Accessible egress needs its own place on the map. Identify ground-level routes, areas of refuge, and the staff assigned to help guests who use mobility devices or have hearing or vision limits. Check whether alarms are both audible and visible. Confirm whether elevators will be out of service during an evacuation. Ask what help a guest prefers, and keep people with their mobility devices unless a responder tells you otherwise.
Before doors open, check in person that every piece of emergency equipment is there, easy to reach, charged or in service, and clearly marked. That includes fire extinguishers, AEDs, first-aid kits, radios, PA systems, emergency lights, and spill kits. It doesn't take much for décor, vendor cases, or crowd-control barriers to end up blocking the gear you'll need first.
Build a contact sheet with 911 instructions, the venue manager, security supervisor, event manager, medical provider, facilities contact, and the person allowed to make cancellation or re-entry decisions. Spell out which situations require calling 911 right away instead of sending the report through management first. Test every communication method - radios, mobile phones, PA announcements, text groups, and runner relay points - from actual event positions before the first guest arrives.
Write re-entry rules before the event starts. Define what must happen before guests come back in: an explicit all-clear from the venue or emergency authority, confirmation that the hazard is under control, and a documented decision. One employee saying it's fine is not a re-entry policy.
Use these checked routes, contacts, and equipment locations in the drills that come next.
Once routes, contacts, and equipment are checked, drills show whether people can actually do the job when stress hits.
Use HSEEP to line up each drill type with what you want to test.
| Exercise type | Primary objective | Typical participants | Safety controls | Evaluation method |
|---|---|---|---|---|
| Tabletop exercise | Test policies, decisions, notification, and leadership handoffs | Team leads, venue representatives, security, catering or staffing managers, and public-safety partners | Written exercise designation, facilitator, scenario boundaries, and no real emergency calls | Compare decisions and timing against objectives; document unresolved policy or communication gaps |
| Drill walk-through | Verify routes, access points, equipment locations, assembly areas, and role assignments | Response leads, supervisors, venue operations, ushers, and selected temporary staff | Observers, controlled movement, accessible routes, and no simulated hazards that could cause unnecessary alarm | Record blocked paths, missing supplies, unclear signage, and role confusion |
| Functional drill | Test one or more response functions, such as dispatch, radio control, accountability, or shelter coordination | Emergency team, supervisors, communications staff, security, and selected department representatives | Drill-only radio channels or clear identifiers, trained controllers, and simulated victims or messages | Measure notification speed, message accuracy, acknowledgments, escalation, and handoffs |
| Live drill | Test an integrated response in a realistic environment | Emergency team, venue staff, vendors, temporary workers, security, medical personnel, and possibly public agencies | Obtain approvals, notify affected parties, coordinate with emergency services, control participants, protect bystanders, and retain a stop authority | Observe real-time performance against objectives, then conduct a hotwash and formal after-action review |
Before any physical drill starts, assign an exercise director, safety officer, controller, evaluator, and stop-exercise authority. Set a verbal or radio phrase such as REAL-WORLD EMERGENCY that halts the drill at once if an actual incident happens. Mark exercise personnel clearly so venue staff and guests don't confuse the drill with the real thing.
Each drill should have three to six measurable objectives written in advance. For example: the event lead receives the first report within 60 seconds, supervisors account for all assigned staff within five minutes, and staff identify an alternate exit when the main route is blocked. A fast evacuation with a bad headcount or a blocked accessible route is still a failed drill.
The point is simple: test the exact weak spots your venue and staffing plan are most likely to face.
Generic scenarios don't do much when the problem on site looks nothing like the script. Build scenarios around the hazards your event could actually face.
That can include a medical emergency in a dense crowd, which tests crowd separation, EMS access, and crowd control nearby. It can include fire or smoke near food service, which tests work stoppage, area isolation, and accounting for kitchen and temporary staff. Severe weather should test who watches alerts, when activities stop, and how guests with disabilities get to shelter. A power outage should test emergency lighting, radio battery life, and controlled evacuation if needed. A suspicious package should test isolation, distance, and notification without unauthorized radio use near the item. A communications outage should test the full backup ladder when both radios and cellular service fail.
Add pressure to make the scenario useful. A kitchen fire drill gets much better when you add a blocked service corridor, a missing radio, and a supervisor in another room. Now the team has to think and act, not just recite steps from memory.
Do not use real smoke, weapons, fire, hazardous substances, simulated physical assaults, or surprise public announcements unless qualified authorities have approved and controlled the exercise.
Set a plain-language format and use it in every functional or live drill until it becomes second nature.
Use this structure:
This is [name or role]. Emergency at [exact location]. [What happened]. Immediate danger is [present or not known]. We need [specific assistance].
For example:
This is Jordan, banquet supervisor. Medical emergency at Ballroom B, north aisle near Door 4. Guest is unconscious; immediate danger is not known. We need EMS access and a clear path from the loading entrance.
For every critical instruction, require closed-loop confirmation. The receiver repeats the key details, and the sender confirms them. If no one acknowledges the message, repeat it once, then switch at once to a backup method.
Keep the channel clean. No speculation. No jokes. No extra chatter. No unverified injury counts. No unauthorized public or social media statements. Only the incident lead or public information lead gives official updates.
Build a communication ladder so one failed channel doesn't freeze the response:
Test each method under conditions that match the site: a loud ballroom, a basement, a service corridor, a crowded outdoor area, and a shift change.
Log missed confirmations, delays, and backup-channel failures for the hotwash.
Capture missed objectives, slow handoffs, and radio failures for the after-action review.
Start with the drill logs, headcounts, and radio notes from the exercise. Then hold a hotwash right after the drill or incident, while the details are still clear. Keep it to 30 minutes.
In that session, ask a few direct questions:
After the hotwash, complete an After-Action Report/Improvement Plan (AAR/IP) with team leads, venue representatives, security, contractors, and other affected partners. Record the drill or event date, start and end times, venue, scenario, objectives, participating staff and agencies, assigned roles, and any conditions that affected performance.
Build a factual timeline from the first notification through evacuation, sheltering, accountability, medical response, all-clear, and re-entry. Include communication delays, missed handoffs, equipment failures, accessibility concerns, and crowd-flow problems. Stick to objective evidence like radio logs, sign-in sheets, timestamps, headcounts, and evaluator notes.
The point is simple: turn findings into tracked corrective actions, not vague lessons learned.
Keep observed facts separate from conclusions. For example, record the 3-minute radio delay as a finding. Don’t label the system unreliable unless you have repeat evidence.
Rank each finding based on:
Move fast on any issue tied to blocked exits, missing emergency contacts, inability to account for people, unsafe radio failure, inaccessible evacuation routes, or unclear authority during a life-safety decision. Lower-risk fixes, like reformatting a checklist or reorganizing training materials, can wait until urgent hazards have owners and due dates.
Then assign every corrective action to one owner, not a department. Add a due date and a clear verification method. FEMA describes corrective actions as SMART steps: specific, measurable, achievable, relevant, and time-bound.
Use a tracker like this to manage open items:
| Finding | Operational impact | Action required | Assigned owner | Due date | Verification method | Status |
|---|---|---|---|---|---|---|
| Emergency contact list contained an outdated venue security number | Event lead could lose critical time reaching the right person | Confirm primary and backup contacts with the venue and replace printed and digital copies | Operations manager | October 2, 2026 | Call-test both numbers and inspect the updated briefing packet | Open |
| Temporary staff were unsure who initiated guest accountability | Duplicate headcounts delayed confirmation of missing personnel | Add a named accountability lead and backup to the staffing plan and briefing script | Event manager | October 5, 2026 | Run a 10-minute accountability tabletop with the next event team | In Progress |
| Accessible evacuation assistance was not assigned at the east exit | Guests using mobility devices could face delay or unsafe movement | Assign trained assistance personnel, identify an accessible route, and confirm refuge or shelter procedures with the venue | Venue liaison | October 9, 2026 | Walk the route with venue staff and repeat the accessibility scenario | Open |
| Radio messages included speculation and incomplete locations | Staff acted on inconsistent information and wasted radio time | Train staff to state location, observed facts, immediate need, and requested action | Safety lead | October 1, 2026 | Review recorded or simulated radio traffic during a functional drill | Complete |
Use the same status labels every time: Open, In Progress, Blocked, Complete, Verified. That way, managers can see the difference between something that was done and something that was tested and confirmed.
Once a corrective action is made, repeat the affected briefing or drill with the staff who will use it, including temporary workers. If you change an evacuation route, do a walk-through. If you change the chain of command, run a tabletop. If communication failed, run a functional drill with timed message tests.
Mark an item Verified only when the owner provides evidence, such as a signed venue walk-through, a completed contact test, drill timing results, or observer notes. If the corrective action fails again, keep the item open, review the root cause, and assign a new action.
Also review the plan any time the venue layout changes, staffing duties shift, new equipment is added, or a key contact is replaced.
There’s no single required number. Team size depends on the event’s scale and complexity.
A good rule of thumb is a span of control of 3 to 7 direct reports per lead. That range helps people stay organized when things get busy.
At smaller events, one person may handle more than one role. That’s fine. But each critical function should still have a named owner so nothing falls through the cracks.
A standard team often includes:
Assess the change right away against your pre-set decision triggers, like weather limits or power-outage time thresholds. Then alert the safety officer or incident commander so they can handle the response through your escalation matrix.
If staffing shifts, use Quickstaff to reassign emergency roles fast, share updated run sheets or briefing links, and keep alerts and status boards up to date.
Build retraining into the daily routine with role-playing, crisis simulations, and short pre-shift refreshers. That way, the training doesn’t sit in a binder and gather dust. It stays active and top of mind when staff need it most.
For steady readiness, run escalation drills and test emergency alert systems quarterly. Announce test dates ahead of time so staff know what to expect and can plan around them.
If you're running a multi-day event, spread training sessions across the schedule instead of packing everything into one block. People tend to retain more when information comes in shorter bursts.
Quickstaff can help by keeping staff contact details in one place, logging shift records, and sending updated briefing materials before doors open.