How Event Teams Handle Lost Guest Items
August 10, 2026

When a guest loses something, the best event teams do the same few things every time: log the report, search in order, limit radio details, lock down high-risk items, verify the owner, and record the return.
If I had to boil the article down, it comes to this:
That matters because a poor handoff can turn a simple lost item into a complaint, a dispute, or a bad review. By contrast, a written process cuts confusion, lowers repeat searches, and helps staff act fast in the first 2–3 minutes after a report.
A few points stand out:
Here’s the short version: one owner, one log, one search path, one return record. That’s what keeps the process clear for guests and staff.
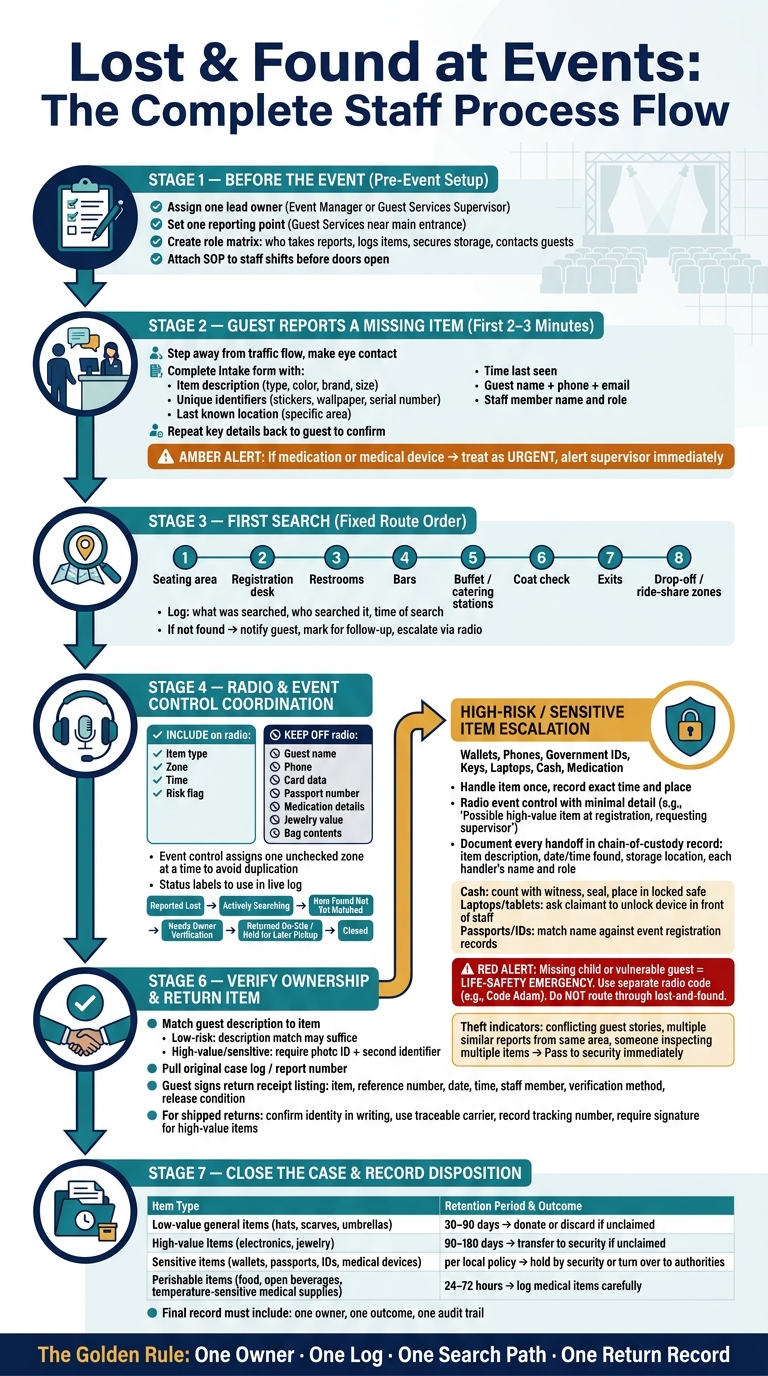
Lost & Found at Events: The Complete Staff Process Flow
Write the lost-and-found policy before the doors open. Share it with staff, and tie it to specific roles before the first guest walks in. If you skip that step, a guest who loses a phone at the bar can get sent from security to the front desk to catering with no clear answer. The policy stops that kind of runaround.
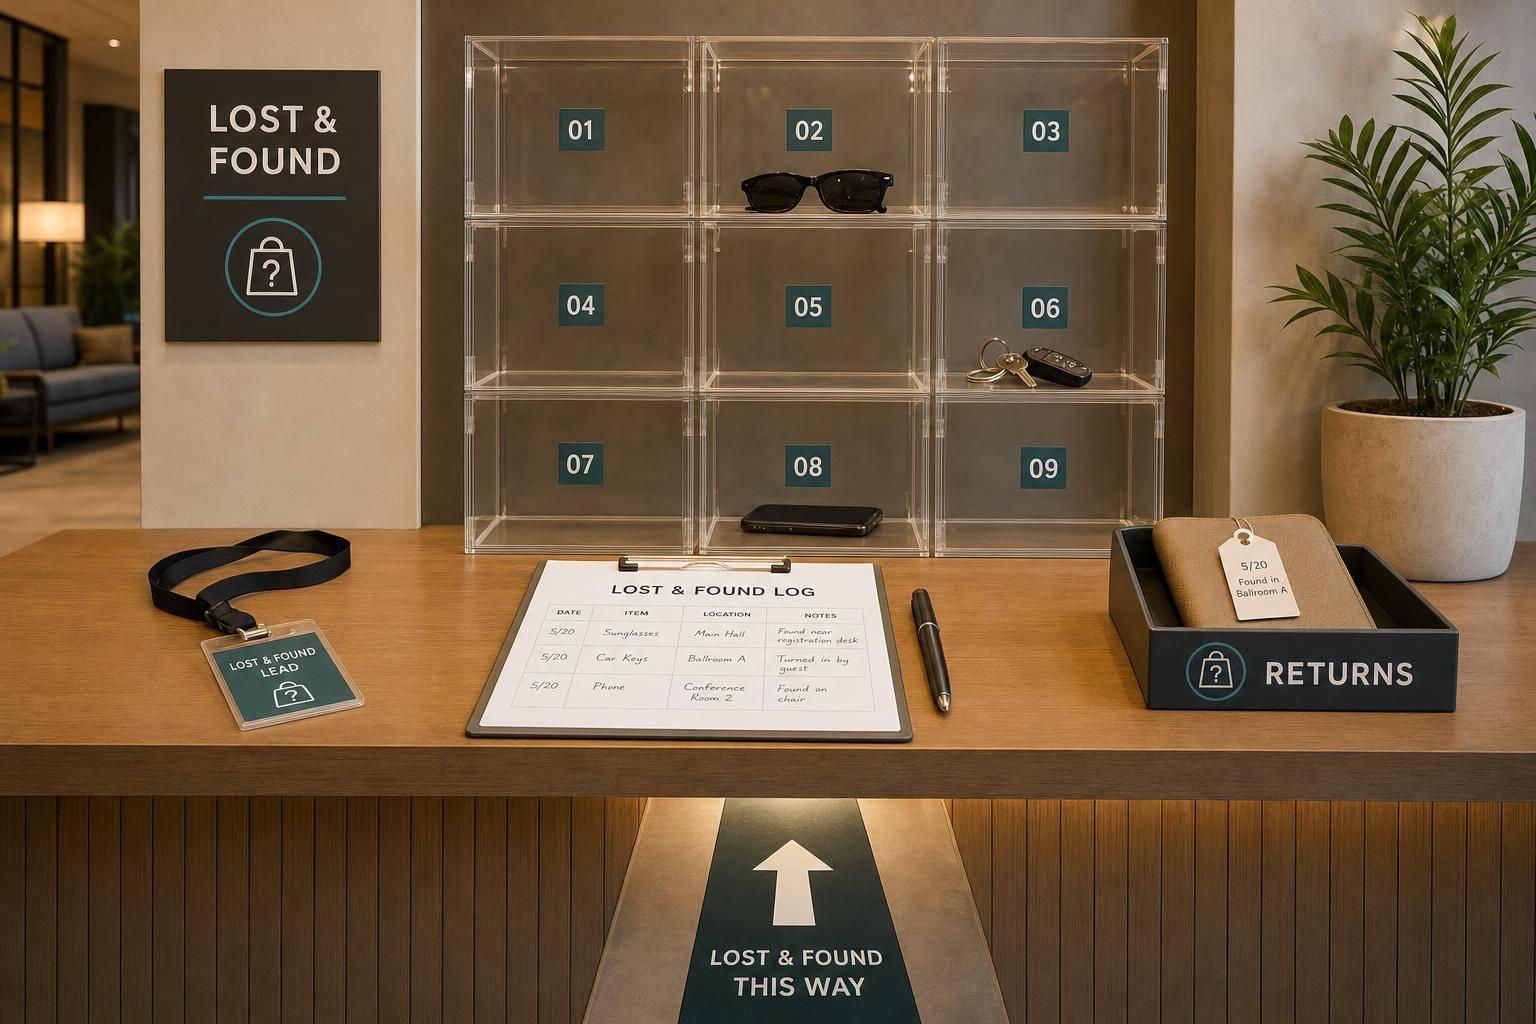
One person should own the process. In most cases, that's the Event Manager or Guest Services Supervisor. Front-of-house, security, catering, and venue staff all play a part, but every report should go to one lead. Put this in a simple one-page role matrix that shows who takes reports, who logs items, who secures storage, and who contacts guests.
The reporting point should usually be a staffed guest-services counter near the entrance. Every staff member needs to send guests to the same lost-and-found location, which is often Guest Services by the main entrance. If your team uses Quickstaff, attach the lost-and-found SOP to the relevant shifts so staff can see the reporting point and lead contact before they get on-site.
Not every lost item brings the same level of risk, so your storage rules shouldn't treat them all the same. A simple way to handle this is to split items into three tiers:
| Category | Examples | Storage Rule |
|---|---|---|
| Low-risk | Jackets, umbrellas, hats, reusable water bottles | Labeled bin or rack in the lost-and-found area |
| Medium-risk | Bags, accessories, jewelry, basic electronics | Behind the desk or in a staff-only room |
| High-risk/sensitive | Wallets, phones, government IDs, keys, laptops, cash, medication | Locked cabinet or safe; access limited to authorized roles |
Medication needs its own handling note. Store it in a clearly labeled, separate container. Keep it sealed unless staff need to identify it. Treat insulin or an EpiPen as urgent, and bring in medical staff.
When collecting guest details, keep it tight: a name, one contact method, and a short item description. Tell guests that the information is used only to return the item. Keep the log secure, limit access to the lost-and-found lead and event manager, and delete or anonymize it after closure.
With the policy in place, staff can log the report and start the search right away.
When a guest says something is missing, the first two to three minutes should be calm, steady, and organized. Start the report right away, then move into the first search without delay.
Step out of the main traffic flow, make eye contact, and begin the report. The goal is simple: get the facts, then start the search.
Collect the same core details every time:
| Field | What to capture |
|---|---|
| Item description | Type, color, brand, size |
| Unique identifiers | Case color, stickers, monogram, lock-screen wallpaper, serial number |
| Last known location | Specific area - table number, bar name, restroom, registration desk |
| Time last seen | Capture a time window, not just a vague estimate |
| Guest name and contact | Name, phone number, and email |
| Staff member taking report | Name and role of the staff member logging the item |
After the form is filled out, repeat the key details back to the guest so they can confirm the description and the last known location. For example, you might say you're looking for a black leather wallet with a silver clasp that was last seen at the dessert buffet.
If the item is medication or a medical device, treat it as urgent at once and alert a supervisor right away. Don't wait for the search to begin.
Use one printed form or one tablet form so every staff member logs the same fields. Once the report is done, send staff to search the guest's route in order.
After the report is logged, assign one or two staff members to search. Send them through the guest's path in sequence, not in a scattershot way. Use the details from the report to guide each stop. This route-based method helps staff catch items left in in-between spots like restrooms or bar areas.
Follow this order: seating area → registration desk → restrooms → bars → buffet or catering stations → coat check → exits → drop-off or ride-share zones.
At each stop, check under chairs, along counters, and behind bar tops. Don't move other guests' belongings. If needed, ask bartenders or catering staff during a service lull.
If the first sweep doesn't turn up the item, log what was searched, who searched it, and the time. Then mark the case for follow-up. Tell the guest that the first sweep is complete, the item hasn't been found yet, and the team will keep checking during the event and will contact them if it turns up.
If the item still isn't found, pass the update through event communication tools and event control.
Once the first search begins, radio traffic and event control keep the case on track. When radio use gets sloppy, things can spiral fast: extra chatter, mixed signals, and privacy problems.
Every radio call about a lost item should be short and fact-based. Include the staff member's role or station, the zone or venue area, a plain-language description of the item, the last known location, the approximate time it was last seen, and whether the item is high-value, sensitive, or suspicious.
For example, front-of-house staff might report that a black leather wallet was last seen near coat check in Lobby A at 8:15 p.m. and ask for a standard search.
That gives the search team enough to act without putting private details on an open channel. Keep names, phone numbers, card data, passport numbers, medication details, jewelry values, and bag contents off the radio. Put that information in the written report instead.
If the item is a passport, prescription medication, a laptop, or another high-value, sensitive, or suspicious item, say that in the radio call. That lets event control assign a supervisor and limit how many staff members handle the case.
After the call comes in, event control should turn it into a simple action plan:
Event control should assign only the next unchecked area. That way, two teams don't end up checking the same spot while another zone gets missed.
Event control should open a record for every lost-item report and manage it from start to finish. Log each zone that was checked, who searched it, and when they reported back. Add every update in time order so the record stays chronological.
Use a fixed set of status labels so anyone reading the log can see the case state at a glance:
| Status | What it means |
|---|---|
| Reported lost | Guest report taken, search not yet started |
| Actively searching | Staff assigned, zones being checked |
| Item found, not yet matched | Located, not yet matched to guest |
| Needs owner verification | Ownership being confirmed |
| Returned on-site | Item handed back to guest at the event |
| Held for later pickup | Item secured, guest will collect after the event |
| Closed | Case resolved, final disposition recorded |
When the wording stays the same, moving a case through these labels takes only seconds. It also cuts down on duplicate searches and makes it less likely that one area gets skipped.
If your team uses Quickstaff, centralized event details and team messaging can help keep everyone briefed in one place during peak service.
From there, high-value or suspicious cases move into tighter escalation and chain-of-custody handling.
Once a case is marked high risk or suspicious, take it out of the normal search flow and escalate it right away. If an item could give access to money, identity data, property, or restricted spaces, treat it as high risk and remove it from routine lost-and-found handling at once.
When someone finds a high-risk item, handle it once, record the exact time and place, and make a short call to event control without giving detailed item information. A simple message like Possible high-value item at registration, requesting supervisor does the job.
After that, document every handoff. A proper chain-of-custody record should include the item description, the exact date and time it was found, where it was stored, and the full name and role of each person who handled it. For wallets, bags, or cash envelopes, record the contents in front of at least two staff members. Keep valuables separate from standard lost property in a locked area with limited access.
Cash needs extra care. Count it with a witness present, seal it, and place it in a locked safe - not on a front desk. According to Metropolitan Police lost-property guidance, cash should only be returned when it can be confirmed "beyond doubt" that it belongs to the claimant, such as through exact circumstances or recognizable packaging. Credit cards should not be handed back without supervisor review; tell the guest to cancel the card.
Before releasing any item, confirm ownership by asking for specific identifying details. For laptops or tablets, ask the claimant to unlock the device in front of staff. For passports and government IDs, match the name against event registration records. If the guest cannot give enough detail to prove ownership, bring in a supervisor and hold the item until they can. Once secure storage has been logged, the case should wait for owner verification or a security review.
If a report does not fit a normal loss pattern, stop treating it like simple retrieval and move into incident handling. Inconsistent stories, repeated reports from the same area, or vague item descriptions can point to theft. Watch for these warning signs:
When any of these signs show up, front-of-house staff should step back and pass the case to security or a duty manager at once. A short script works well: "Security will take over this report." Security can then review CCTV, speak with witnesses, and decide whether local law enforcement needs to be contacted. Staff should document what happened, but they should not run their own investigation.
A missing child or vulnerable guest is never a lost-and-found matter. It is a life-safety emergency. Use a separate radio code - such as Code Adam or your venue's assigned missing-guest procedure - that goes straight to security and incident command, not to the lost-and-found handler.
After the search and any escalation, the last step is to prove ownership, release the item, and close the log. This is where accountability shows up.
Never release an item based on description alone. Start by matching the guest’s description to the item. Then use the item’s risk level to decide how much proof you need. Low-risk items may only need a description match. High-value or sensitive items should require a photo ID and a second identifier.
Before the handoff, pull up the original case log or report number so the release connects straight to the intake record.
Have the guest sign a return receipt that lists:
For shipped returns, confirm identity in writing, collect the full mailing address, use a traceable carrier, record the tracking number, and require a signature for high-value items. Quote the shipping cost upfront in U.S. dollars before sending.
Once the item is returned or shipped, update that same case log with the final outcome. Every case should close with a recorded result.
| Item Category | Retention Period | Disposition |
|---|---|---|
| Low-value general (hats, scarves, umbrellas) | 30–90 days | Return to owner; donate or discard if unclaimed |
| High-value (electronics, jewelry, designer items) | 90–180 days | Return to owner; transfer to security if unclaimed |
| Sensitive (wallets, passports, IDs, medical devices) | Per local policy or legal retention rules | Return to owner; hold by security or turn over to authorities |
| Perishable (food, open beverages, temperature-sensitive medical supplies) | 24–72 hours | Return or discard; log medical items carefully |
Ownership and release work best when each role is clear:
A complete disposition record closes the loop: one owner, one outcome, one audit trail.
Lost-and-found should sit with guest services leads and ushers. Those teams already help guests with day-to-day issues and other non-medical needs, often on a dedicated radio channel like Ops – Guest 1.
Putting this task with those roles keeps lost items handled the same way every time, with a clear chain of command. It also lets security, medical, and logistics teams stay focused on their own work.
Escalate the case right away if the item is a company device, like a laptop or mobile phone. That gives IT a chance to remote wipe it and help prevent data exposure.
For guest items, escalate the case if theft is suspected or if the item is valuable enough to need an official incident record. Your venue’s written protocols should always be the final trigger.
The search results don’t spell out exact proof requirements. In practice, event teams usually rely on internal records - like event logs and post-event audits - to keep a clear paper trail and maintain accountability.
To reclaim an item, a guest should give a detailed description, proof of ownership, or other identifying details that match what’s in the records.