Incident Tracking Systems for Large Events: Guide
September 16, 2026

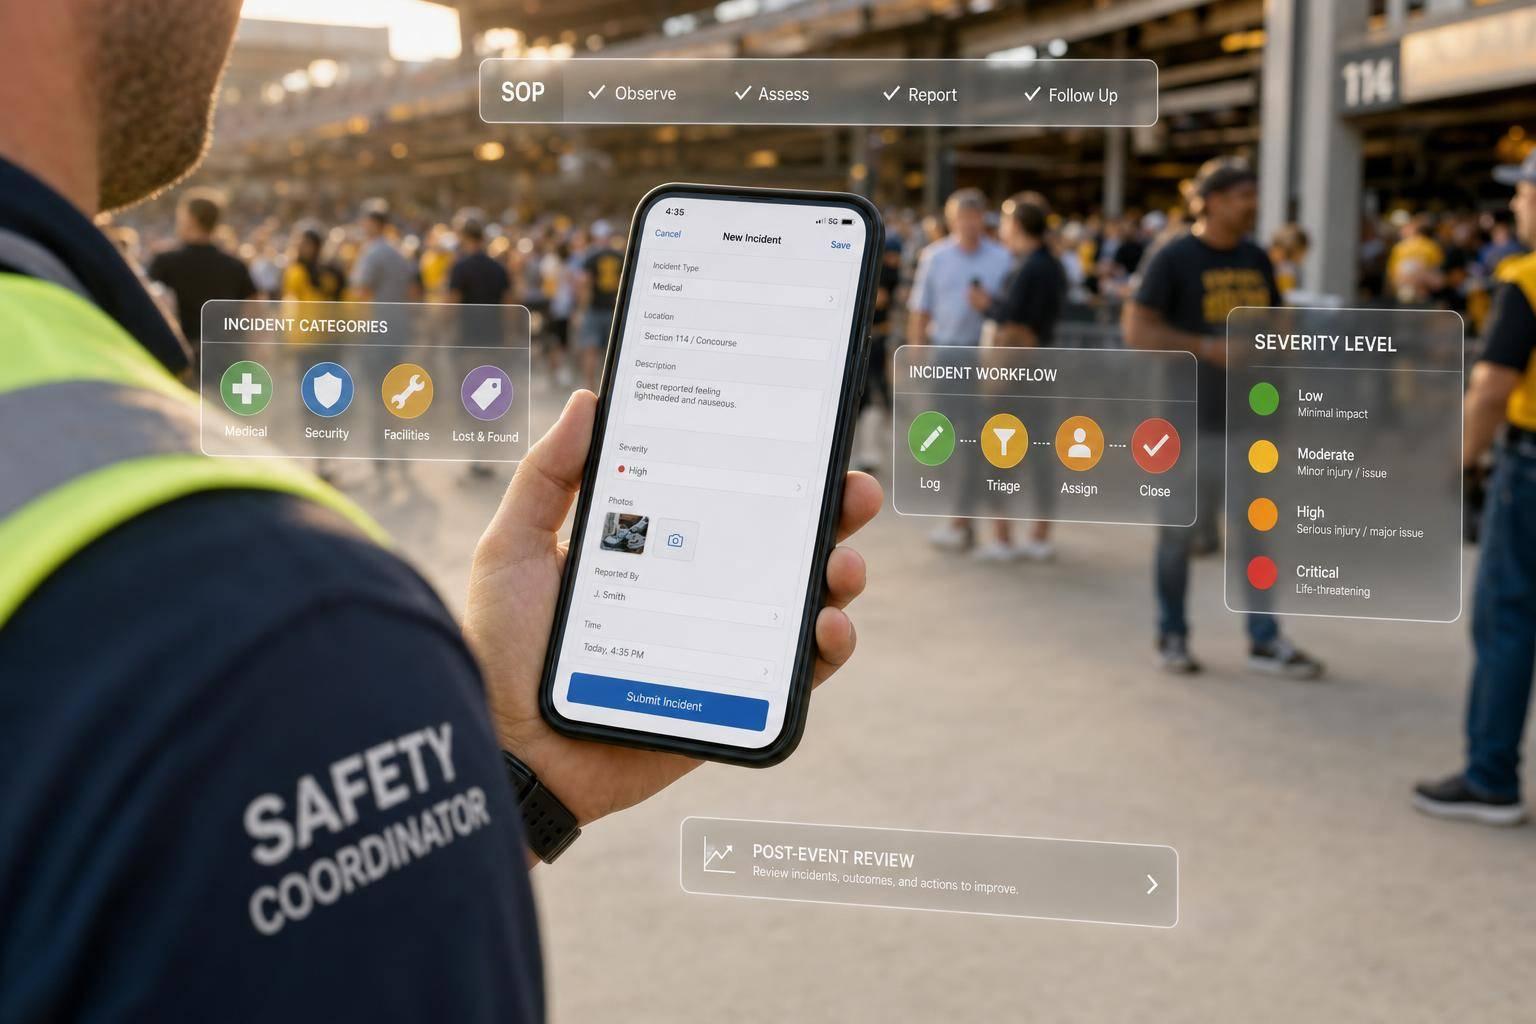
If you run a large event, you need one system for reports, triage, assignment, status updates, and closure. Without it, small issues turn into delays, repeat hazards, missing records, and slow handoffs between teams.
I’d boil this guide down to a few clear steps:
A plain rule helps: if staff can file a report in under a minute, leaders can see status in one place, and every change is time-stamped, the system is doing its job.
Here’s the core idea in one view:
| Area | What I’d put in place |
|---|---|
| What to track | Incidents, near misses, and event issues |
| Severity | 4 levels with color tags |
| Main fields | Time, place, type, severity, people involved, action taken, owner, final status |
| Workflow | Open, Assigned, In Progress, Resolved, Closed |
| Field use | Mobile forms, photos, map pins, offline sync |
| Team setup | Role-based access and zone/site queues |
| After-action work | Trend review by zone, time, category, and severity |
This guide is about one thing: helping event teams log issues fast, send them to the right people, and keep a clean record from first report to final close.
An incident tracking system should make reports fast to file and easy to send to the right team. Each report needs to record who submitted it, what happened, when and where it happened, how it started, and whether it was an incident, a near miss, or an operations issue. Mandatory fields help keep reports complete enough for dispatch and closure.
Categories should match the way your event runs on the ground. A practical setup usually includes medical, security, crowd safety, facilities and technical, and staffing and operations. It’s better to use dropdowns instead of free-text fields. That way, every team uses the same terms, and the data stays cleaner.
Use a four-level scale: minor, moderate, major, and critical. Color coding those levels as green, yellow, orange, and red makes triage faster. During staff training, pair each level with a plain example. That small step helps stop routine issues from getting marked as more serious than they are.
Location tracking should work in two ways: by zone and by map. In a stadium, that usually means section-and-row or section-and-seat pinning. At a festival, staff will lean more on landmarks, stages, and camping areas. Set up zones before event day so field teams can choose from preset locations instead of typing them out. For multi-site events, the system should group incidents by venue so command can spot repeat hot spots and act on them, like rerouting cables or adding lighting.
Once an incident is logged, it should reach the right team right away. Role-based routing handles that without extra back-and-forth: medical goes to medical, facilities goes to facilities, and security goes to the zone supervisor. If conditions shift, command staff should be able to reassign it.
A simple status workflow helps everyone stay on the same page. For most event operations, these five states work well:
Each status change should be time-stamped and linked to the user or role that made it. Audit trails show who acted, when they acted, and what changed. That matters for post-event review, claims, and day-to-day closure.
Escalation rules keep incidents from getting stuck. Time-based triggers can escalate a report if it sits in Open or Assigned too long. Severity-based triggers can alert the command center when a major or critical issue is logged. Staff should also be able to attach photos, video, and documents straight from a mobile device. And access should be controlled by role, so sensitive material is visible only to authorized personnel.
A strong incident tracking system for large events should include structured logging, configurable categories, map-based location tracking, role-based assignment and escalation, time-stamped status updates, secure evidence capture, mobile offline reporting, and multi-site dashboards.
For larger events, check that the system can group incidents by venue or site and show active workload by team, zone, and severity. That makes it easier to see where response is slowing down.
These features work best when staff know their roles and can use the system from the field on a mobile device.
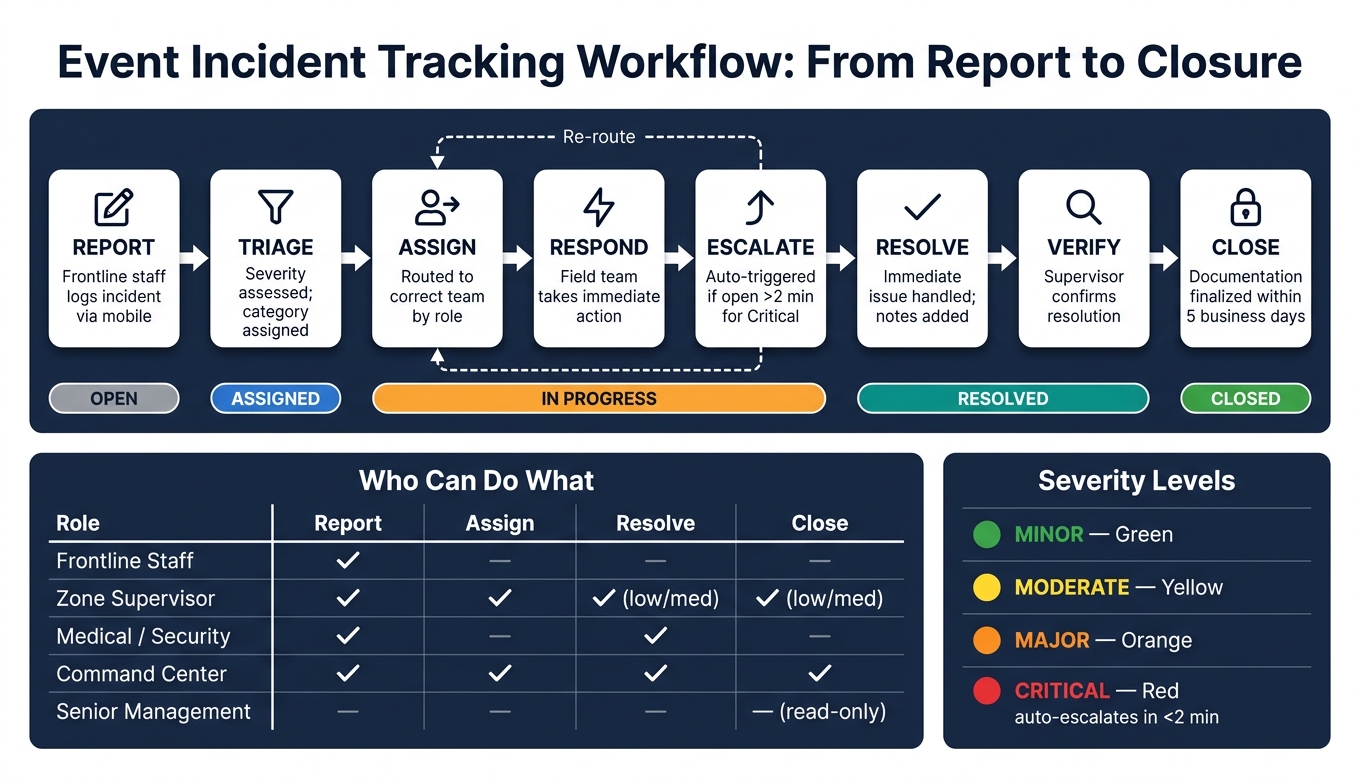
Event Incident Tracking Workflow: From Report to Closure
Once the system is set up, the next step is simple: decide who can report, who can take action, and who can approve (part of a broader event day preparation checklist). Each role should get only the actions it needs - report, triage, assign, resolve, or review. Those permissions need to line up with the incident workflow from the first report all the way to closure.
Frontline staff and volunteers can log new reports, add basic notes, upload photos, and pin a location. They should not be able to edit someone else’s report or close high-severity cases. Say a bar team member spots a slip hazard. They can log it, attach a photo, and add the zone tag. Then a supervisor checks that cleanup is done before marking it resolved.
Zone supervisors review, edit, and assign incidents inside their zone. They can close low-to-medium severity issues once the work is done, and they act as the bridge between field staff and response teams.
Security and medical teams receive assigned incidents, add detailed notes, update status, and flag sensitive cases so only approved users can see them.
Operations and logistics teams handle incidents tied to infrastructure, equipment, transport, or staging. They also update resolution details as work gets done.
Command center leads need full visibility across the event. They can override assignments, escalate incidents, upgrade severity, and run live dashboards across all zones and sites.
Senior managers and executives should have read-only access to aggregated dashboards, incident summaries, and post-event reports. During the event, they do not need editing rights.
Some fields need tighter access. Medical notes, ID details, and security footage references should be shown only to approved roles. Everyone else should see a redacted summary with enough detail to coordinate the response without exposing protected information.
Roles only work if reports move through a clear handoff chain. The flow looks like this: first report → triage → assignment → field response → escalation (if needed) → resolution → verification → closure. That structure keeps things from falling through the cracks.
Here’s a simple example. A frontline staff member logs a guest fall as a medical incident. The system sends it to the medical queue, a triage lead assigns it, and a supervisor checks the outcome before closing the report.
At multi-site events - like a festival with a main stage, satellite venues, and overflow parking - that same flow needs another layer. Each physical area has its own queue. Zone supervisors manage incidents in their section. Site managers get a rolled-up view of their venue. Then a central command dashboard shows what’s happening across all sites and zones.
Cross-site escalation rules matter here. If there’s a major infrastructure failure or a mass-casualty event, central leadership needs to know fast. That lets them trigger event-wide actions like crowd redirection or a partial shutdown without delay.
Field teams need that same workflow in their pocket. Staff working in parking lots, loading docks, kitchens, and backstage areas need mobile reporting that feels fast and easy, not like homework on a small screen.
The features that help most are:
Big events don’t always have stable connectivity. That’s where offline capture comes in. Reports, photos, and notes can be stored locally until the device gets a connection again. Once service returns, the system should send that data to the central platform on its own.
One detail matters a lot: timestamps and location data should reflect when the incident happened, not when the device synced. Otherwise, the command timeline gets messy fast. Staff should also see a clear status indicator so they know the report was sent through and didn’t vanish into thin air.
Once reporting fields and roles are set, lock in the process before event day. Start with one shared incident category list. Safety and medical should always stay mandatory, and severity should use four levels: minor, moderate, major, and critical. Your core categories should include safety (injuries, crowding, slips/falls), security, operations, medical, guest experience, environmental issues, and near misses.
Every incident form should, at a minimum, collect:
After categories and fields are in place, write SOPs for each severity level. Those SOPs should spell out who gets notified, how fast they need to be notified, and what actions staff must take. Then connect those SOPs directly to incident types inside the system, so when someone picks a category, they see step-by-step guidance right away.
Next comes venue zone mapping. Build a digital venue map, plus a structured list of zones and subzones inside the incident tracking system. Every physical area - Gate A, Main Stage, and Medical Post 2 - should be selectable in incident forms and visible as a layer on the operations dashboard. Where possible, geotag zones with GPS or indoor positioning. Zone labels should match the signage and radio call signs staff already use. That way, nobody is left guessing in the middle of a busy shift.
For multi-site operations, give each site its own zone hierarchy, but keep the same naming system and severity setup across all locations. That makes cross-site pattern checks much easier. It also lets the system send alerts to the right zone owner right away.
Training temp staff before event day is a must. A short briefing should explain what counts as an incident versus a near miss, why reporting matters for safety and liability, how severity works, and how to use the mobile reporting tool. Pair that with hands-on practice using test data. It also helps to say this plainly: reporting is non-punitive.
A one-page quick reference card can keep things simple. Include categories, severity definitions, escalation contacts, and zone names. Expectations should also be tied to the role, so gate staff, kitchen teams, and stage crews know what they need to log and what they need to escalate. Short scenario drills - guest fainting near Stage B, prop damage backstage, lost child at Gate A - give people a dry run before anything real hits.
Once the event begins, the dashboard becomes the main coordination hub. Supervisors need a live view of incident volume, status, and cluster locations. Coordinators should also be able to group incidents by category and zone to spot repeat issues fast. If several trip-hazard near misses show up around the same entrance, that’s not random. It’s a pattern, and it needs action now: send a crew, fix the hazard, and watch that zone more closely.
Triage is about sorting incoming reports by severity and assigning the right responder without delay. The dashboard should support quick assignment and status changes, especially when things get hectic. For handoffs between teams, the system should log who owns the incident at that moment and store a short transfer note. That keeps the audit trail in place and helps stop details from slipping through the cracks. Alerts tied to those changes also matter, since supervisors and responders can miss updates in a loud or crowded setting.
To keep records up to date while responders stay focused in the field, the command center should assign a scribe to update incident records from radio traffic. That lets field staff stay on the response instead of stopping to type notes. Supervisors should also run periodic record sweeps to review open incidents, confirm the current status matches what’s happening on the ground, and push teams to fill in missing documentation.
After the event, review every open incident in a set order, starting with high-severity and unresolved cases. Each record should confirm the final status, a summary of actions taken, the names and roles of responders, any external authorities involved, and supporting evidence such as photos or witness details. If an incident may lead to an insurance or legal issue, cross-check the record against any formal reports sent to insurers or venue operators, and add notes if anything doesn’t line up.
Draft the review within 24–48 hours and finalize it within five business days.
Speed matters here. Memory fades fast. Wait too long, and building a clear timeline turns into guesswork. Once records are closed, review incident data by category, zone, time of day, and severity to find repeat patterns. Use what you find to update risk registers, entry flow setups, staffing levels, and SOPs.
Use the table below to split the work by phase.
| Phase | Key Tasks | Data Captured | Stakeholders Involved |
|---|---|---|---|
| Pre-event | Define categories and SOPs, map venue zones, train staff | Incident taxonomy, zone list, training logs | Event owner, safety lead, venue contacts, staffing coordinators |
| Live-event | Log incidents, triage, coordinate response, update records | Incident records, timestamps, photos, status updates | Supervisors, responders, command center, vendors |
| Post-event | Close records, review timelines, analyze trends, update plans | Final statuses, root-cause notes, trend reports, corrective actions | Safety lead, operations manager, insurance contacts, senior leadership |
Retention rules may require certain record contents and storage periods. Set up the system to export and securely store incident data for the required time in line with U.S. data protection and privacy laws. A designated review lead should sign off on all closures, flag incidents that need more monitoring, and make sure sensitive records stay access-controlled.
Start with three basics: categories, severity, and ownership. Set one shared incident category list, define four severity levels, and spell out who reports, who reviews, and who closes each incident. With those pieces in place, field reporting and escalation can run without bogging staff down.
Next up: mobile reporting and escalation rules. Staff need to log incidents where they happen - parking lots, outdoor stages, packed entry gates - and the system still needs to work when cell service is weak. If a critical incident stays open for more than 2 minutes, it should auto-escalate.
Just as important as the software is a nonpunitive reporting culture. If staff think logging an incident will be held against them, many will stay quiet. And when that happens, patterns vanish from the record. Put the nonpunitive policy in writing, repeat it in briefings, and back it up in day-to-day use.
After the event, that same setup should carry into review and closure. Post-event review turns incident logs into fixes for staffing, layout, and crowd flow. Incident data by zone, time of day, and category also creates a clear record of due diligence for venue owners, promoters, and insurers. For Quickstaff users, linking schedules to incident records helps show which zones and time windows need more coverage.
Match severity levels to your event’s risk profile and day-to-day needs. Keep it simple with four clear categories:
Each level should spell out three things: response time, designated owner, and escalation trigger.
For instance, critical issues need action right away. Low-severity issues can often wait 15–30 minutes before they move up the chain.
Stick to your offline communication plan and your pre-set hardware protocols. Map venue dead zones ahead of time, and use wired landlines, like the control room phone, as your main communication hubs.
If both radio and cell service go down, send runners and fall back on printed, laminated copies of the ICS 205, contact directories, and incident logs kept in the command center, medical tent, and security office.
The person listed as the main owner for that incident type should close the incident, based on your event escalation matrix. For high-level incidents, the Incident Commander usually has final say.
Before closing it, log an arrived-on-scene update, a resolved update, and a short outcome note. That paperwork helps with post-event review and keeps your records accurate.