Event Crisis Communication: Team Roles Checklist
August 31, 2026

When a live event goes wrong, the first problem is often not the incident itself. It’s confusion about who does what.
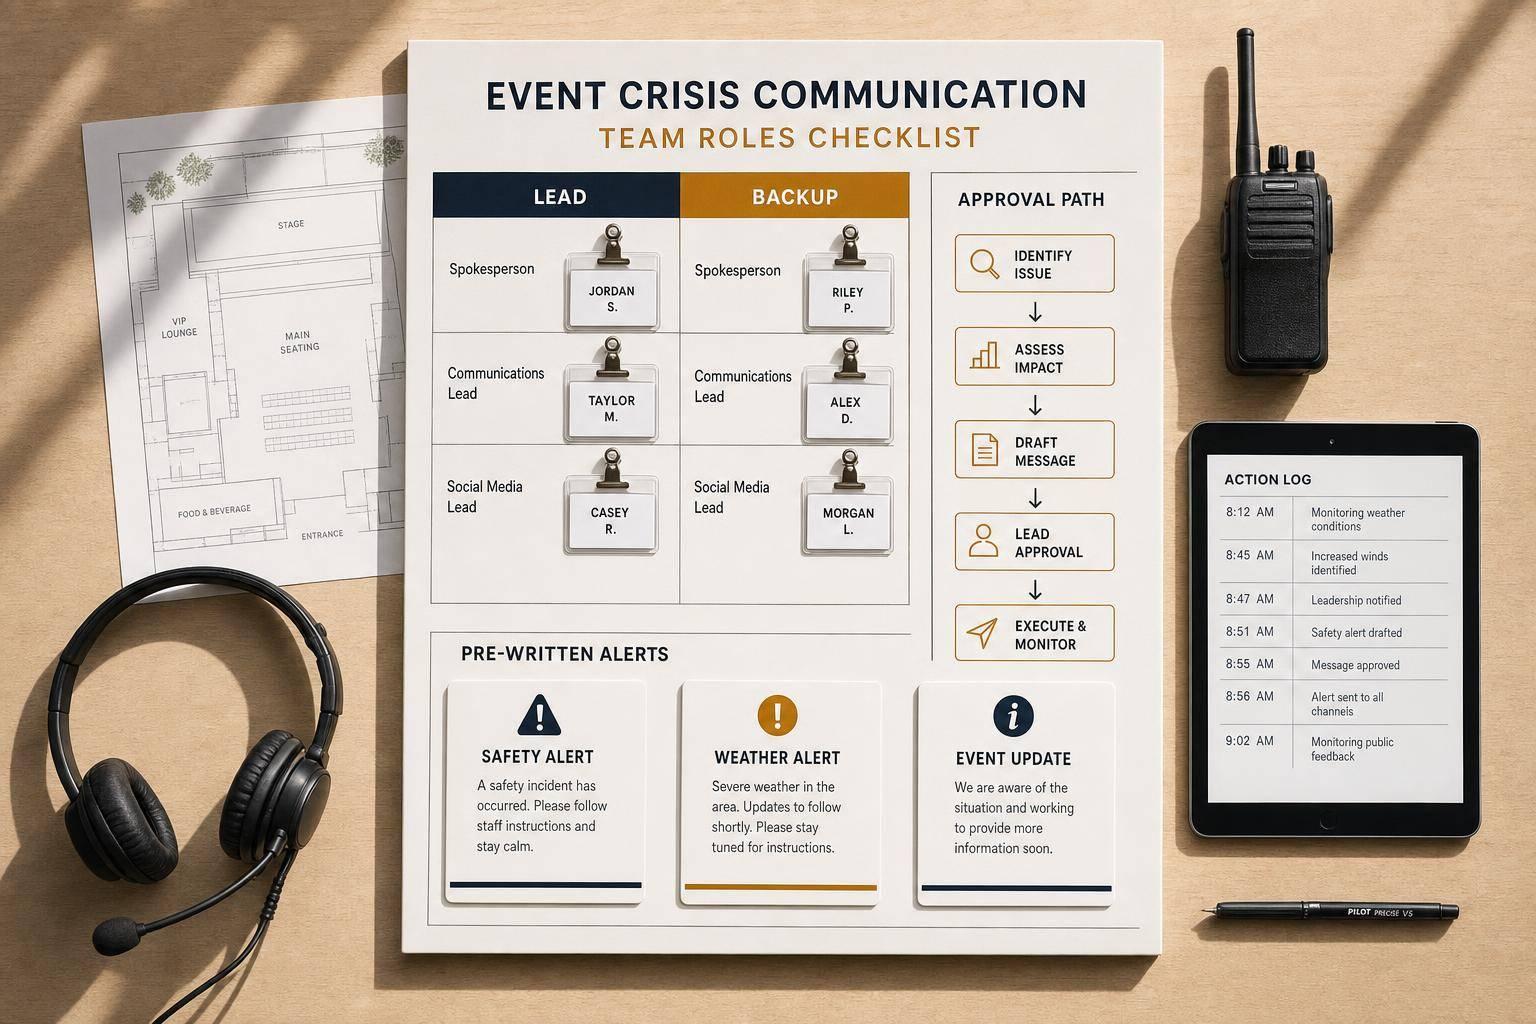
If I were setting up an event crisis plan, I’d keep it simple: name the lead, name the backup, lock the approval path, pre-write alerts, and log every step. That is the core idea of this checklist.
Here’s the short version:
A clear role map can cut delay and reduce mixed messages. In many incident reviews, the biggest gaps come from handoff issues, unclear authority, and poor records - not from lack of effort. That’s why named owners, approved templates, and a live incident log matter so much.
If you want one takeaway, it’s this: don’t build your crisis communication plan during the crisis. Build it before the event starts, keep it visible, and make sure every person knows their lane.
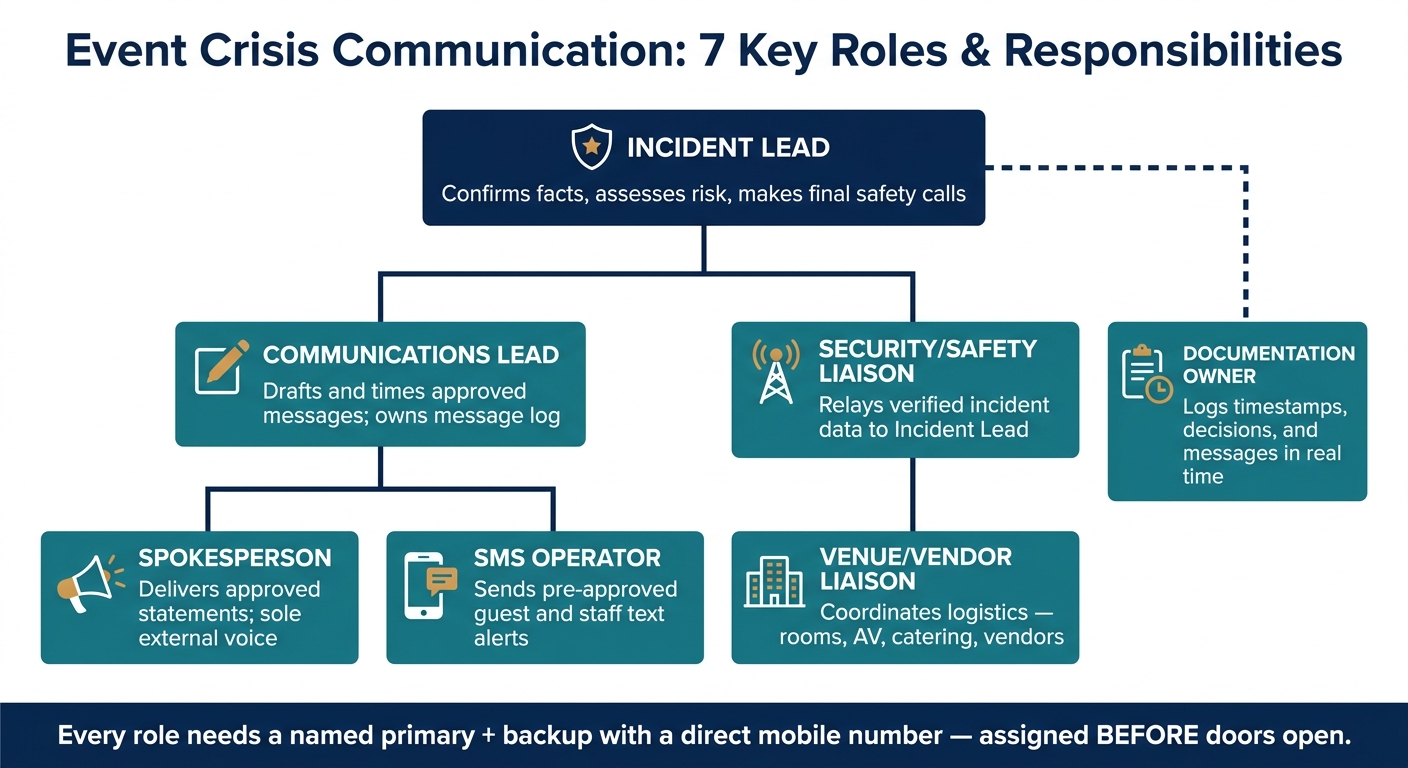
Event Crisis Communication: 7 Key Roles & Responsibilities
Assign one main owner and one backup for each crisis role before doors open. Put in actual names before the event starts, not in the middle of a problem.
| Role | Primary Owner | Backup Owner | Core Responsibilities | Approval Authority | Channels |
|---|---|---|---|---|---|
| Incident Lead | [Name, Title] | [Name, Title] | Confirm facts, assess risk, pause/resume activities; escalate to venue or emergency services | Halt event activities, escalate to venue/emergency services | Venue radio, direct phone |
| Communications Lead | [Name, Title] | [Name, Title] | Draft and time approved messages; keep the message log | Final message wording after Incident Lead approves the decision | SMS platform, email, PA system |
| Spokesperson | [Name, Title] | [Name, Title] | Deliver approved statements; handle media and attendee questions | External voice only; no safety decisions | Media briefings, attendee announcements |
| Security/Safety Liaison | [Name, Title] | [Name, Title] | Relay incident data from security, law enforcement, and medical contacts | None independently; feeds information to the Incident Lead | Radio, direct phone |
| Venue/Vendor Liaison | [Name, Title] | [Name, Title] | Coordinate room changes, AV holds, catering adjustments, and vendor updates | No independent approval; coordinates logistics within assigned scope | Phone, radio, in-person |
| SMS Operator | [Name, Title] | [Name, Title] | Send guest and staff text alerts | Executes only pre-approved messages | SMS platform |
| Documentation Owner | [Name, Title] | [Name, Title] | Log timestamps, decisions, messages sent, and key responses | None; records only | Notes app, paper log |
These three roles are the minimum core team.
The Incident Lead makes the call. That means confirming facts, judging risk, and deciding what happens next from a safety standpoint. The Communications Lead turns that decision into approved messages for each channel. The Spokesperson delivers those messages as the one public voice, using approved talking points and avoiding off-the-cuff comments about operations.
If your team is small, one person may cover more than one role. Even then, you still need separate backups. If someone is unavailable, tied up, or off-site, the handoff should be instant, not messy.
Once the decision-makers are named, check how each person will be reached and which channel they should use first.
The Security or Safety Liaison passes verified updates to the Incident Lead. The Venue or Vendor Liaison handles the on-the-ground logistics: room closures, food holds, AV shutdowns, and vendor coordination. Both roles should have a direct U.S. mobile number in this format: (555) 123-4567. Add a preferred contact method too, such as: "Text first, then call after 2 minutes."
The SMS Operator has a simple but time-sensitive job: send guest and staff text alerts, but only after the message is approved. That guardrail helps stop mixed messages when things get tense.
The Documentation Owner keeps the incident log in real time. This record should include timestamps, decisions, messages sent, and key responses. It matters later for post-event review, insurance, and any legal follow-up.
Use Quickstaff to store role assignments, backups, and contact details in the event record so the on-duty team can find them fast.
After roles are set, verify every lead contact, emergency number, and approval path.
With roles assigned, the next step is simple: turn that role map into a live contact sheet with current numbers and clear ways to reach people. A role without a working number is just a title.
For each critical role, record the full name, title, mobile number, backup number, on-site post, and preferred contact method. Group contacts by category so the team can find the right person fast.
| Category | Roles to Include |
|---|---|
| Event Management | Event Manager, Communications Lead, Spokesperson |
| Venue & Facilities | Venue Manager, AV/IT Support Lead |
| Safety & Security | Security Lead, EMS/Medical Contact (if applicable) |
| Logistics | Transportation Lead, Key Vendor Contacts (catering, staffing, production) |
Each entry should include a named backup and a direct number. Job titles alone break down in a crisis. Use names and direct lines.
Stamp every roster update with the U.S. date, time, and time zone - for example, 09/01/2026, 3:15 PM CT - so everyone knows which version is current. Keep the latest roster available on phones and in the command center.
Set one approver and one backup for each message type. The Incident Lead confirms the facts, the Communications Lead drafts the message, the approver signs off, and the channel owner publishes it.
Pre-approve templates for the scenarios most likely to happen - severe weather, medical incidents, and power loss. That way, the team only has to fill in details like time and location instead of writing from scratch under pressure.
| Message Type | Drafted By | Approved By | Published By | Channels |
|---|---|---|---|---|
| Severe weather delay (guests) | Communications Lead | Event Director | Social Media Manager + Venue Announcer | SMS alert, venue PA, social media, event app |
| Medical incident (staff alert) | Security Lead | Incident Lead | Radio Dispatcher | Staff radio channel, internal text thread |
| Power loss (guests) | Communications Lead | Client Representative or Event Director | Venue Announcer | Venue PA, entry-point signage |
Public social posts and press statements should require senior approval. Internal channels, like staff radio, can move faster with lower-level sign-off.
Link the roster and approval matrix in Quickstaff. With contacts and approvals locked in, the team can move into guest and staff alert workflows.
Once your contact roster and approval chain are set, the next step is simple: write the messages before you need them and decide which alert channels each team will use as part of a scalable scheduling system. That way, people can act in minutes instead of scrambling when things get tense.
After contacts and approvals are in place, lock down the message format before an incident starts.
Every guest-facing message should answer four questions: What happened? Is it safe? What should guests do right now? When and where will the next update appear? That framework works across channels and across scenarios.
Write short templates - just two or three sentences - for the incidents you're most likely to face, like severe weather, a medical emergency, a power outage, or a partial evacuation. When something happens, plug in the exact details such as the time, location, and affected area, then send the update.
Be specific with directions. Use feet and clear landmarks, like: "Move at least 50 feet from the main stage toward the ticketing area, or exit left and follow staff in red vests to the north parking lot." Keep the writing at about an 8th-grade reading level. Use plain language. Skip acronyms unless you spell them out. Direct verbs work best: move, wait, follow, and stay.
Use this channel map:
| Scenario | Primary Channel | Secondary Channels |
|---|---|---|
| Immediate life safety / evacuation | PA announcement (loudspeaker) | Posted signage, staff direction |
| Severe weather delay | SMS alert | Event app push notification, website banner |
| Power outage | PA announcement (loudspeaker) | Venue signage, staff verbal direction |
| Schedule change or delay | SMS + event app | Email for guests who have left, website |
| Post-incident all-clear | PA announcement (loudspeaker) | SMS, event app, website |
Push the same core message across all active channels at the same time.
Staff alerts should match the guest message, with added instructions for each role. Set ahead of time who has the authority to trigger each alert level:
Each staff alert should include the alert level, the issue, role-based instructions, and whether staff should speak with guests or defer to central messaging. The clearer the task, the better. For example:
If your team uses Quickstaff, use role-based scheduling and messaging to reach scheduled staff and named backups fast with role-based instructions. Keep radios and PA announcements as the main channels.
Once alerts are out, start logging every decision, message, and follow-up item in real time. This matters more than most teams expect. In the middle of an incident, small details slip fast. A clean log gives you a clear record of what happened, who approved what, and what still needs attention.
During the incident, the Documentation Owner should log entries only. Nothing else. Give that person a prebuilt table on a laptop or tablet so they aren’t trying to piece things together from scratch under pressure.
Every entry should include the fields below:
| Field | What to Record |
|---|---|
| Date | MM/DD/YYYY format (e.g., 09/01/2026) |
| Time + Time Zone | Local event time, clearly marked (e.g., 7:18 PM PT) |
| Channel | SMS, PA system, radio, email, in-person, social media |
| Audience | "All guests", "Kitchen staff", "Security", "Venue GM" |
| Summary | Confirmed facts only. |
| Owner | Full name and role. |
| Approval | Approver and time. |
| Follow-up Required | Any open items that still need action |
Tag each entry as Fact, Inbound Question, Outbound Message, Decision/Approval, or Action Taken. If something isn’t confirmed yet, mark it Preliminary. Then add a new row once you confirm it.
Don’t edit or delete original entries. If something changes, log the correction as a new row instead. That way, your record stays clear and time-based, which helps later when the team reviews the timeline.
If event staff scheduling software like Quickstaff is part of your workflow, use it to confirm who is on duty and fill the Owner field fast.
Use the finished log to run the post-event review. Hold that review within 1 to 7 days, while details are still fresh. Bring in the incident lead, communications lead, operations and security reps, venue contacts, and any key vendors.
Keep the discussion centered on four questions:
The Owner and Approval columns can help you spot delays. The Follow-up Required column shows which open items were closed and which still need work.
From there, update backups, templates, and checklist steps based on what the team learned. If Quickstaff is part of your workflow, make sure scheduled roles match the updated plan so the right staff get the right instructions at the start of the next event.
Set approval authority before the event so no one is guessing when pressure hits. In most cases, the Public Information Officer should control outbound messages to guests, media, and social channels.
For major or critical incidents, keep the Event Director or Incident Commander in the loop. That helps clients and talent get one aligned message, not a mix of updates from different people. The designated outbound communications lead should give final approval before anything goes to staff or attendees.
Yes. One person can handle more than one role during an event. That’s common with lean teams or smaller events where staffing is tight.
That said, each critical function should still have a clear owner before the event starts. Otherwise, things can slip through the cracks and no one knows who’s on point.
Quickstaff can help you track those backup or combined roles in your event schedule.
Your incident log should consistently record the caller, location, incident type, time, and a unique incident ID. It should also include shift start and end times, message traffic, and major activities.
A designated logkeeper should record major decisions and resource deployments. Use one time standard across the entire log, and clearly note whether details came from hard records or staff memory.